Do you want to know securely deploy k3s kubernetes for production? Have a read of this blog and accompanying Ansible project for you to run.

The post Ansible Versioning appeared first on digitalis.io.
]]>If you are reading this blog you probably know what Ansible is but in case this is new to you, let me give you a brief introduction.
In the past servers were installed and configured manually. This was quite tedious but ok when there were only a few servers to manage. However nowadays, the number of servers and their complexity, under management in the average company, has increased exponentially. Even more so when we talk about Infrastructure As Code when the servers are transient.
Also doing things manually often leads to errors and discrepancies between configurations and servers.
That is how automation came to be. There are multiple options these days probably the most widely used are Puppet, Chef and Ansible. All three allow us to manage the configuration of multiple servers in a way that is repeatable to ensure all servers have the same settings and that any new server we add into the mix will be identical to the others.
However the orchestration software is only going to be as good as the version and code management. If you do not keep track of the changes you’re making to (in our case) the Ansible code you will eventually have different configurations on servers and unrepeatable infrastructure.
- hosts: all
  vars:
    env: production
  var_files:
    - "vars/{{ env }}.yml"
  tasks:
    - name: Install nginx
      package:
        name: nginx
        state: present
The above example is a very simple playbook for installing nginx which reads the environment parameters from a file imported on runtime based on the env variable.
The most common way of keeping track of your changes to Ansible is using version control and the best version control software at the moment is git. People starting up with git find it slightly daunting to begin with but it is pretty powerful and used around the world.
By keeping your Ansible code in a git repository you will be able to track changes to the code. If you’re working on a project with little collaboration it is easy to fall into the temptation of committing all your changes straight into the master branch. After all, it’s just you and you know what you have done, right?
It may well be you have a fantastic memory and you are able to keep track but once multiple people start working on the same repository you will very quickly lose sight. Furthermore your configuration changes will no longer be repeatable. You cannot (easily) go back to the code you created two months ago and use it to set up a server. See the use case below:
Let’s have a look at a use case and see what would happen depending on whether you are using versioned code or not (a bit more on versioning in the next section).
You have 10 servers in development and 20 in production. Your production servers have been running for the last year with no issues and very few updates. In the meantime you’ve been working on a new feature and testing it in the development servers.
Suddenly you’re in urgent need of building 5 more servers in production:
As you can see having a versioned deployment would have helped in this case. This is a very simplistic way of explaining it but you can probably see how much of an advantage it is to use versions. Knowing what’s on each of your environments as oppose to thinking you know will add a large amount of peace of mind to your daily work.
Companies and individuals may take different approaches at versioning the git repositories. At the core of our version control we use branches and tags. We use branches to separate the work stream between individuals or projects and tags to mark a fixed point in time, for example, project end.
A branch is simply a fork of your code you keep separated from the main branch (usually called master ) where you can record your changes until they are ready for mainstream use at which point you would merge them with the master branch.
A tag by contract is a fixed point in time. Tags are immutable. Once created they have no further history or commits.
We allow deployments into development from git branches but we don’t allow deployments into the rest of the environments other than from tags (known versions).
We prefer to use tags in the format MAJOR.MINOR.HOTFIX (ie, 1.1.0). This type of versioning is called semantic versioning.
Major version change should only occur when it is materially different to the previous version or includes backward incompatible changes.
Progression over last version such as new feature of improvement over existing.
Applies a correction to existing repository without carrying forward new code.
I’m not going to explain how to create tags but I will go into some detail on how we manage hot fixes as this is quite different between companies. In this scenario we have a product called productX and we’re running version 2.0.0 on production.

We have confirmed there is bug and we need to update a single parameters on our Ansible code. If we take the current code on our repository and tag it as 2.13.0, which would be the next logical version number, we will be taking with us all changes between versions and the HEAD of the git repository, many of which have never gone through testing. What we do instead is we create a tag using the current version as a base. That way your version will be identical to the production version except for the fix you just introduced.
[(master)]$ git checkout -b hotfix/2.0.1 2.0.0
Switched to a new branch 'hotfix/2.0.1'
[(hotfix/2.0.1)]$ echo hotfix > README.md
[(hotfix/2.0.1)]$ git commit -am 'hotfix: fixing something broken'
[hotfix/2.0.1 3cda6d4] hotfix: fixing something broken
 1 file changed, 1 insertion(+)
[(hotfix/2.0.1)]$ git push -u origin hotfix/2.0.1
Counting objects: 3, done.
Writing objects: 100% (3/3), 258 bytes | 0 bytes/s, done.
Total 3 (delta 0), reused 0 (delta 0)
To git@localhost:sample-repo.git
 * [new branch]      hotfix/2.0.1 -> hotfix/2.0.1
Branch hotfix/1.0.1 set up to track remote branch hotfix/2.0.1 from origin.[(hotfix/1.0.1)]$ git tag 1.0.1
[(hotfix/1.0.1)]$ git push --tags
Counting objects: 1, done.
Writing objects: 100% (1/1), 156 bytes | 0 bytes/s, done.
Total 1 (delta 0), reused 0 (delta 0)
To git@localhost:sample-repo.git
* [new tag] 1.0.1 -> 1.0.1
* [new tag] 3.0.0 -> 3.0.0Before we can talk about versioning our code, let’s take it apart. There are three areas where we do versioning separately:
When making changes to Ansible code you will most likely be updating one or more of the above resources. We therefore need to keep track of everything keeping in mind that some areas like the roles are shared between deployments.
We separated the roles from the rest of the playbook. Each role is a git repository in its own right with a git tag for versioning. And we use ansible-galaxy at runtime to download the required versions every time the playbook is run.
Ansible Galaxy uses a simple yaml configuration file to list all the roles. Whilst you can use Ansible Tower or AWX this is not required. This is the prefer approach as it decreases the complexity and the number of servers we need to support.
- src: [email protected]:mygroup/ansible-role-nginx.git
  scm: git
  version: "1.0.0"
- src: [email protected]:mygroup/ansible-role-apache.git
  scm: git
  version: "1.3.0"
- src: [email protected]:mygroup/ansible-role-cassandra.git
  scm: git
  version: "feature/AAABBB"
Versions can be either a branch name or a tag. This adds the flexibility to test new features in the development environment without the need to update the requirements.yml file every time with a new tag.
Each of your roles will also need to be configured for Galaxy. It needs an additional file, meta/main.yml with a format like
---
galaxy_info:
  author: Sergio Rua <[email protected]>
  description: Digitalis Role for Blog
  company: Digitalis.IO
  license: Apache Licese 2.0

  min_ansible_version: 2.9

  platforms:
    - name: RedHat
      versions:
        - all
    - name: Debian
      versions:
        - all

  galaxy_tags:
    - digitalis
    - blog

dependencies: []
If your role requires another one to run (dependent), you can add them to the dependencies section. You can also use SCM here for downloading the roles, though I would not recommend this as it will clash with the config in requirements.yml and you will end up having to maintain two different configurations.
dependencies:
  - role: foo
    src: [email protected]:MyOrg/ansible-foo
    scm: git
    version: 0.1.0
The screenshot below represents a sample deployment which we refer to a product. You may have noticed there are no roles defined in this directory. We have the different variables, the tasks and finally the requirements.yml. As explained above, we keep them on their own git repositories and we include them with Ansible Galaxy on demand.

The product git repository is tagged every time any of the files it contains changes (except during development when we use branches) and this becomes the version we control to keep track of changes into our different environments.
We now have the two main components joined up.
As you can see in the diagram below we have one single version for the whole product, which in turn contains all the roles with their versions. Whenever we make a change we will always need to update the product repository and therefore a new version (tag) is created

The best way in this scenario is to either have one playbook git repository per environment (preferred option) or to have one per environment.

Be aware that multiple is probably a good idea for large deployments but it can be quite painful to keep environments in sync. Many times I have seen the versions between environments become very different and unfortunately there is no magic pill to fix this other than to ensure there are good practices and that the whole team follows them. Automation is key.
When using Ansible with Ansible Galaxy for role management there is an extra step before you can run the playbook which is downloading all roles referenced in the requirements.yml. This is done using the ansible-galaxy command:
ansible-galaxy install -r requirements.ymlThere are a couple of additional options worth mentioning:
We prefer to automate as much as we can, including running Ansible. Also we don’t encourage manual intervention. What I mean is we try not to log into servers whenever possible and use centralised tools such as Jenkins and Rundeck to run any command on the servers.
There are many advantages to automation tools such as Jenkins and Rundeck. To list a few:
Pretty much everyone is reluctant to introduce versioning into their code. After all, commit to master and run Ansible, what’s the worst that could happen? The worst will happen, it is only a matter of time. The good news is that implementing good DevOps principals is easy and once you build your automation around it, it becomes easy to manage.
The next time you need to rollback your code you will be grateful you can do so without having to cherry pick your last 100 git commits.
Be safe.
If you would like to know more about how to implement modern data and cloud technologies, into to your business, we at Digitalis do it all: from cloud migration to fully managed services, we can help you modernize your operations, data, and applications. We provide consulting and managed services on cloud, data, and DevOps for any business type. Contact us today for more information or learn more about each of our services here.

Senior DevOps Engineer
Sergio has many years experience working on various development projects before joining Digitalis. He worked for large companies with complex networks and infrastructure. ‘This has helped Sergio gain lots of experience in multiple areas from programming to networks. He especially excels in DevOps: automation is his day-to-day and Kubernetes his passion.
Do you want to know securely deploy k3s kubernetes for production? Have a read of this blog and accompanying Ansible project for you to run.
Do you want to know securely deploy k3s kubernetes for production? Have a read of this blog and accompanying Ansible project for you to run.
Do you want to know securely deploy k3s kubernetes for production? Have a read of this blog and accompanying Ansible project for you to run.
The post Ansible Versioning appeared first on digitalis.io.
]]>The post Kubernetes Operators pros and cons – the good, the bad and the ugly appeared first on digitalis.io.
]]>When you use Kubernetes to deploy an application, say a Deployment, you are calling the underlying Kubernetes API which hands over your request to an application and applies the config as you requested via the Yaml configuration file.
apiVersion: apps/v1
kind: Deployment
metadata:
  name: nginx-deployment
  labels:
    app: nginx
spec:
[...]In this example, Deployment is part of the default K8s server but there are many others you are probably using that are not and you installed beforehand. For example, if you use a nginx ingress controller on your server you are installing an API (kind: Ingress) to modify the behaviour of nginx every time you configure a new web entry point.
The role of the controller is to track a resource type until it achieves the desired state. For example, another built-in controller is the Pod kind. The controller will loop over itself ensuring the Pod reaches the Running state by starting the containers configured in it. It will usually accomplish the task by calling an API server.
We can find three important parts of any controller:

Kubernetes Operators offer a way to extend the functionality of Kubernetes beyond its basics. This is especially interesting for complex applications which require intrinsic knowledge of the functionality of the application to be installed. We saw a good example earlier with the Ingress controller. Others are databases and stateful applications.
It can also reduce the complexity and length of the configuration. If you look for example at the postgres operator by Zalando you can see that with only a few lines you can spin up a fully featured cluster
apiVersion: "acid.zalan.do/v1"
kind: postgresql
metadata:
  name: acid-minimal-cluster
  namespace: default
spec:
  teamId: "acid"
  volume:
    size: 1Gi
  numberOfInstances: 2
  users:
    zalando:  # database owner
    - superuser
    - createdb
    foo_user: []  # role for application foo
  databases:
    foo: zalando  # dbname: owner
  preparedDatabases:
    bar: {}
  postgresql:
    version: "13"
The bad
The worst thing in my opinion is that it can lead to abuse and overuse.
You should only use an operator if the functionality cannot be provided by Kubernetes. K8s operators are not a way of packaging applications, they are extensions to Kubernetes. I often see community projects for K8s Operators I would easily replace with a helm chart, in most cases a much better option
apiVersion: apiextensions.k8s.io/v1
kind: CustomResourceDefinition
metadata:
  # name must match the spec fields below, and be in the form: <plural>.<group>
  name: crontabs.stable.example.com
spec:
  # group name to use for REST API: /apis/<group>/<version>
  group: stable.example.com
  # list of versions supported by this CustomResourceDefinition
  versions:
    - name: v1
      # Each version can be enabled/disabled by Served flag.
      served: true
      # One and only one version must be marked as the storage version.
      storage: true
      schema:
        openAPIV3Schema:
          type: object
          properties:
            spec:
              type: object
              properties:
                cronSpec:
                  type: string
                image:
                  type: string
                replicas:
                  type: integer
  # either Namespaced or Cluster
  scope: Namespaced
  names:
    # plural name to be used in the URL: /apis/<group>/<version>/<plural>
    plural: crontabs
    # singular name to be used as an alias on the CLI and for display
    singular: crontab
    # kind is normally the CamelCased singular type. Your resource manifests use this.
    kind: CronTab
    # shortNames allow shorter string to match your resource on the CLI
    shortNames:
    - ct
The good news is you may never have to. Enter kubebuilder. Kubebuilder is a framework for building Kubernetes APIs. I guess it is not dissimilar to Ruby on Rails, Django or Spring.
I took it out for a test and created my first API and controller 🎉
I have Kubernetes running on my laptop with minikube. There I installed OpenLDAP and I got to work to see if I could manage the LDAP users and groups from Kubernetes.
For my project I need to create two APIs, one for managing users and another for groups. Let’s initialise it create the APIs:
kubebuilder init --domain digitalis.io --license apache2 --owner "Digitalis.IO"
kubebuilder create api --group ldap --version v1 --kind LdapUser
kubebuilder create api --group ldap --version v1 --kind LdapGroup
These commands create everything I need to get started. Have a good look to the directory tree from where I would highlight these three folders:
api: it contains a sub directory for each of the api versions you are writing code for. In our example you should only see v1
config: all the yaml files required to set up the controller when installing in Kubernetes, chief among them the CRD.
controller: the main part where you write the code to Reconcile
The next part is to define the API. Using kubebuilder rather than having to edit the CRD manually you just need to add your code and kubebuilder will generate them for you.
If you look into the api/v1 directory you’ll find the resource type definitions for users and groups:
type LdapUserSpec struct {
	Username string `json:"username"`
	UID      string `json:"uid"`
	GID      string `json:"gid"`
	Password string `json:"password"`
	Homedir  string `json:"homedir,omitempty"`
	Shell    string `json:"shell,omitempty"`
}
For example I have defined my users with these struct and the groups with:
type LdapGroupSpec struct {
	Name    string   `json:"name"`
	GID     string   `json:"gid"`
	Members []string `json:"members,omitempty"`
}
Once you have your resources defined just run make install and it will generate and install the CRD into your Kubernetes cluster.
The truth is kubebuilder does an excellent job. After defining my API I just needed to update the Reconcile functions with my code and voila. This function is called every time an object (user or group in our case) is added, removed or updated. I’m not ashamed to say it took me probably 3 times longer to write up the code to talk to the LDAP server.
func (r *LdapGroupReconciler) Reconcile(req ctrl.Request) (ctrl.Result, error) {
	ctx := context.Background()
	log := r.Log.WithValues("ldapgroup", req.NamespacedName)
[...]
}
My only complication was with deleting. On my first version the controller was crashing because it could not find the object to delete and without that I could not delete the user/group from LDAP. I found the answer in finalizer.
A finalizer is added to a resource and it acts like a pre-delete hook. This way the code captures that the user has requested the user/group to be deleted and it can then do the deed and reply back saying all good, move along. Below is the relevant code adapted from the kubebuilder book with extra comments:
	//! [finalizer]
	ldapuserFinalizerName := "ldap.digitalis.io/finalizer"
    // Am I being deleted?
	if ldapuser.ObjectMeta.DeletionTimestamp.IsZero() {
        // No: check if I have the `finalizer` installed and install otherwise
		if !containsString(ldapuser.GetFinalizers(), ldapuserFinalizerName) {
			ldapuser.SetFinalizers(append(ldapuser.GetFinalizers(), ldapuserFinalizerName))
			if err := r.Update(context.Background(), &ldapuser); err != nil {
				return ctrl.Result{}, err
			}
		}
	} else {
		// The object is being deleted
		if containsString(ldapuser.GetFinalizers(), ldapuserFinalizerName) {
			// our finalizer is present, let's delete the user
			if err := ld.LdapDeleteUser(ldapuser.Spec); err != nil {
				log.Error(err, "Error deleting from LDAP")
				return ctrl.Result{}, err
			}

			// remove our finalizer from the list and update it.
			ldapuser.SetFinalizers(removeString(ldapuser.GetFinalizers(), ldapuserFinalizerName))
			if err := r.Update(context.Background(), &ldapuser); err != nil {
				return ctrl.Result{}, err
			}
		}

		// Stop reconciliation as the item is being deleted
		return ctrl.Result{}, nil
	}
//! [finalizer]I created some test code. It’s very messy, remember this is just a learning exercise and it’ll break apart if you try to use it. There are also lots of duplications in the LDAP functions but it serves a purpose.
You can find it here: https://github.com/digitalis-io/ldap-accounts-controller
This controller will talk to a LDAP server to create users and groups as defined on my CRD. As you can see below I have now two Kinds defined, one for LDAP users and one for LDAP groups. As they are registered on Kubernetes by the CRD it will tell it to use our controller.
apiVersion: ldap.digitalis.io/v1
kind: LdapUser
metadata:
  name: user01
spec:
  username: user01
  password: myPassword!
  gid: "1000"
  uid: "1000"
  homedir: /home/user01
  shell: /bin/bash
apiVersion: ldap.digitalis.io/v1
kind: LdapGroup
metadata:
name: devops
spec:
name: devops
gid: "1000"
members:
- user01
- "90000"LDAP_BASE_DN="dc=digitalis,dc=io"
LDAP_BIND="cn=admin,dc=digitalis,dc=io"
LDAP_PASSWORD=xxxx
LDAP_HOSTNAME=ldap_server_ip_or_host
LDAP_PORT=389
LDAP_TLS="false"
make install run
Do you want to know securely deploy k3s kubernetes for production? Have a read of this blog and accompanying Ansible project for you to run.
Do you want to know securely deploy k3s kubernetes for production? Have a read of this blog and accompanying Ansible project for you to run.
Do you want to know securely deploy k3s kubernetes for production? Have a read of this blog and accompanying Ansible project for you to run.
The post Kubernetes Operators pros and cons – the good, the bad and the ugly appeared first on digitalis.io.
]]>The post Cassandra with AxonOps on Kubernetes appeared first on digitalis.io.
]]>The following shows how to install AxonOps for monitoring Cassandra. This process specifically requires the official cassandra helm repository.
The deployment should work fine on latest versions of minikube as long as you provide enough memory for it.
minikube start --memory 8192 --cpus=4
minikube addons enable storage-provisioner
⚠️ Make sure you use a recent version of minikube. Also check available drivers and select the most appropriate for your platform
As this deployment contains multiple applications we recommend you use an automation system such as Ansible or Helmfile to put together the config. The example below uses helmfile.
You would need to install the following components:
Alternatively you can consider using a dockerized version of them both such as https://hub.docker.com/r/chatwork/helmfile
The values below are set for running on a laptop with minikube, adjust accordingly for larger deployments.
The values below are set for running on a laptop with minikube, adjust accordingly for larger deployments.
---
repositories:
  - name: stable
    url: https://kubernetes-charts.storage.googleapis.com
  - name: incubator
    url: https://kubernetes-charts-incubator.storage.googleapis.com
  - name: axonops-helm
    url: https://repo.axonops.com/public/helm/helm/charts/
  - name: bitnami
    url: https://charts.bitnami.com/bitnami
releases:
  - name: axon-elastic
    namespace: {{ env "NAMESPACE" | default "monitoring" }}
    chart: "bitnami/elasticsearch"
    wait: true
    labels:
      env: minikube
    values:
      - fullnameOverride: axon-elastic
      - imageTag: "7.8.0"
      - data:
          replicas: 1
          persistence:
            size: 1Gi
            enabled: true
            accessModes: [ "ReadWriteOnce" ]
      - curator:
          enabled: true
      - coordinating:
          replicas: 1
      - master:
          replicas: 1
          persistence:
            size: 1Gi
            enabled: true
            accessModes: [ "ReadWriteOnce" ]

  - name: axonops
    namespace: {{ env "NAMESPACE" | default "monitoring" }}
    chart: "axonops-helm/axonops"
    wait: true
    labels:
      env: minikube
    values:
      - values.yaml

  - name: cassandra
    namespace: cassandra
    chart: "incubator/cassandra"
    wait: true
    labels:
      env: dev
    values:
- values.yaml---
persistence:
enabled: true
size: 1Gi
accessMode: ReadWriteMany
podSettings:
terminationGracePeriodSeconds: 300
image:
tag: 3.11.6
pullPolicy: IfNotPresent
config:
cluster_name: minikube
cluster_size: 3
seed_size: 2
num_tokens: 256
max_heap_size: 512M
heap_new_size: 512M
env:
JVM_OPTS: "-javaagent:/var/lib/axonops/axon-cassandra3.11-agent.jar=/etc/axonops/axon-agent.yml"
extraVolumes:
- name: axonops-agent-config
configMap:
name: axonops-agent
- name: axonops-shared
emptyDir: {}
- name: axonops-logs
emptyDir: {}
- name: cassandra-logs
emptyDir: {}
extraVolumeMounts:
- name: axonops-shared
mountPath: /var/lib/axonops
readOnly: false
- name: axonops-agent-config
mountPath: /etc/axonops
readOnly: true
- name: axonops-logs
mountPath: /var/log/axonops
- name: cassandra-logs
mountPath: /var/log/cassandra
extraContainers:
- name: axonops-agent
image: digitalisdocker/axon-agent:latest
env:
- name: AXON_AGENT_VERBOSITY
value: "1"
volumeMounts:
- name: axonops-agent-config
mountPath: /etc/axonops
readOnly: true
- name: axonops-shared
mountPath: /var/lib/axonops
readOnly: false
- name: axonops-logs
mountPath: /var/log/axonops
- name: cassandra-logs
mountPath: /var/log/cassandra
axon-server:
elastic_host: http://axon-elastic-elasticsearch-master
image:
repository: digitalisdocker/axon-server
tag: latest
pullPolicy: IfNotPresent
axon-dash:
axonServerUrl: http://axonops-axon-server:8080
service:
# use NodePort for minikube, change to ClusterIP or LoadBalancer on fully featured
# k8s deployments such as AWS or Google
type: NodePort
image:
repository: digitalisdocker/axon-dash
tag: latest
pullPolicy: IfNotPresentaxon-server:
hosts: "axonops-axon-server.monitoring" # Specify axon-server IP axon-server.mycompany.
port: 1888
axon-agent:
org: "minikube" # Specify your organisation name
human_readable_identifier: "axon_agent_ip" # one of the following:
NTP:
host: "pool.ntp.org" # Specify a NTP to determine a NTP offset
cassandra:
tier0: # metrics collected every 5 seconds
metrics:
jvm_:
- "java.lang:*"
cas_:
- "org.apache.cassandra.metrics:*"
- "org.apache.cassandra.net:type=FailureDetector"
tier1:
frequency: 300 # metrics collected every 300 seconds (5m)
metrics:
cas_:
- "org.apache.cassandra.metrics:name=EstimatedPartitionCount,*"
blacklist: # You can blacklist metrics based on Regex pattern. Hit the agent on http://agentIP:9916/metricslist to list JMX metrics it is collecting
- "org.apache.cassandra.metrics:type=ColumnFamily.*" # duplication of table metrics
- "org.apache.cassandra.metrics:.*scope=Repair#.*" # ignore each repair instance metrics
- "org.apache.cassandra.metrics:.*name=SnapshotsSize.*" # Collecting SnapshotsSize metrics slows down collection
- "org.apache.cassandra.metrics:.*Max.*"
- "org.apache.cassandra.metrics:.*Min.*"
- ".*999thPercentile|.*50thPercentile|.*FifteenMinuteRate|.*FiveMinuteRate|.*MeanRate|.*Mean|.*OneMinuteRate|.*StdDev"
JMXOperationsBlacklist:
- "getThreadInfo"
- "getDatacenter"
- "getRack"
DMLEventsWhitelist: # You can whitelist keyspaces / tables (list of "keyspace" and/or "keyspace.table" to log DML queries. Data is not analysed.
# - "system_distributed"
DMLEventsBlacklist: # You can blacklist keyspaces / tables from the DMLEventsWhitelist (list of "keyspace" and/or "keyspace.table" to log DML queries. Data is not analysed.
# - system_distributed.parent_repair_history
logSuccessfulRepairs: false # set it to true if you want to log all the successful repair events.
warningThresholdMillis: 200 # This will warn in logs when a MBean takes longer than the specified value.
logFormat: "%4$s %1$tY-%1$tm-%1$td %1$tH:%1$tM:%1$tS,%1$tL %5$s%6$s%n"kubectl create ns cassandra
kubectl create configmap axonops-agent --from-file=axon-agent.yml -n cassandraWith locally installed helm and helmfile
cd your/config/directory
hemlfile sync
With docker image
docker run --rm
    -v ~/.kube:/root/.kube
    -v ${PWD}/.helm:/root/.helm
    -v ${PWD}/helmfile.yaml:/helmfile.yaml
    -v ${PWD}/values.yaml:/values.yaml
--net=host chatwork/helmfile syncIf you used minikube, identify the name of the service with kubectl get svc -n monitoring and launch it with
minikube service axonops-axon-dash -n monitoringFind the DNS entry for it:
kubectl get svc -n monitoring -o wideOpen your browser and copy and paste the URL.
Check the status of the pods:
kubectl get pod -n monitoring
kubectl get pod -n cassandra
Any pod which is not on state Running check it out with
kubectl describe -n NAMESPACE pod POD-NAMEOne common problem is regarding storage. If you have enabled persistent storage you may see an error about persistent volume claims (not found, unclaimed, etc). If you’re using minikube make sure you enable storage with
minikube addons enable storage-provisionerThe second most common problem is not enough memory (OOMKilled). You will see this often if you’re node does not have enough memory to run the containers or if the heap settings for Cassandra are not right. kubectl describe command will be showing Error 127 when this occurs.
In the values.yaml file adjust the heap options to match your hardware:
max_heap_size: 512M
heap_new_size: 512MReview the way you have started up minikube and assign more memory if you can. Also check the available drivers and select the appropriate for your platform. On MacOS where I tested hyperkit or virtualbox are the best ones.
minikube start --memory 10240 --cpus=4 --driver=hyperkitDo you want to know securely deploy k3s kubernetes for production? Have a read of this blog and accompanying Ansible project for you to run.
Do you want to know securely deploy k3s kubernetes for production? Have a read of this blog and accompanying Ansible project for you to run.
Do you want to know securely deploy k3s kubernetes for production? Have a read of this blog and accompanying Ansible project for you to run.
The post Cassandra with AxonOps on Kubernetes appeared first on digitalis.io.
]]>The post Ansible: Variables scope and precedence appeared first on digitalis.io.
]]>Variable scoping can be quite complicated on Ansible and it’s important to know what variable your playbook is going to be using. But sometimes it’s not as easy as it may appear. The documentation on Ansible’s website explains this but I’d like to run you through a scenario we found where this is not what you would expect it to be.
Recently whilst working on a deployment where we had the same role applied to a group of servers twice with different configurations we found it wasn’t working for us. We did a bit of investigation and we found that some of the variable precedence was not behaving as we were expecting it to be.
The scenarios below demonstrate the problem on tests 4 and 5.
I’m going to use a simple playbook with a single role which prints a variable content to the screen.
.
├── main.yml
└── roles
    └── my-role
        ├── defaults
        │   └── main.yml
        └── tasks
            └── main.yml

4 directories, 3 files---
- debug:
var: day_of_the_week---
day_of_the_week: Thursday- hosts: all
roles:
- name: my-role- hosts: all
vars:
day_of_the_week: Monday
roles:
- name: my-role- hosts: all
roles:
- name: my-role
vars:
day_of_the_week: Monday- hosts: all
roles:
- name: my-role
vars:
day_of_the_week: Monday
- name: my-role- hosts: all
roles:
- name: my-role
- name: my-role
vars:
day_of_the_week: Monday- hosts: all
roles:
- name: my-role
vars:
day_of_the_week: Monday
- name: my-role
vars:
day_of_the_week: Tuesday- hosts: all
vars:
day_of_the_week: Friday
roles:
- name: my-role
- name: my-role
vars:
day_of_the_week: Tuesday- hosts: all
vars:
day_of_the_week: Friday
roles:
- name: my-role
- name: my-role
vars:
day_of_the_week: Tuesdayand we’re running the playbook using
ansible-playbook -i localhost,
  --connection=local
  -v main.yml
-e day_of_the_week=Yesterday- hosts: all
vars:
day_of_the_week: Friday
pre_tasks:
- set_fact:
day_of_the_week: Wednesday
roles:
- name: my-role
vars:
day_of_the_week: Monday
- name: my-role
vars:
day_of_the_week: TuesdayThe day_of_the_week variable is move into two files, one defines Wednesday and loaded first and the other one sets the value of Friday and it’s loaded last
- hosts: all
  vars_files:
    - wed.yml
    - fri.yml
  roles:
- name: my-roleSome of the results where surprising to me.
DevOps Engineer
Sergio has many years experience working on various development projects before joining Digitalis. He worked for large companies with complex networks and infrastructure. ‘This has helped Sergio gain lots of experience in multiple areas from programming to networks. He especial excels is in DevOps: automation is his day-to-day and Kubernetes his passion.

If you want to understand how to easily ingest data from Kafka topics into Cassandra than this blog can show you how with the DataStax Kafka Connector.
Do you want to know securely deploy k3s kubernetes for production? Have a read of this blog and accompanying Ansible project for you to run.
Do you want to know securely deploy k3s kubernetes for production? Have a read of this blog and accompanying Ansible project for you to run.
The post Ansible: Variables scope and precedence appeared first on digitalis.io.
]]>The post Using Molecule to Test Ansible Roles appeared first on digitalis.io.
]]>Molecule version 2.22 was used throughout the examples and therefore they are not compatible with the recently released version 3 of Molecule.
No one is perfect. We all make mistakes but we can avoid many of them with careful planning.
Many times I have made changes to an Ansible role and only after going through the process of releasing it to our environment have encountered a simple typo that breaks it, only to fix it, try again and find yet another typo! Or sometimes your role worked fine on Debian but now it doesn’t on CentOS!
Luckily we have a fantastic suite called Molecule to test roles in isolation. Before discovering Molecule I had my own set of test pipelines using Docker and Jenkins but my test scripts were quite rigid and didn’t account for the diversity of configurations and operating systems we manage. It meant my roles were never tested properly.
Using Molecule is much simpler. You can create multiple scenarios for testing configuration variances and you can use Docker images for all the common Operating Systems and versions ensuring they are all thoroughly tested.
Molecule is written in python and distributed as a pip. In most cases it can be easily installed with the pip command. I am using Docker to test my roles and I therefore need to install the Molecule package with Docker support.
pip install molecule
pip install 'molecule[docker]'
If you have trouble with the installation process check the very well documented steps here.
You will also need to have Docker installed and running on your computer.
If you prefer you can run Molecule directly from a Docker image instead of installing it to your system. Quay.io distributes a Molecule Docker image for you to use:
~$ docker run --rm quay.io/ansible/molecule molecule --version
molecule, version 2.20.0.0a3.dev12I’m going to make this section quite practical so you can follow through the steps and set up your own roles with Molecule.
First thing is to initialise the role. There are two different ways depending on whether you’re updating an existing role or creating a brand new role.
The molecule init command creates not just the Molecule directory hierarchy but also the Ansible one.
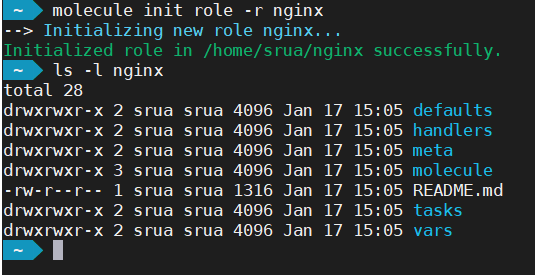
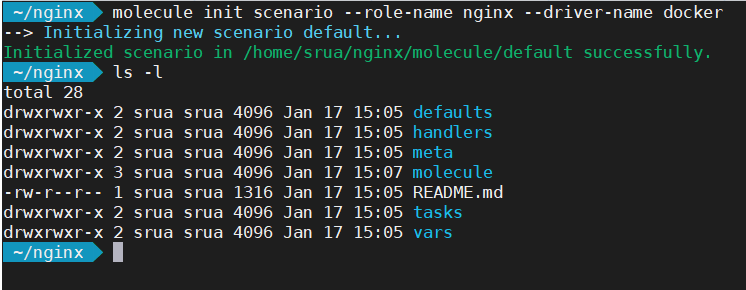
If on the other hand you are updating an existing role, the following command create only the directory molecule with the most basic configuration.
Let’s first of all examine the contents of the molecule directory:
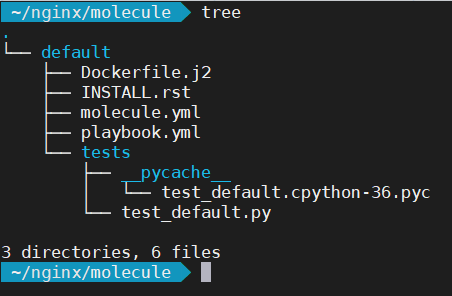
The first thing you’ll notice is there is a default directory. This defines your test scenario. For instance, it allows you to test the same role using different configurations. Inside the default directory there are several files. We’re interested in just the molecule.yml and playbook.yml
Let’s look first at molecule.yml
---
# use Ansible Galaxy to get other modules
dependency:
  name: galaxy
# we'll be running our tests inside a docker container
driver:
  name: docker
# linter to check file systax; try "molecule lint" to test it
lint:
  name: yamllint
# docker images to use, you can have as many as you'd like
platforms:
  - name: instance
    image: centos:7
# run ansible in the docker containers
provisioner:
  name: ansible
  lint:
    name: ansible-lint
# Molecule handles role testing by invoking configurable verifiers.
verifier:
  name: testinfra
  lint:
    name: flake8
And this is playbook.yml which is a standard Ansible playbook to invoke your role.
---
- name: Converge
  hosts: all
  roles:
- role: nginxYou can add more roles to playbook.yml if you need, variables etc, using standard playbook configs.
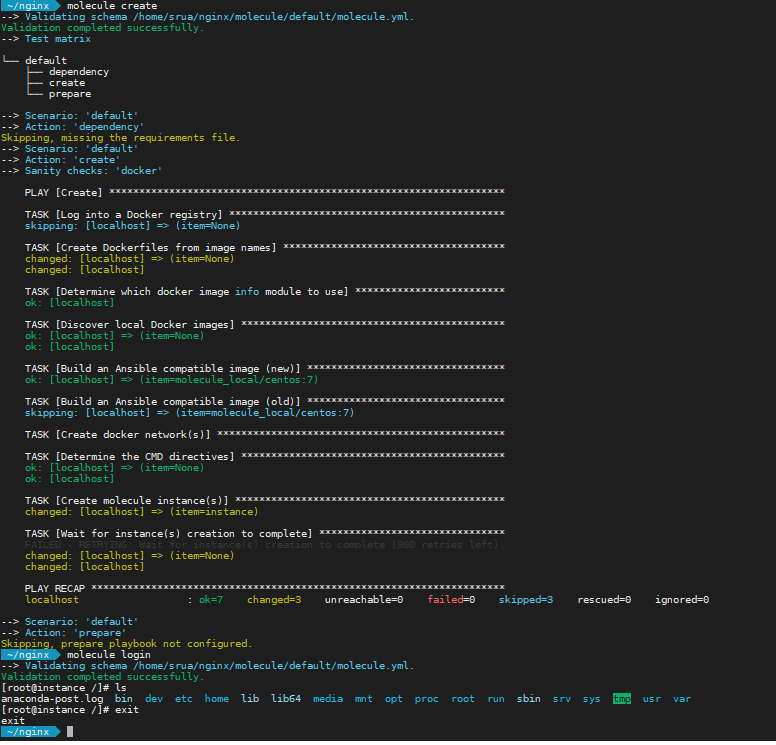
You can test your initial setup simply by running molecule create. This command creates the docker images where Ansible will be running your playbooks. Another handy command is molecule login to open a shell into the running docker container for you to perform debugging for example.
I’m going to assume you are creating a new role for this lab. I’m doing a simple nginx installation. My first change is to make the role install nginx when it runs, adding the following to tasks/main.yml
You may have noticed the default image on molecule is centos7. Feel free to change it to whatever image you prefer but I’m sticking to defaults for the moment and I’ll be showing how to test for multiple distributions shortly.
- name: Install EPEL
  package:
    name: epel-release
    state: present
  when: ansible_os_family == "RedHat"

- name: Install nginx
  package:
    name: nginx
    state: present
Now you can simply run molecule converge and the default scenario will run to test your role.
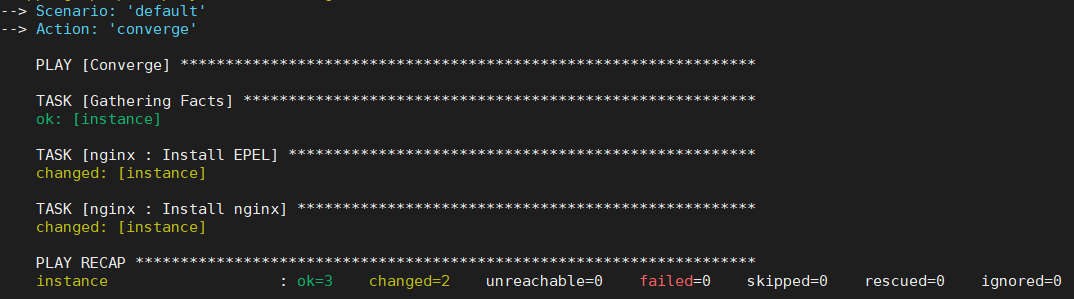
You can use the command molecule test instead which would run through every single step in molecule such as linting, converging, clean up, destroy, etc. But for our tests converge alone is much faster and lint is unlikely to succeed as we haven’t edited the meta/* configurations.
The above role has only been tested for CentOS version 7. But this role may be used on Ubuntu or Debian and we should therefore test them as well. We do this by adding the different images to the platforms section in the molecule.yml file config
platforms:
  - name: CentOS-7
    image: centos:7
  - name: Ubuntu-18
image: ubuntu:18.04molecule converge command will now create two docker images, one for CentOS 7 and one for Ubuntu 18.08 and run Ansible with our brand new role in both.You will need to execute molecule destroy after you change the molecule.yml for Molecule to pick up the new configurations.

Docker is a containerised system and it can be limiting. It doesn’t always support all the capabilities a host does. I often have problems with some roles requiring config changes to kernel related activities such as sysctl, iptables, etc. In this cases I tend to just ignore the errors by either using the Ansible’s ignore_errors or most often, by setting up a molecule variable and checking for its existence.
- sysctl:
    name: vm.swappiness
    value: '5'
    state: present
  when: molecule is not defined
#
# Or
#
- sysctl:
    name: vm.swappiness
    value: '5'
    state: present
ignore_errors: yesBut one of them that is easily fixed is systemd. Most modern GNU/Linux distribution now use systemd for starting and stopping daemons. You will see an error similar to:
TASK [nginx : Start up nginx]
**************************************************
 fatal: [CentOS-7]: FAILED! => {"changed": false,
"msg": "Could not find the requested service nginx: "}
changed: [Ubuntu-18]/sbin/init. You do these changes in the molecule.yml as in the example below:platforms:
- name: CentOS-7
image: centos:7
command: /sbin/init
tmpfs:
- /run
- /tmp
volumes:
- /sys/fs/cgroup:/sys/fs/cgroup:romolecule converge it should work. Remember to do a molecule destroy if you’re making configuration changes to Molecule.You can also allow running docker inside Docker by sharing the docker socket with the Molecule containers adding this line to the volumes section:
/var/run/docker.sock:/var/run/docker.sock
We use ansible-vault to encrypt all our passwords into the roles we create. There is an argument as to whether roles should have any private information at all (which I agree with) but unfortunately it is sometimes unavoidable for the molecule tests to complete.
Avoid passwords on roles as much as possible. You may want to consider Hashicorp vault as a safer alternative.
This can cause a problem because Molecule will fail if it cannot access the vault. The solution is pretty simple. You just need to edit the molecule.yml and add the path to the vault password file as an argument to Ansible.
provisioner:
  name: ansible
  log: true
  options:
    'vault-id': '@$HOME/.ansible/very_secret_file.txt'
  lint:
name: ansible-lintJust a note to those that decided not install Molecule onto their computer and use Docker instead, your command line is slightly longer but it should work as well:
docker run -ti
  -v /var/run/docker.sock:/var/run/docker.sock
  -v $(pwd):/nginx quay.io/ansible/molecule
  -v /sys/fs/cgroup:/sys/fs/cgroup:ro
/bin/sh -c 'cd /nginx && molecule converge'The final piece of the puzzle is the continuous integration. In an ideal world you would not be running Molecule from your own desktop. It makes more sense to automate it using a CI. We prefer Jenkins here as we have an internal git repository but you can also use public CI such as GitLab. You can find examples in the molecule documentation. See below as well:
---
image: docker:git

# uses Docker In Docker
services:
  - docker:dind

before_script:
  - apk update && apk add --no-cache docker
    python3-dev py3-pip docker gcc git curl build-base
    autoconf automake py3-cryptography linux-headers
    musl-dev libffi-dev openssl-dev openssh
  - docker info
  - python3 --version

molecule:
stage: default
script:
  - pip3 install ansible molecule docker
# you may use "molecule test" to do a full run
# or individual steps if you prefer
  - molecule cleanup
  - molecule converge
  - molecule destroy
Using BitBucket is also pretty straightforward:
---
image: quay.io/ansible/molecule

pipelines:
  default:
    - step:
        deployment: test
        services:
          - docker
        script:
          - molecule converge
          - molecule destroy
A Jenkins example you can use would look like this:
pipeline {
  agent {
    docker {
      image 'quay.io/ansible/molecule'
      args '-v /var/run/docker.sock:/var/run/docker.sock -v /sys/fs/cgroup:/sys/fs/cgroup:ro'
    }
  }

  stages {

    stage ('Molecule: Clean up environment') {
      steps {
        sh 'molecule cleanup; sudo molecule destroy'
      }
    }

    stage ('Molecule: run full test') {
      steps {
        sh 'molecule test --all'
      }
    }

  } // close stages
} // close pipelineMolecule can be of great help to ensure your roles are up to the best of standards before you tag them for use. It will help you ensuring quality code is used and it works (at least in isolation). It doesn’t mean it will be all perfect, you will rarely be running a single role on your playbook but it should simplify your debugging when problems occur.
But using Molecule alone is not the solution. You should adhere to good DevOps practices and avoid manual process as much as possible. This is what we aim for:
Molecule is an integral part of our release process but it would become meaningless if we don’t follow the process.
Senior DevOps Engineer
Sergio has many years experience working on various development projects before joining Digitalis. He worked for large companies with complex networks and infrastructure. ‘This has helped Sergio gain lots of experience in multiple areas from programming to networks. He especially excels in DevOps: automation is his day-to-day and Kubernetes his passion.
If you want to understand how to easily ingest data from Kafka topics into Cassandra than this blog can show you how with the DataStax Kafka Connector.
Do you want to know securely deploy k3s kubernetes for production? Have a read of this blog and accompanying Ansible project for you to run.
Do you want to know securely deploy k3s kubernetes for production? Have a read of this blog and accompanying Ansible project for you to run.
The post Using Molecule to Test Ansible Roles appeared first on digitalis.io.
]]>