If you want to understand how to easily ingest data from Kafka topics into Cassandra than this blog can show you how with the DataStax Kafka Connector.
The post Kafka Installation and Security with Ansible – Topics, SASL and ACLs appeared first on digitalis.io.
]]>It is all too easy to create a Kafka cluster and let it be used as a streaming platform but how do you secure it for sensitive data? This blog will introduce you to some of the security features in Apache Kafka and provides a fully working project on Github for you to install, configure and secure a Kafka cluster.
If you would like to know more about how to implement modern data and cloud technologies into to your business, we at Digitalis do it all: from cloud and Kubernetes migration to fully managed services, we can help you modernize your operations, data, and applications – on-premises, in the cloud and hybrid.
We provide consulting and managed services on wide variety of technologies including Apache Kafka.
Contact us today for more information or to learn more about each of our services.
Introduction
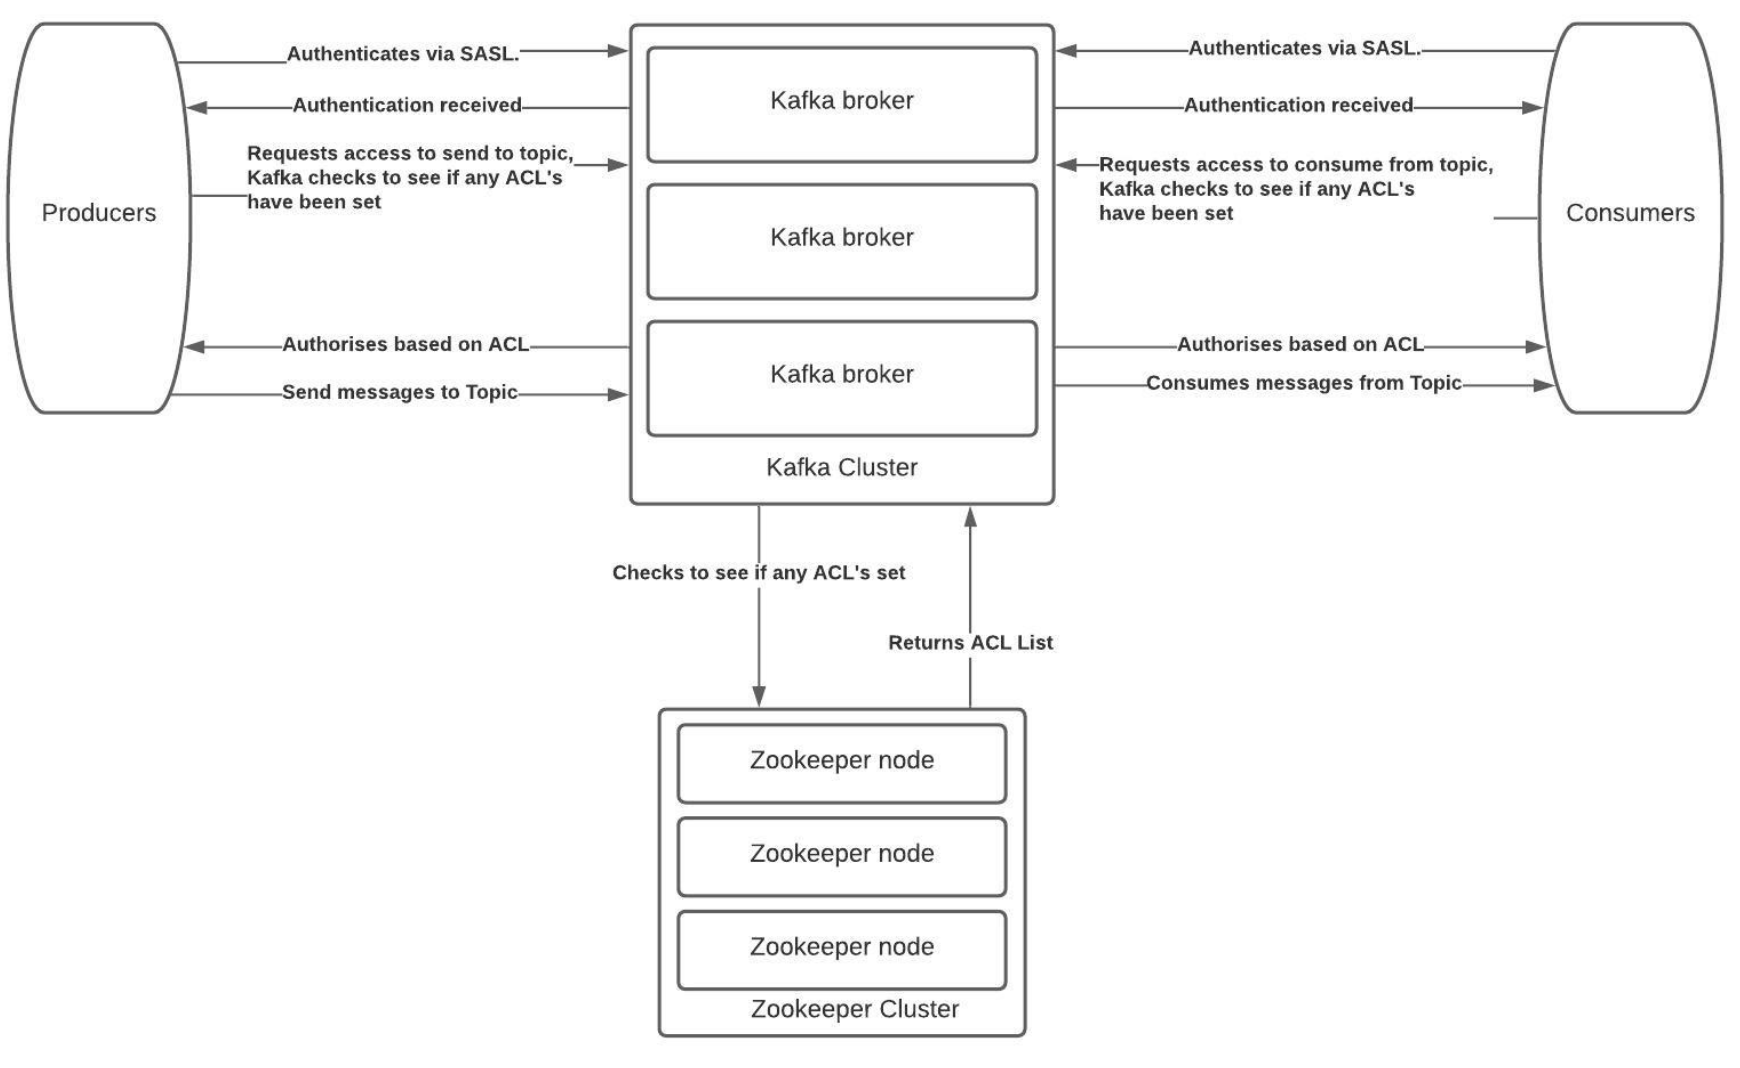
One of the many sections of Kafka that often gets overlooked is the management of topics, the Access Control Lists (ACLs) and Simple Authentication and Security Layer (SASL) components and how to lock down and secure a cluster. There is no denying it is complex to secure Kafka and hopefully this blog and associated Ansible project on Github should help you do this.
The Solution
At Digitalis we focus on using tools that can automate and maintain our processes. ACLs within Kafka is a command line process but maintaining active users can become difficult as the cluster size increases and more users are added.
As such we have built an ACL and SASL manager which we have released as open source on the Digitalis Github repository. The URL is: https://github.com/digitalis-io/kafka_sasl_acl_manager
The Kafka, SASL and ACL Manager is a set of playbooks written in Ansible to manage:
- Installation and configuration of Kafka and Zookeeper.
- Manage Topics creation and deletion.
- Set Basic JAAS configuration using plaintext user name and password stored in jaas.conf files on the kafka brokers.
- Set ACL’s per topic on per-user or per-group type access.
The Technical Jargon
Apache Kafka
Kafka is an open source project that provides a framework for storing, reading and analysing streaming data. Kafka was originally created at LinkedIn, where it played a part in analysing the connections between their millions of professional users in order to build networks between people. It was given open source status and passed to the Apache Foundation – which coordinates and oversees development of open source software – in 2011.
Being open source means that it is essentially free to use and has a large network of users and developers who contribute towards updates, new features and offering support for new users.
Kafka is designed to be run in a “distributed” environment, which means that rather than sitting on one user’s computer, it runs across several (or many) servers, leveraging the additional processing power and storage capacity that this brings.
ACL (Access Control List)
Kafka ships with a pluggable Authorizer and an out-of-box authorizer implementation that uses zookeeper to store all the ACLs. Kafka ACLs are defined in the general format of “Principal P is [Allowed/Denied] Operation O From Host H On Resource R”.
Ansible
Ansible is a configuration management and orchestration tool. It works as an IT automation engine.
Ansible can be run directly from the command line without setting up any configuration files. You only need to install Ansible on the control server or node. It communicates and performs the required tasks using SSH. No other installation is required. This is different from other orchestration tools like Chef and Puppet where you have to install software both on the control and client nodes.
Ansible uses configuration files called playbooks to perform a series of tasks.
Java JAAS
The Java Authentication and Authorization Service (JAAS) was introduced as an optional package (extension) to the Java SDK.
JAAS can be used for two purposes:
- for authentication of users, to reliably and securely determine who is currently executing Java code, regardless of whether the code is running as an application, an applet, a bean, or a servlet.
- for authorization of users to ensure they have the access control rights (permissions) required to do the actions performed.
Installation and Management
Primary Setup
Setup the inventories/hosts.yml to match your specific inventory
- Zookeeper servers should fall under zookeeper_nodes section and should be either a hostname or ip address.
- Kafka Broker servers should fall under the section and should be either a hostname or ip address.
Setup the group_vars
For PLAINTEXT Authorisation set the following variables in group_vars/all.yml
kafka_listener_protocol: PLAINTEXT
kafka_inter_broker_listener_protocol: PLAINTEXT
kafka_allow_everyone_if_no_acl_found: ‘true’ #!IMPORTANT
For SASL_PLAINTEXT Authorisation set the following variables in group_vars/all.yml
configure_sasl: false
configure_acl: false
kafka_opts:
-Djava.security.auth.login.config=/opt/kafka/config/jaas.conf
kafka_listener_protocol: SASL_PLAINTEXT
kafka_inter_broker_listener_protocol: SASL_PLAINTEXT
kafka_sasl_mechanism_inter_broker_protocol: PLAIN
kafka_sasl_enabled_mechanisms: PLAIN
kafka_super_users: “User:admin” #SASL Admin User that has access to administer kafka.
kafka_allow_everyone_if_no_acl_found: ‘false’
kafka_authorizer_class_name: “kafka.security.authorizer.AclAuthorizer”
Once the above has been set as configuration for Kafka and Zookeeper you will need to configure and setup the topics and SASL users. For the SASL User list it will need to be set in the group_vars/kafka_brokers.yml . These need to be set on all the brokers and the play will configure the jaas.conf on every broker in a rolling fashion. The list is a simple YAML format username and password list. Please don’t remove the admin_user_password that needs to be set so that the brokers can communicate with each other. The default admin username is admin.
Topics and ACL’s
In the group_vars/all.yml there is a list called topics_acl_users. This is a 2-fold list that manages the topics to be created as well as the ACL’s that need to be set per topic.
- In a PLAINTEXT configuration it will read the list of topics and create only those topics.
- In a SASL_PLAINTEXT with ACL context it will read the list and create topics and set user permissions(ACL’s) per topic.
There are 2 components to a topic and that is a user that can Produce to or Consume from a topic and the list splits that functionality also.
Installation Steps
They can individually be toggled on or off with variables in the group_vars/all.yml
install_ssh_key: true
install_openjdk: true
Example play:
ansible-playbook playbooks/base.yml -i inventories/hosts.yml -u root
Once the above has been set up the environment should be prepped with the basics for the Kafka and Zookeeper install to connect as root user and install and configure.
They can individually be toggled on or off with variables in the group_vars/all.yml
The variables have been set to use Opensource/Apache Kafka.
install_zookeeper_opensource: true
install_kafka_opensource: true
ansible-playbook playbooks/install_kafka_zkp.yml -i inventories/hosts.yml -u root
Once kafka has been installed then the last playbook needs to be run.
Based on either SASL_PLAINTEXT or PLAINTEXT configuration the playbook will
- Configure topics
- Setup ACL’s (If SASL_PLAINTEXT)
Please note that for ACL’s to work in Kafka there needs to be an authentication engine behind it.
If you want to install kafka to allow any connections and auto create topics please set the following configuration in the group_vars/all.yml
configure_topics: false
kafka_auto_create_topics_enable: true
This will disable the topic creation step and allow any topics to be created with the kafka defaults.
Once all the above topic and ACL config has been finalised please run:
ansible-playbook playbooks/configure_kafka.yml -i inventories/hosts.yml -u root
Testing the plays
Steps
- Start a logging tool aka Metricbeat
- Consume messages from topic
Examples
PLAIN TEXT
/opt/kafka/bin/kafka-console-consumer.sh –bootstrap-server $(hostname):9092 –topic metricbeat –group metricebeatCon1
SASL_PLAINTEXT
/opt/kafka/bin/kafka-console-consumer.sh –bootstrap-server $(hostname):9092 –consumer.config /opt/kafka/config/kafkaclient.jaas.conf –topic metricbeat –group metricebeatCon1
As part of the ACL play it will create a default kafkaclient.jaas.conf file as used in the examples above. This has the basic setup needed to connect to Kafka from any client using SASL_PLAINTEXT Authentication.
Conclusion
This project will give you an easily repeatable and more sustainable security model for Kafka.
The Ansbile playbooks are idempotent and can be run in succession as many times a day as you need. You can add and remove security and have a running cluster with high availability that is secure.
For any further assistance please reach out to us at Digitalis and we will be happy to assist.
Related Articles
K3s – lightweight kubernetes made ready for production – Part 3
Do you want to know securely deploy k3s kubernetes for production? Have a read of this blog and accompanying Ansible project for you to run.
K3s – lightweight kubernetes made ready for production – Part 2
Do you want to know securely deploy k3s kubernetes for production? Have a read of this blog and accompanying Ansible project for you to run.
The post Kafka Installation and Security with Ansible – Topics, SASL and ACLs appeared first on digitalis.io.
]]>The post Getting started with Kafka Cassandra Connector appeared first on digitalis.io.
]]>This blog provides step by step instructions on using Kafka Connect with Apache Cassandra. It provides a fully working docker-compose project on Github allowing you to explore the various features and options available to you.
If you would like to know more about how to implement modern data and cloud technologies into to your business, we at Digitalis do it all: from cloud and Kubernetes migration to fully managed services, we can help you modernize your operations, data, and applications – on-premises, in the cloud and hybrid.
We provide consulting and managed services on wide variety of technologies including Apache Cassandra and Apache Kafka.
Contact us today for more information or to learn more about each of our services.
What is a Kafka connect
Kafka Connect streams data between Apache Kafka and other data systems. Kafka Connect can copy data from applications to Kafka topics for stream processing. Additionally data can be copied from Kafka topics to external data systems like Elasticsearch, Cassandra and lots of others. There is a wide set of pre-existing Kafka Connectors for you to use and its straightforward to build your own.
If you have not come across it before, here is an introductory video from Confluent giving you an overview of Kafka Connect.
Kafka connect can be run either standalone mode for quick testing or development purposes or can be run distributed mode for scalability and high availability.
Ingesting data from Kafka topics into Cassandra
As mentioned above, Kafka Connect can be used for copying data from Kafka to Cassandra. DataStax Apache Kafka Connector is an open-source connector for copying data to Cassandra tables.
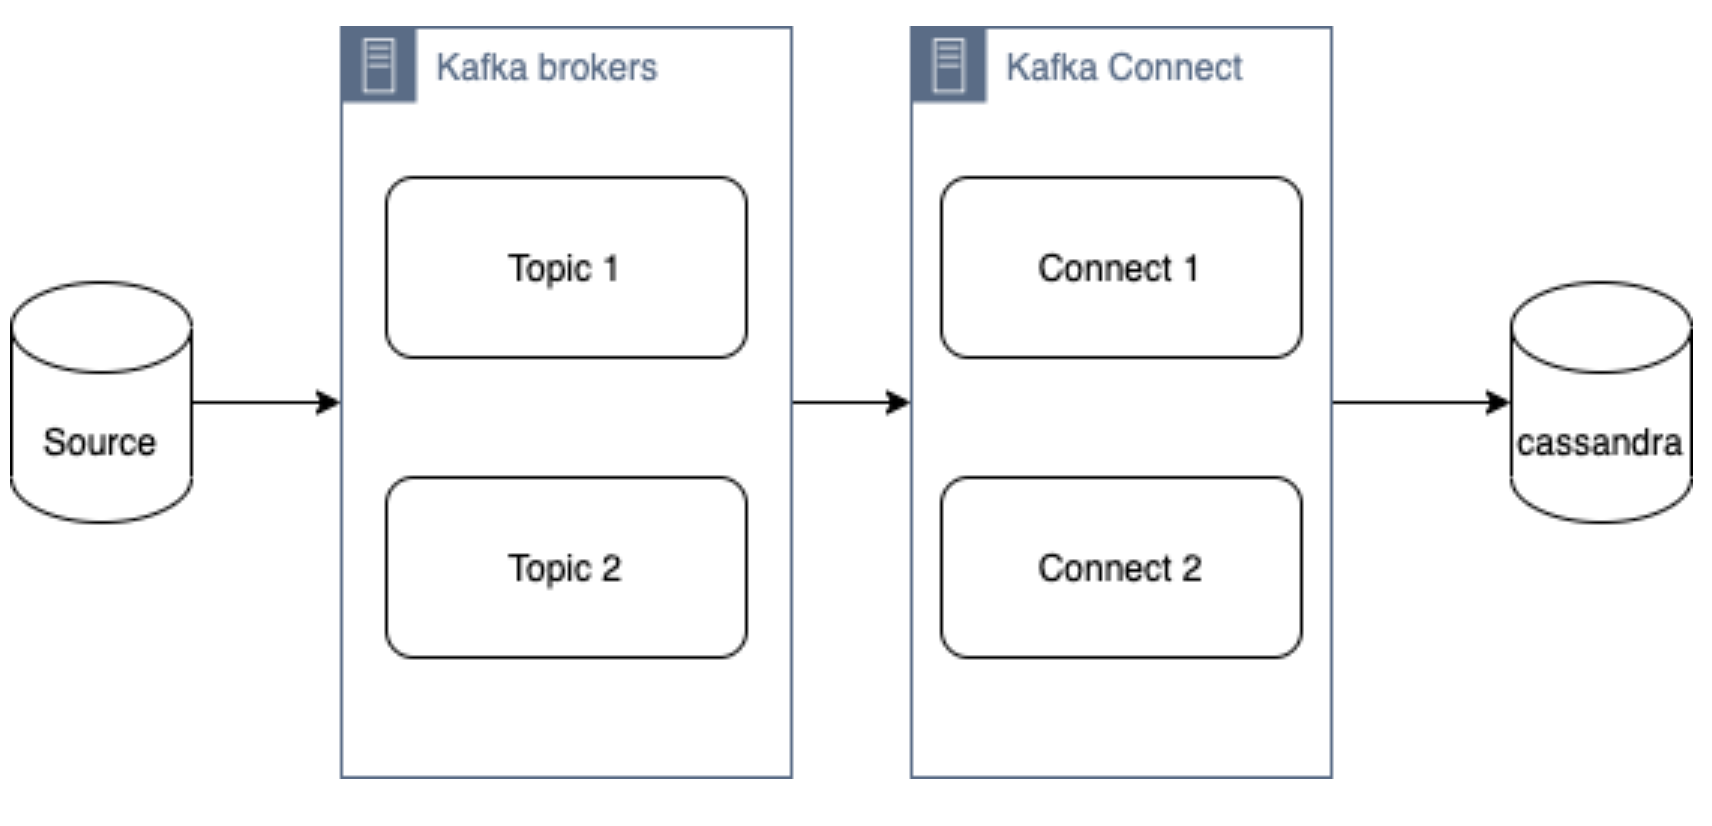
The diagram below illustrates how the Kafka Connect fits into the ecosystem. Data is published onto Kafka topics and then it is consumed and inserted into Apache Cassandra by Kafka Connect.
DataStax Apache Kafka Connector
The DataStax Apache Kafka Connector can be used to push data to the following databases:
- Apache Cassandra 2.1 and later
- DataStax Enterprise (DSE) 4.7 and later
Kafka Connect workers can run one or more Cassandra connectors and each one creates a DataStax java driver session. A single connector can consume data from multiple topics and write to multiple tables. Multiple connector instances are required for scenarios where different global connect configurations are required such as writing to different clusters, data centers etc.
Kafka topic to Cassandra table mapping
The DataStax connector gives you several option on how to configure it to map data on the topics to Cassandra tables.
The options below explain how each mapping option works.
Note – in all cases. you should ensure that the data types of the message field are compatible with the data type of the target table column.
Basic format
This option maps the data key and the value to the Cassandra table columns. See here for more detail.
JSON format
This option maps the individual fields in the data key or value JSON to Cassandra table fields. See here for more detail.
AVRO format
Kafka Struct
CQL query
This option maps the individual fields in the data key or value JSON to Cassandra table fields. See here for more detail.
Let’s try it!
All required files are in https://github.com/digitalis-io/kafka-connect-cassandra-blog. Just clone the repo to get started.
The examples are using docker and docker-compose .It is easy to use docker and docker-compose for testing locally. Installation instructions for docker and docker-compose can be found here:
The example on github will start up containers running everything needed in this blog – Kafka, Cassandra, Connect etc..
docker-compose.yml file
The following resources are defined in the projects docker-compose.yml file:
- A bridge network called kafka-net
- Zookeeper server
- 3 Kafka broker server
- Kafka schema registry server
- Kafka connect server
- Apache Cassandra cluster with a single node
This section of the blog will take you through the fully working deployment defined in the docker-compose.yml file used to start up Kafka, Cassandra and Connect.
Bridge network
networks:
 kafka-net:
driver: bridgeApache Zookeeper is (currently) an integral part of the Kafka deployment which keeps track of the Kafka nodes, topics etc. We are using the confluent docker image (confluentinc/cp-zookeeper) for Zookeeper.
zookeeper-server:
   image: 'confluentinc/cp-zookeeper:latest'
   container_name: 'zookeeper-server'
   hostname: 'zookeeper-server'
   healthcheck:
     test: ["CMD-SHELL", "nc -z localhost 2181 || exit 1" ]
     interval: 5s
     timeout: 5s
     retries: 60
   networks:
     - kafka-net
   ports:
     - '2181:2181'
   environment:
     - ZOOKEEPER_CLIENT_PORT=2181
     - ZOOKEEPER_SERVER_ID=1
Kafka brokers
Kafka brokers store topics and messages. We are using the confluentinc/cp-kafka docker image for this.
As Kafka brokers in this setup of Kafka depend on Zookeeper, we instruct docker-compose to wait for Zookeeper to be up and running before starting the brokers. This is defined in the depends_on section.
kafka-server1:
   image: 'confluentinc/cp-kafka:latest'
   container_name: 'kafka-server1'
   hostname: 'kafka-server1'
   healthcheck:
     test: ["CMD-SHELL", "nc -z localhost 9092 || exit 1" ]
     interval: 5s
     timeout: 5s
     retries: 60
   networks:
     - kafka-net
   ports:
     - '9092:9092'
   environment:
     - KAFKA_ZOOKEEPER_CONNECT=zookeeper-server:2181
     - KAFKA_ADVERTISED_LISTENERS=PLAINTEXT://kafka-server1:9092
     - KAFKA_BROKER_ID=1
   depends_on:
     - zookeeper-server

 kafka-server2:
   image: 'confluentinc/cp-kafka:latest'
   container_name: 'kafka-server2'
   hostname: 'kafka-server2'
   healthcheck:
     test: ["CMD-SHELL", "nc -z localhost 9092 || exit 1" ]
     interval: 5s
     timeout: 5s
     retries: 60
   networks:
     - kafka-net
   ports:
     - '9093:9092'
   environment:
     - KAFKA_ZOOKEEPER_CONNECT=zookeeper-server:2181
     - KAFKA_ADVERTISED_LISTENERS=PLAINTEXT://kafka-server2:9092
     - KAFKA_BROKER_ID=2
   depends_on:
     - zookeeper-server

 kafka-server3:
   image: 'confluentinc/cp-kafka:latest'
   container_name: 'kafka-server3'
   hostname: 'kafka-server3'
   healthcheck:
     test: ["CMD-SHELL", "nc -z localhost 9092 || exit 1" ]
     interval: 5s
     timeout: 5s
     retries: 60
   networks:
     - kafka-net
   ports:
     - '9094:9092'
   environment:
     - KAFKA_ZOOKEEPER_CONNECT=zookeeper-server:2181
     - KAFKA_ADVERTISED_LISTENERS=PLAINTEXT://kafka-server3:9092
     - KAFKA_BROKER_ID=3
   depends_on:
     - zookeeper-server
Schema registry
Schema registry is used for storing schemas used for the messages encoded in AVRO, Protobuf and JSON.
The confluentinc/cp-schema-registry docker image is used.
 kafka-sr1:
   image: 'confluentinc/cp-schema-registry:latest'
   container_name: 'kafka-sr1'
   hostname: 'kafka-sr1'
   healthcheck:
     test: ["CMD-SHELL", "nc -z kafka-sr1 8081 || exit 1" ]
     interval: 5s
     timeout: 5s
     retries: 60
   networks:
     - kafka-net
   ports:
     - '8081:8081'
   environment:
     - SCHEMA_REGISTRY_KAFKASTORE_BOOTSTRAP_SERVERS=kafka-server1:9092,kafka-server2:9092,kafka-server3:9092
     - SCHEMA_REGISTRY_HOST_NAME=kafka-sr1
     - SCHEMA_REGISTRY_LISTENERS=http://kafka-sr1:8081
   depends_on:
     - zookeeper-server
Kafka connect
Kafka connect writes data to Cassandra as explained in the previous section.
 kafka-connect1:
   image: 'confluentinc/cp-kafka-connect:latest'
   container_name: 'kafka-connect1'
   hostname: 'kafka-connect1'
   healthcheck:
     test: ["CMD-SHELL", "nc -z localhost 8082 || exit 1" ]
     interval: 5s
     timeout: 5s
     retries: 60
   networks:
     - kafka-net
   ports:
     - '8082:8082'
   volumes:
     - ./vol-kafka-connect-jar:/etc/kafka-connect/jars
     - ./vol-kafka-connect-conf:/etc/kafka-connect/connectors
   environment:
     - CONNECT_BOOTSTRAP_SERVERS=kafka-server1:9092,kafka-server2:9092,kafka-server3:9092
     - CONNECT_REST_PORT=8082
     - CONNECT_GROUP_ID=cassandraConnect
     - CONNECT_CONFIG_STORAGE_TOPIC=cassandraconnect-config
     - CONNECT_OFFSET_STORAGE_TOPIC=cassandraconnect-offset
     - CONNECT_STATUS_STORAGE_TOPIC=cassandraconnect-status
     - CONNECT_KEY_CONVERTER=org.apache.kafka.connect.json.JsonConverter
     - CONNECT_VALUE_CONVERTER=org.apache.kafka.connect.json.JsonConverter
     - CONNECT_INTERNAL_KEY_CONVERTER=org.apache.kafka.connect.json.JsonConverter
     - CONNECT_INTERNAL_VALUE_CONVERTER=org.apache.kafka.connect.json.JsonConverter
     - CONNECT_KEY_CONVERTER_SCHEMAS_ENABLE=false
     - CONNECT_VALUE_CONVERTER_SCHEMAS_ENABLE=false
     - CONNECT_REST_ADVERTISED_HOST_NAME=kafka-connect
     - CONNECT_PLUGIN_PATH=/etc/kafka-connect/jars
   depends_on:
     - zookeeper-server
     - kafka-server1
     - kafka-server2
     - kafka-server3
Apache Cassandra
cassandra-server1:
   image: cassandra:latest
   mem_limit: 2g
   container_name: 'cassandra-server1'
   hostname: 'cassandra-server1'
   healthcheck:
     test: ["CMD-SHELL", "cqlsh", "-e", "describe keyspaces" ]
     interval: 5s
     timeout: 5s
     retries: 60
   networks:
     - kafka-net
   ports:
     - "9042:9042"
   environment:
     - CASSANDRA_SEEDS=cassandra-server1
     - CASSANDRA_CLUSTER_NAME=Digitalis
     - CASSANDRA_DC=DC1
     - CASSANDRA_RACK=rack1
     - CASSANDRA_ENDPOINT_SNITCH=GossipingPropertyFileSnitch
     - CASSANDRA_NUM_TOKENS=128
Kafka Connect configuration
As you may have already noticed, we have defined two docker volumes for the Kafka Connect service in the docker-compose.yml. The first one is for the Cassandra Connector jar and the second volume is for the connector configuration.
We will need to configure the Cassandra connection, the source topic for Kafka Connect to consume messages from and the mapping of the message payloads to the target Cassandra table.
Setting up the cluster
First thing we need to do is download the connector tarball file from DataStax website: https://downloads.datastax.com/#akc and then extract its contents to the vol-kafka-connect-jar folder in the accompanying github project. If you have not checked out the project, do this now.
Once you have download the tarball, extract its contents:
$ tar -zxf kafka-connect-cassandra-sink-1.4.0.tar.gz
Copy kafka-connect-cassandra-sink-1.4.0.jar to vol-kafka-connect-jar folder
$ cp kafka-connect-cassandra-sink-1.4.0/kafka-connect-cassandra-sink-1.4.0.jar vol-kafka-connect-jar
Go to the base directory of the checked out project and let’s start the containers up
$ docker-compose up -d

$ docker-compose ps
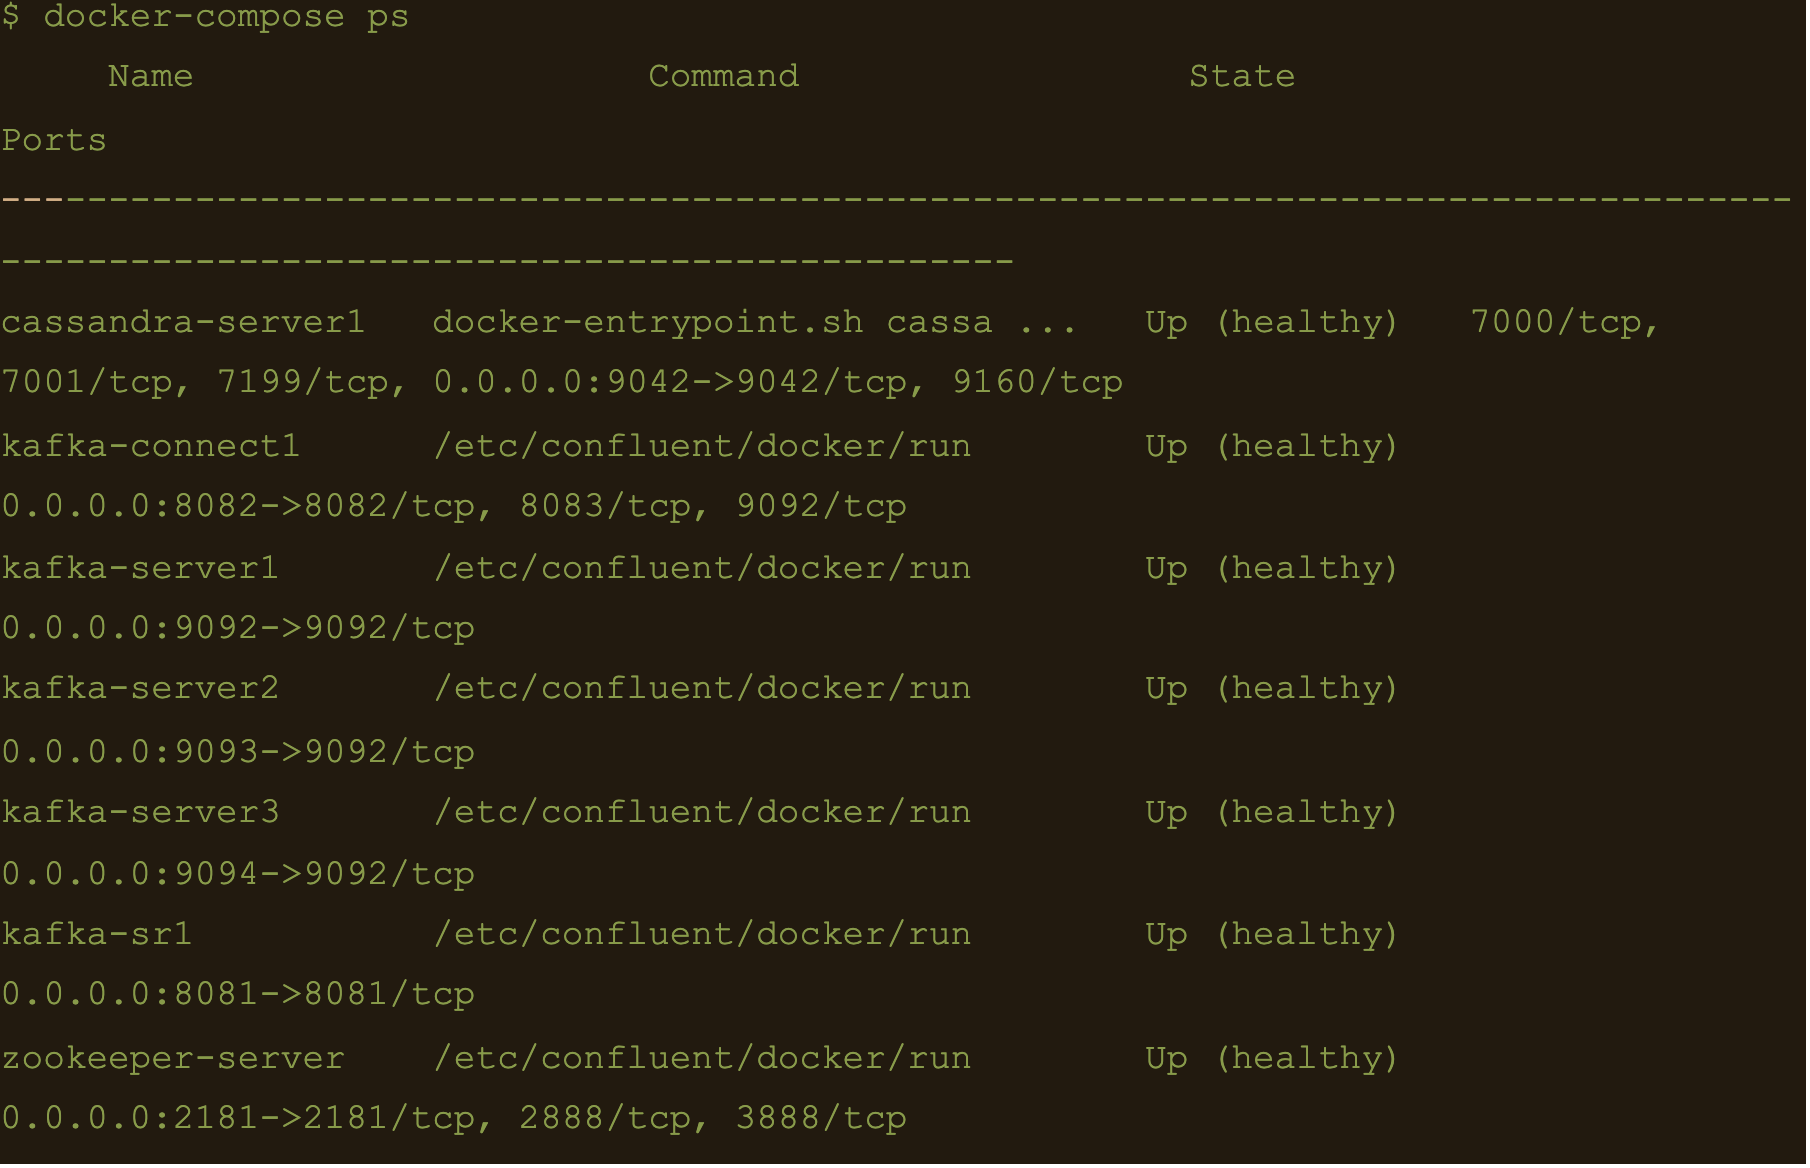
We now have Apache Cassandra, Apache Kafka and Connect all up and running via docker and docker-compose on your local machine.
You may follow the container logs and check for any errors using the following command:
$ docker-compose logs -f
Create the Cassandra Keyspace
The next thing we need to do is connect to our docker deployed Cassandra DB and create a keyspace and table for our Kafka connect to use.
Connect to the cassandra container and create a keyspace via cqlsh
$ docker exec -it cassandra-server1 /bin/bash
$ cqlsh -e “CREATE KEYSPACE connect WITH replication = {‘class’: ‘NetworkTopologyStrategy’,’DC1′: 1};”

Basic format
$ cqlsh -e “CREATE TABLE connect.basic_table (userid text PRIMARY KEY, username text);”

$ docker exec -it kafka-server1 /bin/bash
$ kafka-topics –create –topic basic_topic –zookeeper zookeeper-server:2181 –partitions 3 –replication-factor 3

$ docker exec -it kafka-connect1 /bin/bash
We need to create the basic connector using the basic-connect.json configuration which is mounted at /etc/kafka-connect/connectors/conf/basic-connect.json within the container
$ curl -X POST -H “Content-Type: application/json” -d “@/etc/kafka-connect/connectors/conf/basic-connect.json” “http://localhost:8082/connectors”
basic-connect.json contains the following configuration:
{
  "name": "cassandra-basic-sink", #name of the sink
  "config": {
      "connector.class": "com.datastax.oss.kafka.sink.CassandraSinkConnector", #connector class
      "tasks.max": "1", #max no of connect tasks
      "topics": "basic_topic", #kafka topic
      "contactPoints": "cassandra-server1", #cassandra cluster node
      "loadBalancing.localDc": "DC1", #cassandra DC name
      "topic.basic_topic.connect.basic_table.mapping": "userid=key, username=value", #topic to table mapping
      "key.converter": "org.apache.kafka.connect.storage.StringConverter", #use string converter for key
      "value.converter": "org.apache.kafka.connect.storage.StringConverter", #use string converter for values
      "key.converter.schemas.enable": false,  #no schema in data for the key
      "value.converter.schemas.enable": false  #no schema in data for value
  }
}
Here the key is mapped to the userid column and the value is mapped to the username column i.e
“topic.basic_topic.connect.basic_table.mapping”: “userid=key, username=value”
Both the key and value are expected in plain text format as specified in the key.converter and the value.converter configuration.
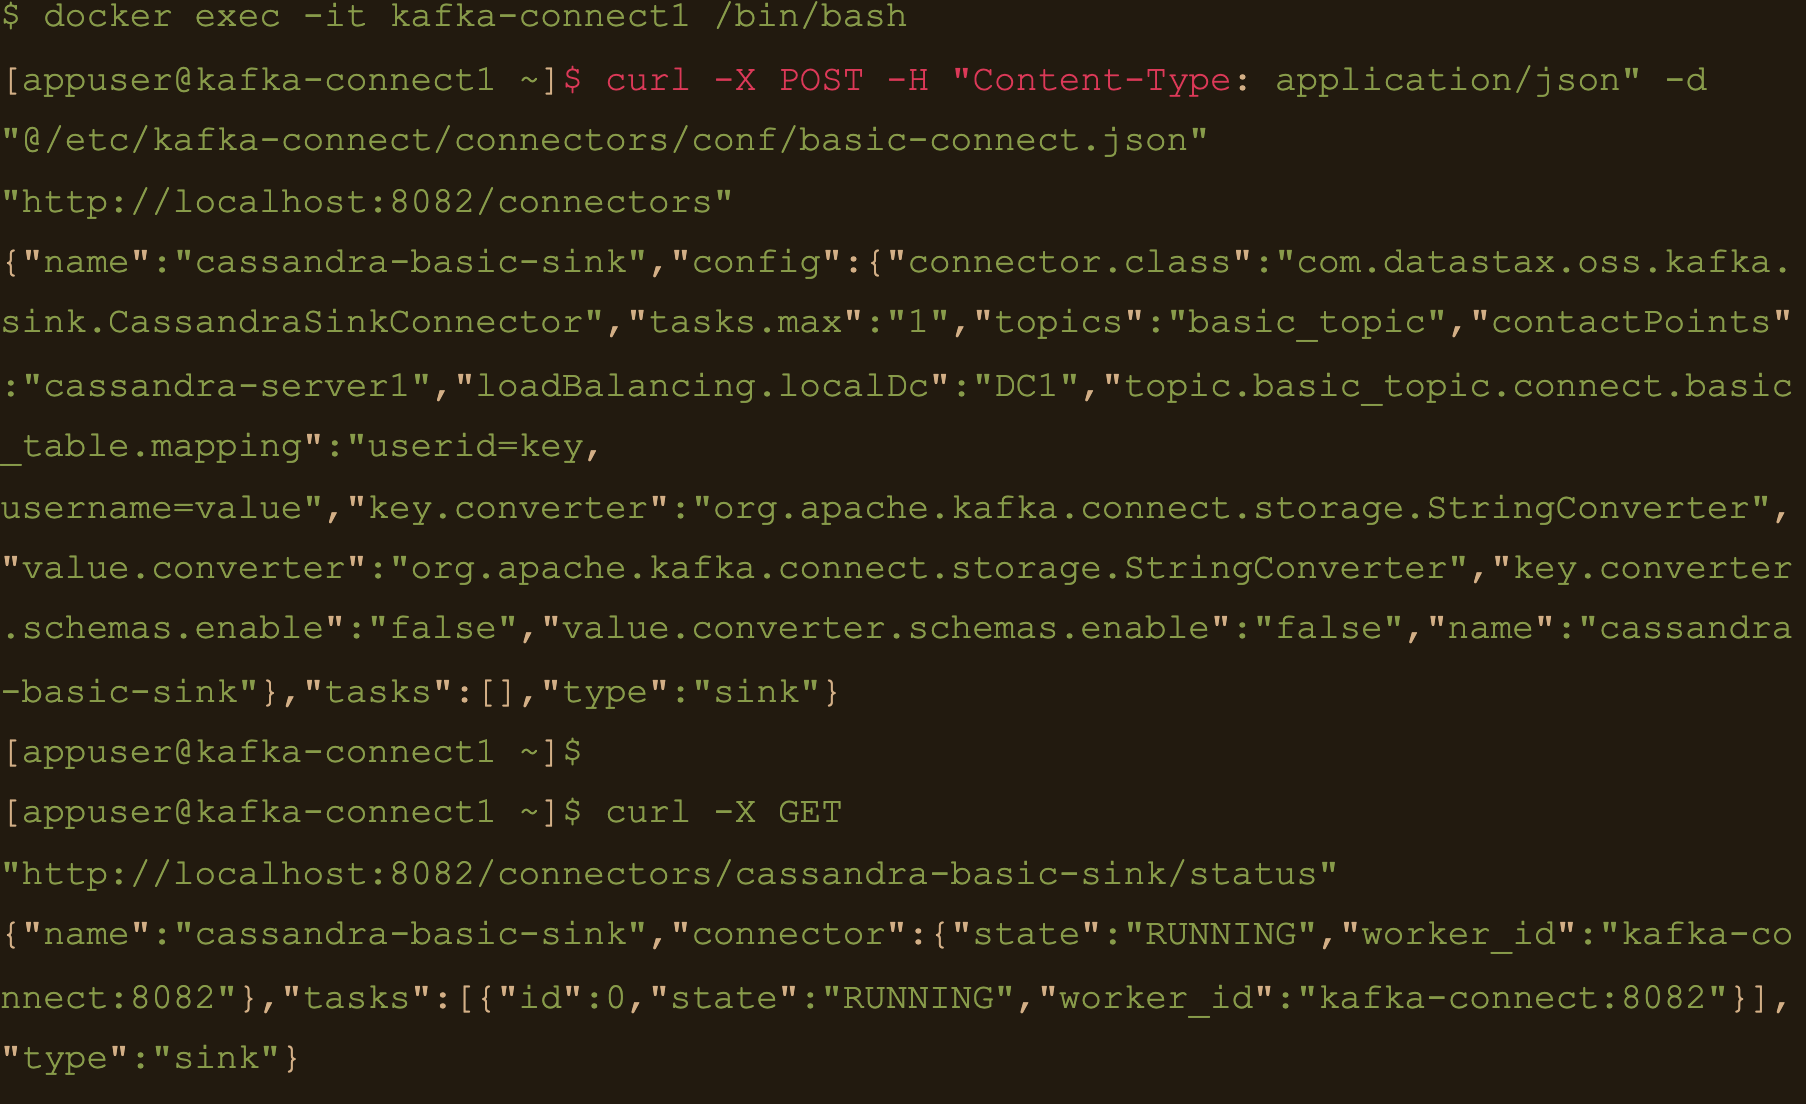
We can check status of the connector via the Kafka connect container and make sure the connector is running with the command:
$ curl -X GET “http://localhost:8082/connectors/cassandra-basic-sink/status”
$ docker exec -it kafka-server1 /bin/bash
Lets create a file containing some test data:
$ echo abc:abcvalue > data.txt
And now, using the kafka-console-producer command inject that data into the target topic:
$ kafka-console-producer –broker-list localhost:9092 –topic basic_topic –property parse.key=true –property key.separator=: < data.txt

$ docker exec -it cassandra-server1 /bin/bash
$ cqlsh -e cqlsh -e “select * from connect.basic_table;”

JSON Data
First lets create another table to store the data:
$ docker exec -it cassandra-server1 /bin/bash
$ cqlsh -e “CREATE TABLE connect.json_table (userid text PRIMARY KEY, username text, firstname text, lastname text);”

Connect to one of the Kafka brokers to create a new topic
$ docker exec -it kafka-server1 /bin/bash
$ kafka-topics –create –topic json_topic –zookeeper zookeeper-server:2181 –partitions 3 –replication-factor 3

$ docker exec -it kafka-connect1 /bin/bash
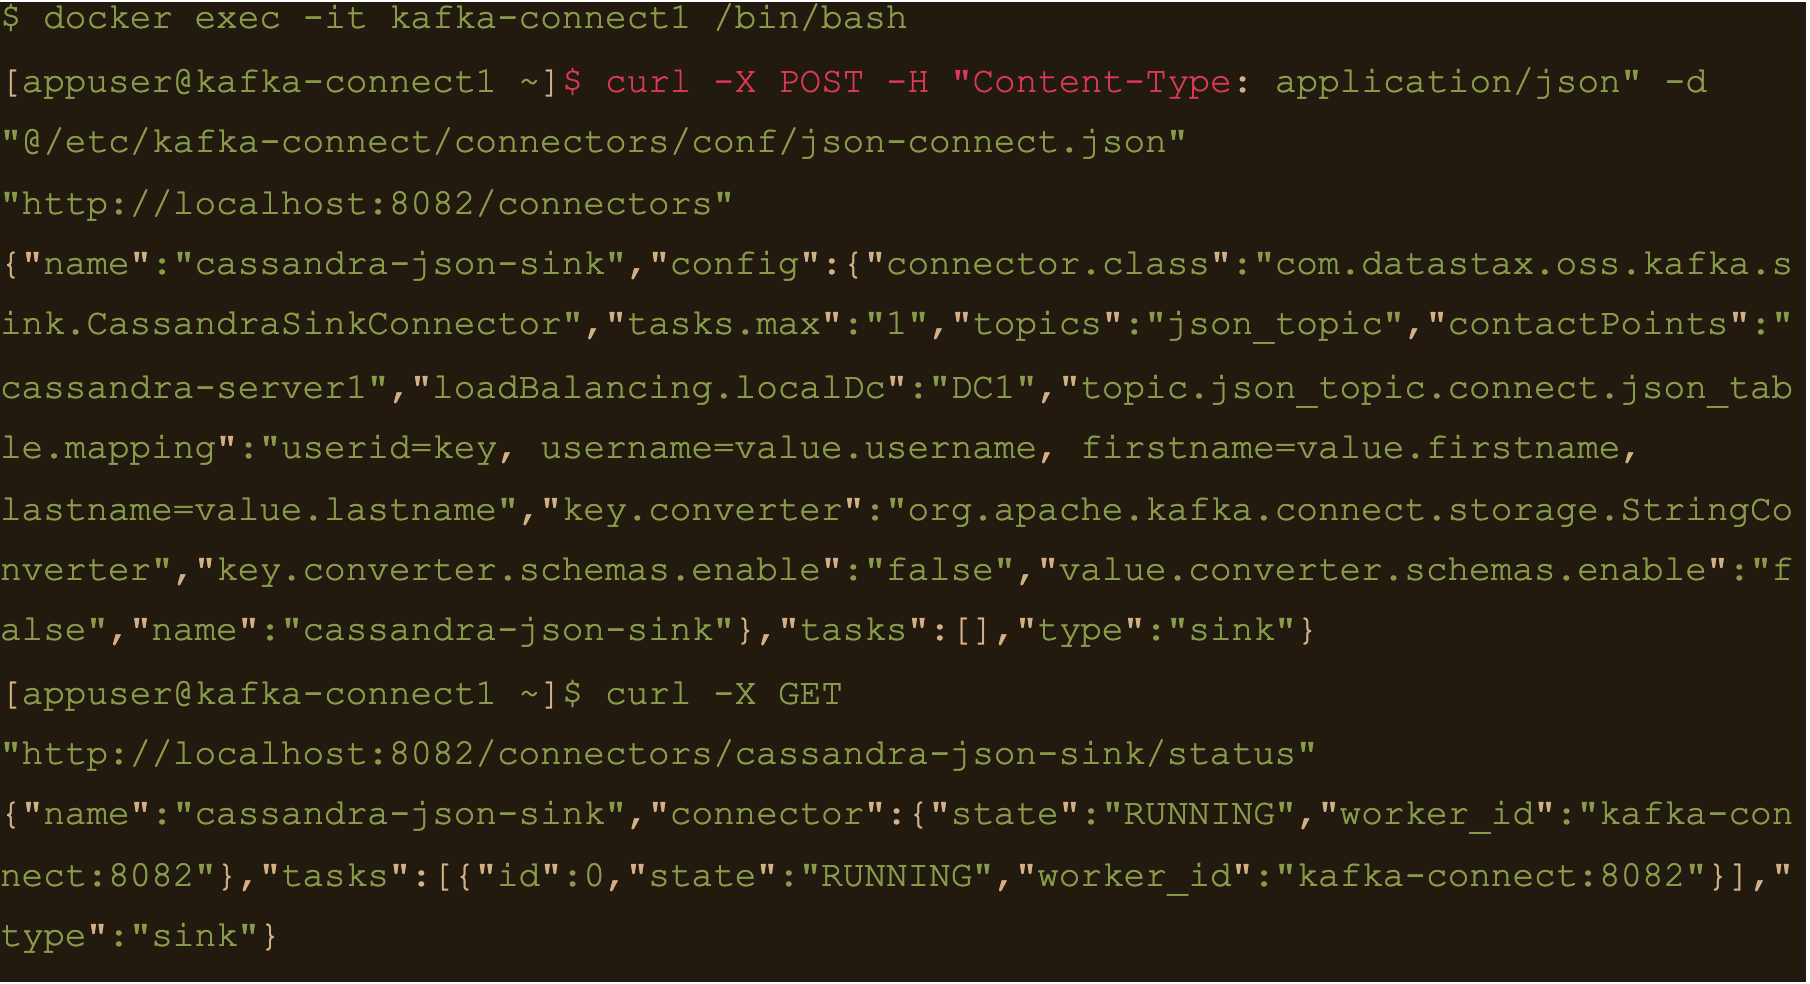
Create the connector using the json-connect.json configuration which is mounted at /etc/kafka-connect/connectors/conf/json-connect.json on the container
$ curl -X POST -H “Content-Type: application/json” -d “@/etc/kafka-connect/connectors/conf/json-connect.json” “http://localhost:8082/connectors”
Connect config has following values
{
   "name": "cassandra-json-sink",
   "config": {
       "connector.class": "com.datastax.oss.kafka.sink.CassandraSinkConnector",
       "tasks.max": "1",
       "topics": "json_topic",
       "contactPoints": "cassandra-server1",
       "loadBalancing.localDc": "DC1",
       "topic.json_topic.connect.json_table.mapping": "userid=key, username=value.username, firstname=value.firstname, lastname=value.lastname",
       "key.converter": "org.apache.kafka.connect.storage.StringConverter",
       "key.converter.schemas.enable": false,
       "value.converter.schemas.enable": false
   }
}
“topic.json_topic.connect.json_table.mapping”: “userid=key, username=value.username, firstname=value.firstname, lastname=value.lastname”
Check status of the connector and make sure the connector is running
$ docker exec -it kafka-connect1 /bin/bash
$ curl -X GET “http://localhost:8082/connectors/cassandra-json-sink/status”
Now lets connect to one of the broker nodes, generate some JSON data and then inject it into the topic we created
$ docker exec -it kafka-server1 /bin/bash
$ echo ‘abc:{“username”: “fbar”, “firstname”: “foo”, “lastname”: “bar”}’ > data.json
$ kafka-console-producer –broker-list localhost:9092 –topic json_topic –property parse.key=true –property key.separator=: < data.json

$ docker exec -it cassandra-server1 /bin/bash
$ cqlsh -e “select * from connect.json_table;”

AVRO data
First lets create a table to store the data:
$ docker exec -it cassandra-server1 /bin/bash
$ cqlsh -e “CREATE TABLE connect.avro_table (userid uuid PRIMARY KEY, username text, firstname text, lastname text);”

$ docker exec -it kafka-server1 /bin/bash
$ kafka-topics –create –topic avro_topic –zookeeper zookeeper-server:2181 –partitions 3 –replication-factor 3

$ docker exec -it kafka-connect1 /bin/bash
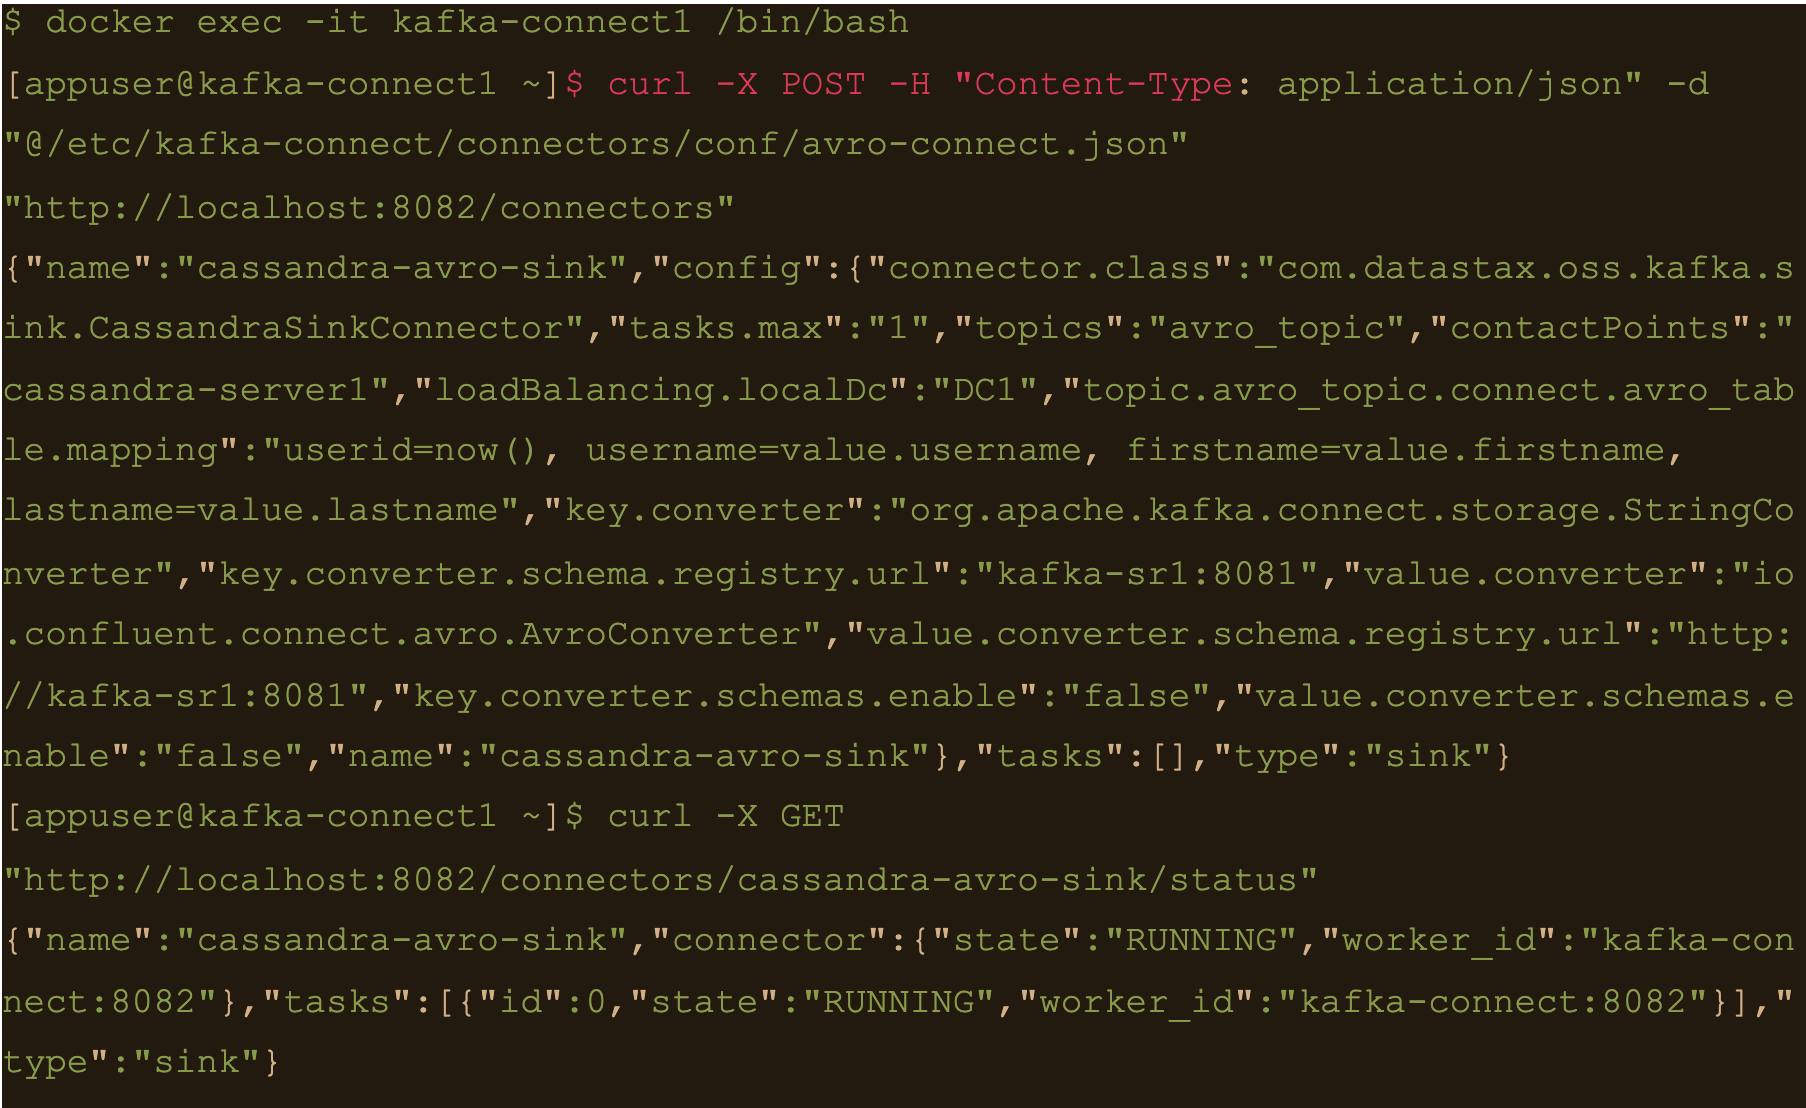
$ curl -X POST -H “Content-Type: application/json” -d “@/etc/kafka-connect/connectors/conf/avro-connect.json” “http://localhost:8082/connectors”
Avro connect configuration:
{
   "name": "cassandra-avro-sink",
   "config": {
       "connector.class": "com.datastax.oss.kafka.sink.CassandraSinkConnector",
       "tasks.max": "1",
       "topics": "avro_topic",
       "contactPoints": "cassandra-server1",
       "loadBalancing.localDc": "DC1",
       "topic.avro_topic.connect.avro_table.mapping": "userid=now(), username=value.username, firstname=value.firstname, lastname=value.lastname",
       "key.converter": "org.apache.kafka.connect.storage.StringConverter",
       "key.converter.schema.registry.url":"kafka-sr1:8081",
       "value.converter": "io.confluent.connect.avro.AvroConverter",
       "value.converter.schema.registry.url":"http://kafka-sr1:8081",
       "key.converter.schemas.enable": false,
       "value.converter.schemas.enable": false
   }
}
“topic.avro_topic.connect.avro_table.mapping”: “userid=now(), username=value.username, firstname=value.firstname, lastname=value.lastname”
Also the value converter is
“value.converter”: “io.confluent.connect.avro.AvroConverter” and its pointing at our docker deployed schema registry “value.converter.schema.registry.url”:”http://kafka-sr1:8081″
$ docker exec -it kafka-connect1 /bin/bash
$ curl -X GET “http://localhost:8082/connectors/cassandra-avro-sink/status”
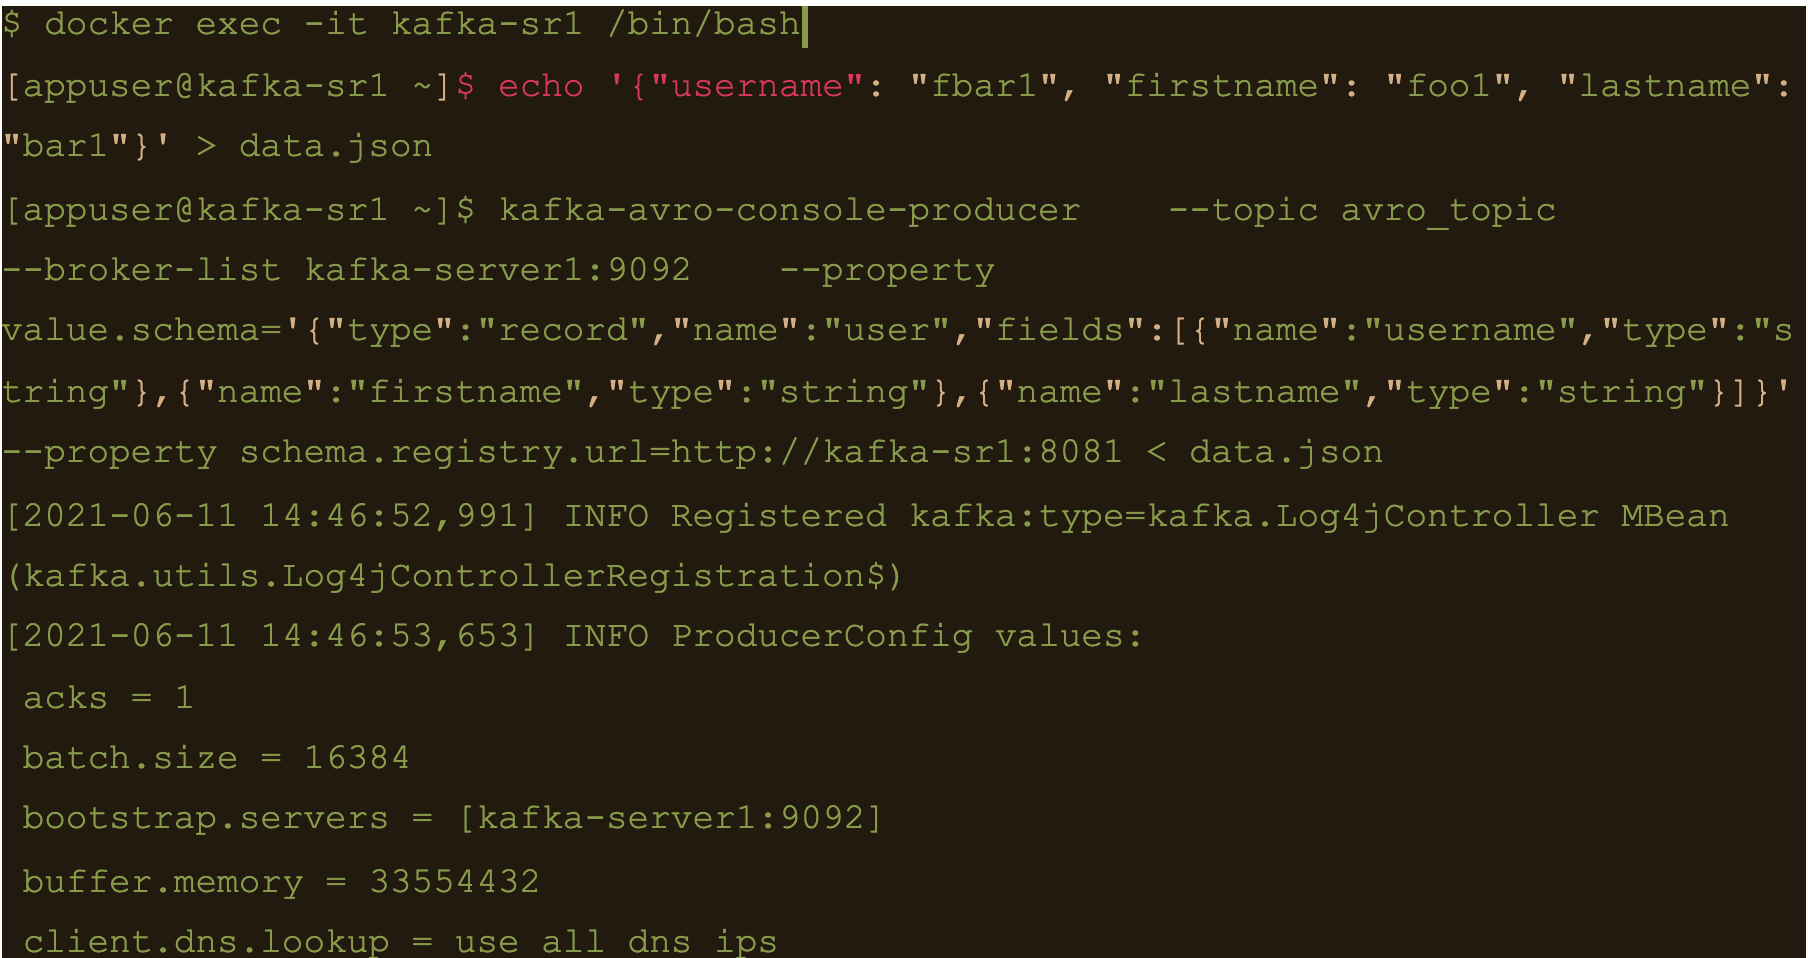
$ docker exec -it kafka-sr1 /bin/bash
Generate a data file to input to the avro producer
$ echo ‘{“username”: “fbar1”, “firstname”: “foo1”, “lastname”: “bar1”}’ > data.json
And push data using kafka-avro-console-producer
$ kafka-avro-console-producer \
–topic avro_topic \
–broker-list kafka-server1:9092 \
–property value.schema='{“type”:”record”,”name”:”user”,”fields”:[{“name”:”username”,”type”:”string”},{“name”:”firstname”,”type”:”string”},{“name”:”lastname”,”type”:”string”}]}’ \
–property schema.registry.url=http://kafka-sr1:8081 < data.json
$ cqlsh -e cqlsh -e “select * from connect.avro_table;”

Use CQL in connect
First thing to do is to create another table for the data
$ docker exec -it cassandra-server1 /bin/bash
$ cqlsh -e “CREATE TABLE connect.cql_table (userid uuid PRIMARY KEY, username text, firstname text, lastname text);”

$ docker exec -it kafka-server1 /bin/bash
$ kafka-topics –create –topic cql_topic –zookeeper zookeeper-server:2181 –partitions 3 –replication-factor 3

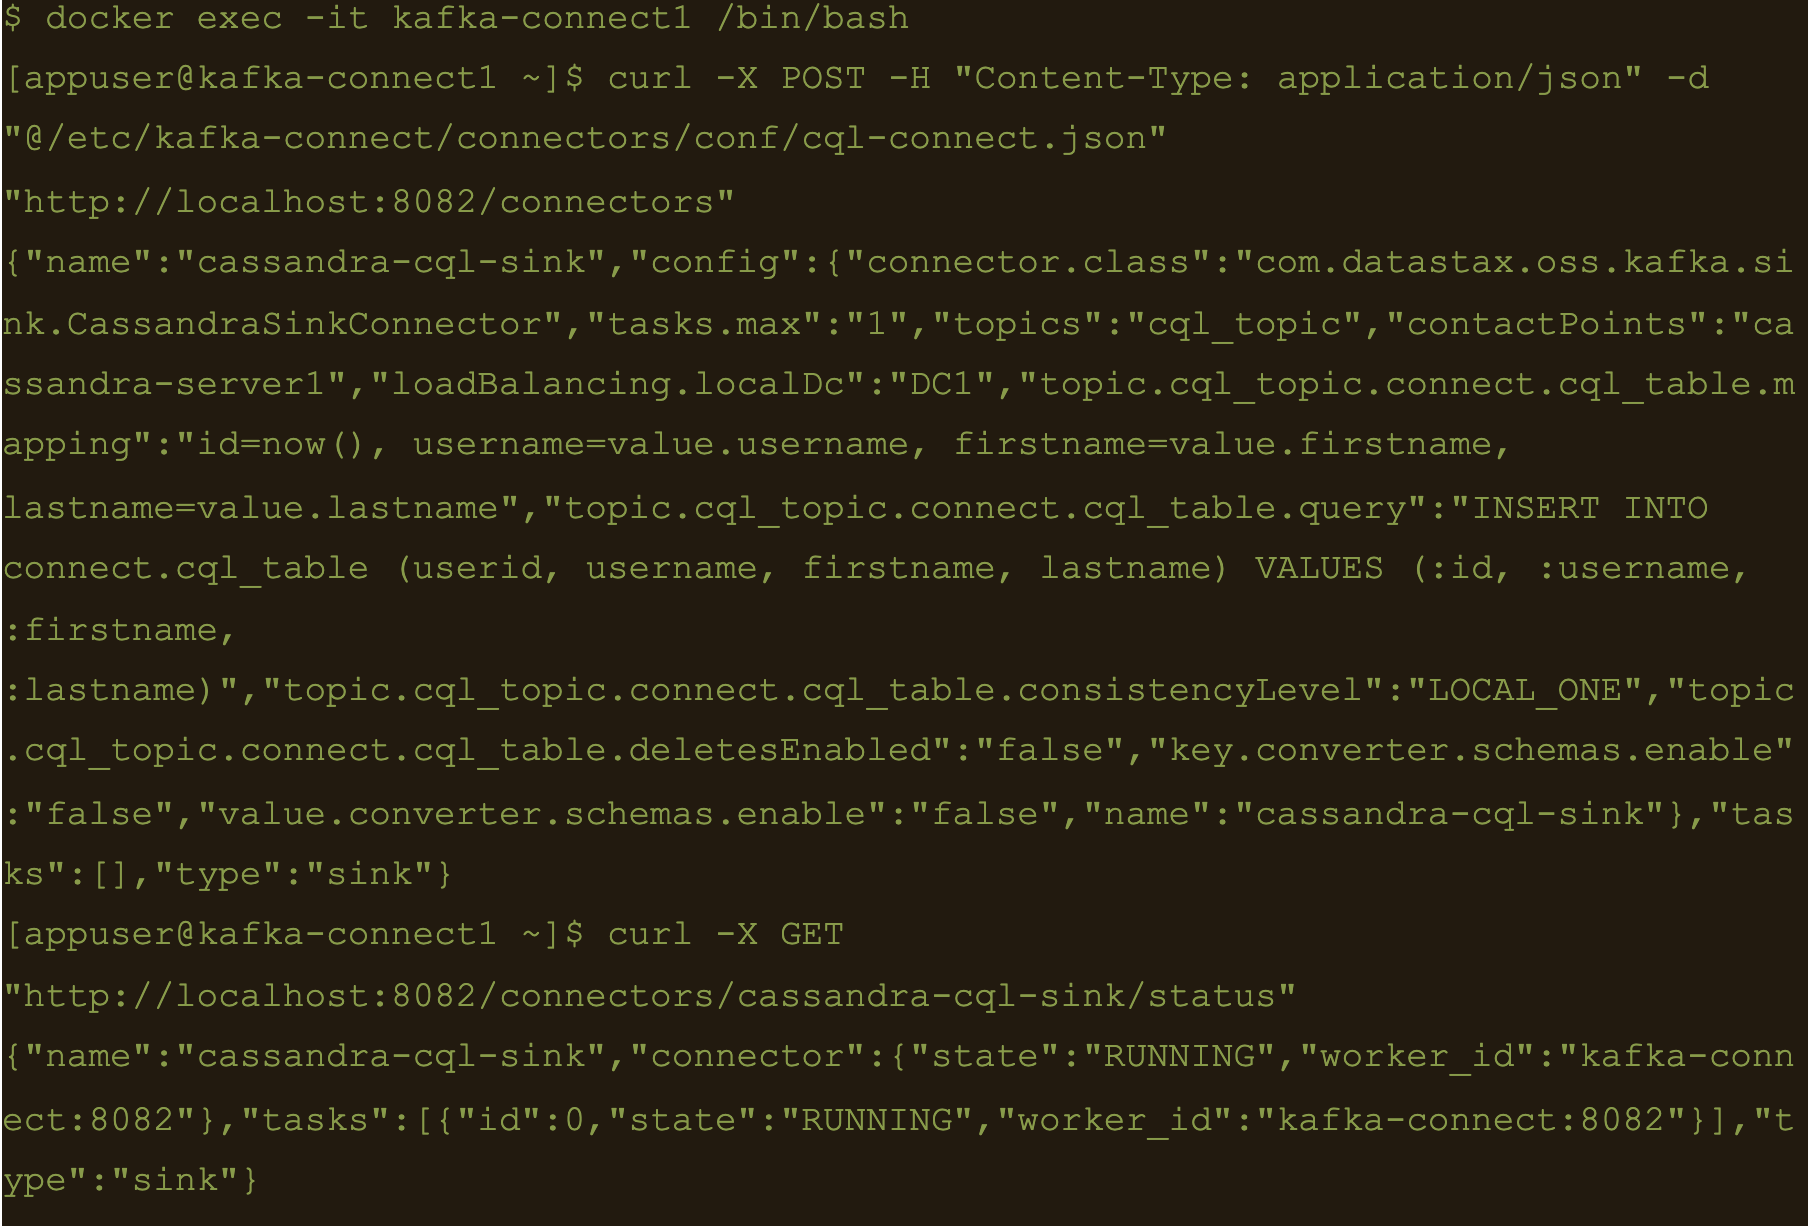
Here the file cql-connect.json contains the connect configuration:
{
	"name": "cassandra-cql-sink",
	"config": {
		"connector.class": "com.datastax.oss.kafka.sink.CassandraSinkConnector",
		"tasks.max": "1",
		"topics": "cql_topic",
		"contactPoints": "cassandra-server1",
		"loadBalancing.localDc": "DC1",
		"topic.cql_topic.connect.cql_table.mapping": "id=now(), username=value.username, firstname=value.firstname, lastname=value.lastname",
		"topic.cql_topic.connect.cql_table.query": "INSERT INTO connect.cql_table (userid, username, firstname, lastname) VALUES (:id, :username, :firstname, :lastname)",
		"topic.cql_topic.connect.cql_table.consistencyLevel": "LOCAL_ONE",
        "topic.cql_topic.connect.cql_table.deletesEnabled": false,
        "key.converter.schemas.enable": false,
        "value.converter.schemas.enable": false
	}
}- topic.cql_topic.connect.cql_table.mapping”: “id=now(), username=value.username, firstname=value.firstname, lastname=value.lastname”
- “topic.cql_topic.connect.cql_table.query”: “INSERT INTO connect.cql_table (userid, username, firstname, lastname) VALUES (:id, :username, :firstname, :lastname)”
- And the consistency with “topic.cql_topic.connect.cql_table.consistencyLevel”: “LOCAL_ONE”
$ docker exec -it kafka-connect1 /bin/bash
$ curl -X POST -H “Content-Type: application/json” -d “@/etc/kafka-connect/connectors/conf/cql-connect.json” “http://localhost:8082/connectors”
Check status of the connector and make sure the connector is running
$ curl -X GET “http://localhost:8082/connectors/cassandra-cql-sink/status”
$ docker exec -it kafka-server1 /bin/bash
$ echo ‘{“username”: “fbar”, “firstname”: “foo”, “lastname”: “bar”}’ > data.json
$ kafka-console-producer –broker-list localhost:9092 –topic cql_topic < data.json

INSERT INTO connect.cql_table (userid, username, firstname, lastname) VALUES (
The uuid will be generated using the now() function which returns TIMEUUID.
The following data will be inserted to the table and the result can be confirmed by running a select cql query on the connect.cql_table from the cassandra node.
$ docker exec -it cassandra-server1 /bin/bash
$ cqlsh -e “select * from connect.cql_table;”

Summary
Kafka connect is a scalable and simple framework for moving data between Kafka and other data systems. It is a great tool for easily wiring together and when you combined Kafka with Cassandra you get an extremely scalable, available and performant system.
Kafka Connector reliably streams data from Kaka topics to Cassandra. This blog just covers how to install and configure Kafka connect for testing and development purposes. Security and scalability is out of scope of this blog.
More detailed information about Apache Kafka Connector can be found at https://docs.datastax.com/en/kafka/doc/kafka/kafkaIntro.html
At Digitalis we have extensive experience dealing with Cassandra and Kafka in complex and critical environments. We are experts in Kubernetes, data and streaming along with DevOps and DataOps practices. If you could like to know more, please let us know.
Related Articles
Getting started with Kafka Cassandra Connector
If you want to understand how to easily ingest data from Kafka topics into Cassandra than this blog can show you how with the DataStax Kafka Connector.
What is Apache NiFi?
If you want to understand what Apache NiFi is, this blog will give you an overview of its architecture, components and security features.
Apache Kafka vs Apache Pulsar
This blog describes some of the main differences between Apache Kafka and Pulsar – two of the leading data streaming Apache projects.
The post Getting started with Kafka Cassandra Connector appeared first on digitalis.io.
]]>The post Apache Kafka vs Apache Pulsar appeared first on digitalis.io.
]]>Digitalis has extensive experience in designing, building and maintaining data streaming systems across a wide variety of use cases – on premises, all cloud providers and hybrid. If you would like to know more or want to chat about how we can help you, please reach out.
When we talk about streaming data systems it’s hard to ignore Apache Kafka. Its adoption has risen dramatically over the last five years. The ecosystem around it has grown too. While Kafka dominates the online talks, meetups and conference agendas, there are other streaming platforms that exist.
In this blog post I’m going to compare Apache Kafka and Apache Pulsar. By the end of this post you should have a good comparison of the two platforms. I will cover the core components and some of the common requirements of any streaming platform.
The Core Components
Brokers
Within both Kafka and Pulsar is a broker architecture, these handle incoming messages from producers and then handle the messages that are handled by the consumers. When it comes to the messages, with Kafka the messages are pulled from the Kafka brokers to the consumers. In Pulsar it’s the other way around, they are pushed to the subscribing consumers.

One of the major advantages of Pulsar over Kafka is around the number of topics you can produce. There are hard limitations on a Kafka cluster when it comes to partitions, a limit of 4000 partitions per broker and a total of 200,000 across the entire cluster, there will be a time when you cannot create more topics. Pulsar doesn’t suffer from this limitation, you can scale with millions of topics as the data is not stored within the brokers themselves but externally in Bookkeeper nodes.
Zookeeper
Both systems use Apache Zookeeper for cluster coordination. Kafka, at present, uses Zookeeper for metadata on topic configuration and access control lists (ACLs), Pulsar uses Zookeeper for the same purposes.
With KIP-500 improvement proposal, the removal of Zookeeper in Kafka will happen – it’s currently being tested. This means that Kafka will operate on it’s own, only relying on the operating brokers for all the cluster metadata. It’s worth noting that Kafka can still be run in “legacy mode” if you still want to have Zookeeper handle its metadata.
Multi Data Center Replication
For me Pulsar wins the replication battle, it provides geo-replication out of the box. A replicated cluster can be created across multiple data centers. Applications can be blocked from consuming from local clusters until messages have been replicated and acknowledged.

Kafka has two methods for replication, Mirror Maker 2 or Confluent Replicator. If you are using the Apache Kafka distribution then you have Mirror Maker 2, it works well but takes time to configure. If you have purchased a Confluent licence then Replicator is available to you as a standalone application or a connector running on a Kafka Connect node.

Offset handling is incredibly difficult to achieve with replicated Kafka, with some custom API coding required in applications to read from the replicated cluster. Pulsar doesn’t suffer from these problems. It’s worth pointing out that multi DC operation is coming to the Confluent Platform in the future but will be part of the paid for licence.
Service Discovery
If you have used Kafka then you will be aware of the properties configuration and the adding of bootstrap servers, broker lists or Zookeeper nodes depending on the operation you are doing. When new brokers are added then properties need amending with the new addresses appended to the configuration.
Pulsar provides a proxy layer to address the cluster with a single address. This is a huge advantage over Kafka especially when you are deploying with frameworks such as Kubernetes where direct access to the brokers is not possible. Another win is that you are allowed to run as many Pulsar proxies as you wish and they can be accessed via a single point with a load balancer. For cloud based deployments this makes managing and accessing the cluster easy.
Scaling Clusters
As message frequencies increase then there comes a time when you have to scale up the cluster to accommodate the volume of messages. With Kafka this means adding more brokers to the cluster. Adding new brokers to Kafka is not an easy task, this is something Pulsar is far superior to. With Kafka the broker is added to the cluster and then the manual process of repartitioning and replicating the message data to the new broker is done. Depending on the message volumes this can take a lot of time.

Where Kafka uses the brokers for storage, Pulsar uses Apache Bookkeeper and not in the brokers themselves. The main difference is that Pulsar is storing unacknowledged messages, replication and separating the message persistence from the brokers.
With Pulsar if you want to increase message capacity then you add as many Bookkeeper instances as you require without having to add the equivalent number of brokers (as you would with Kafka).
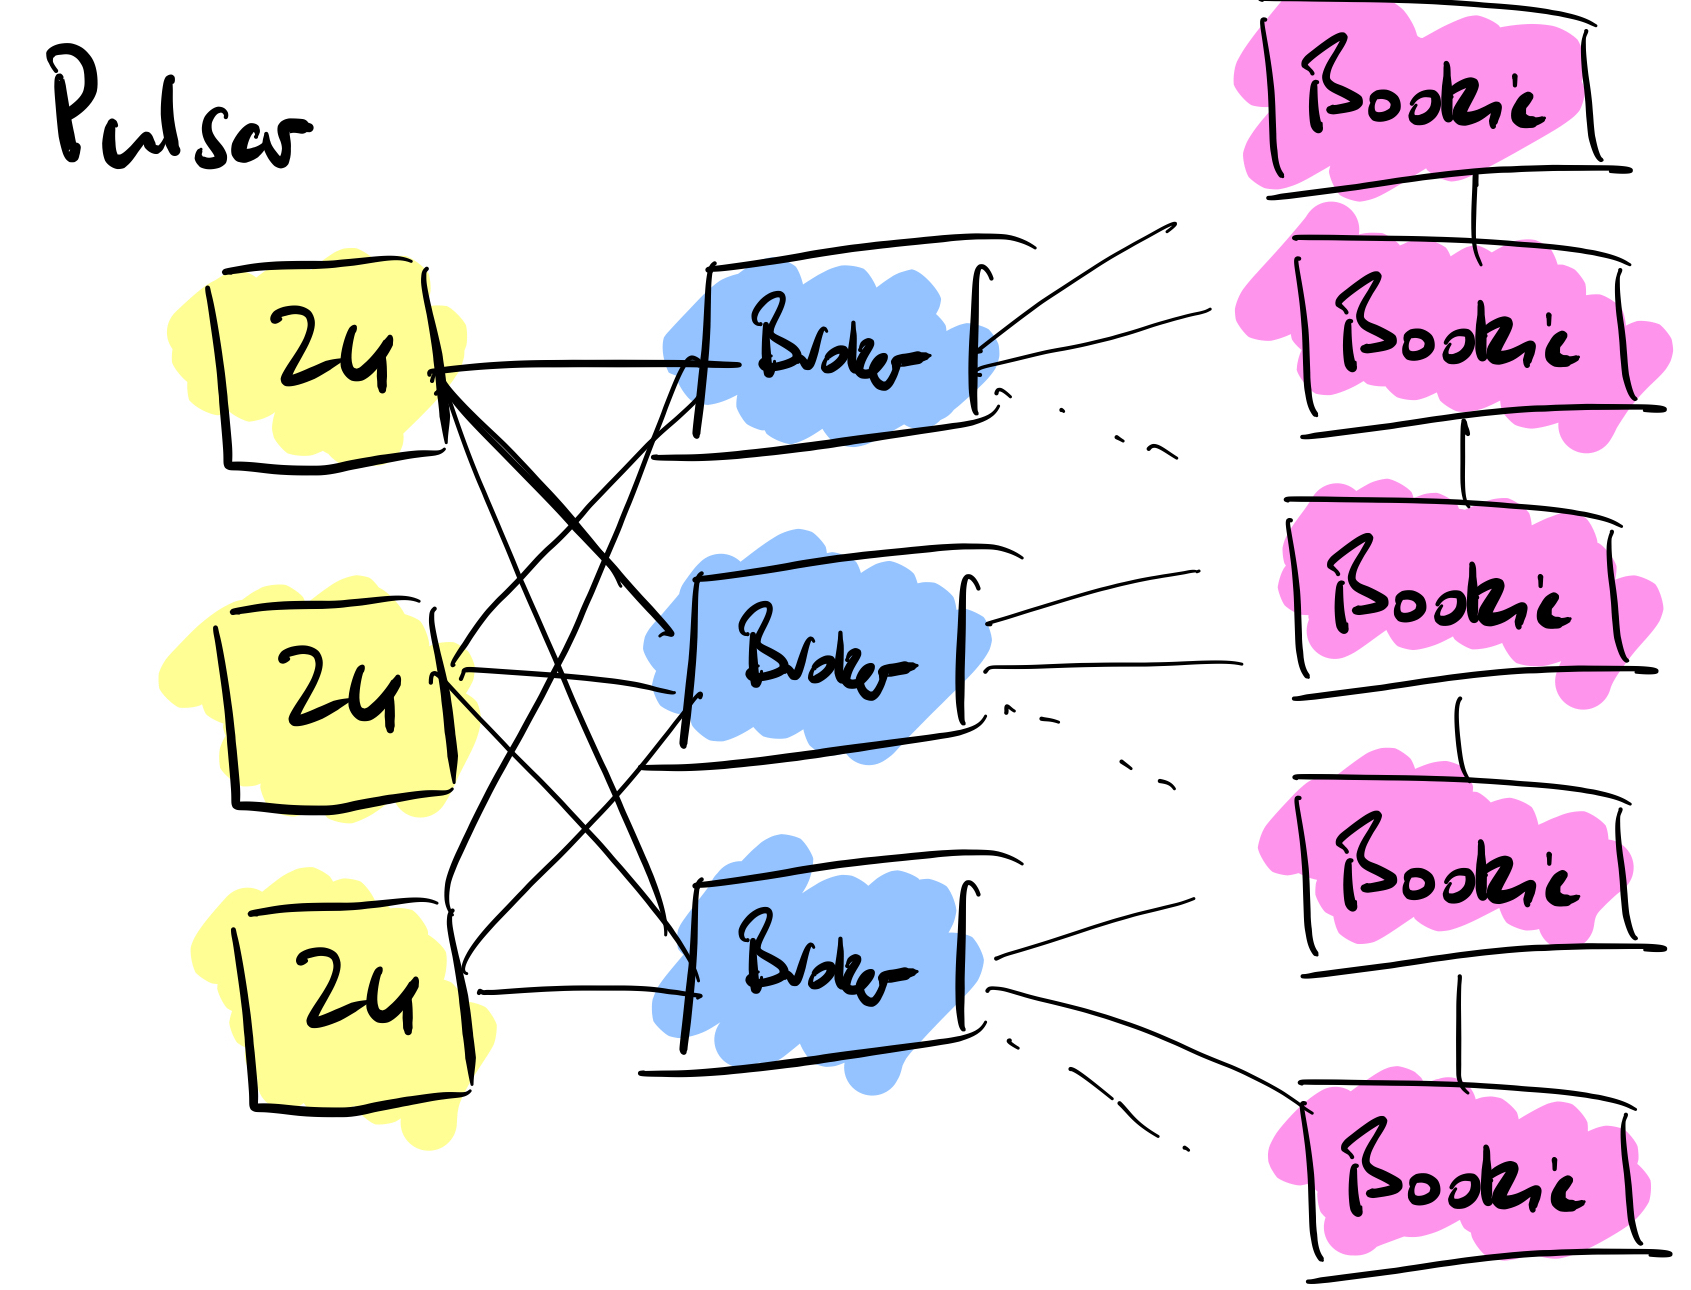
Pulsar provides the option to use non persistent topics in memory, with no data being written to disk. Note however, if the Pulsar broker disconnects from the cluster then those messages and non persistent topics will be lost, whether it is stored in the broker or in transit to the consumer
Clients – Producing and Consuming
| Language | Kafka Client | Pulsar Client |
| C | ✔ | |
| Clojure | ✔ | Using Java Interop |
| C# / .Net | ✔ | ✔ |
| Go | ✔ | ✔ |
| Groovy | ✔ | |
| Java | ✔ | ✔ |
| Spring Boot | ✔ | |
| Kotlin | ✔ | |
| Node.js | ✔ | |
| Python | ✔ | ✔ |
| Ruby | ✔ | |
| Rust | ✔ | |
| Scala | ✔ |
While there are various Kafka client libraries available it’s worth taking the time to study the Kafka features they support, not all aspects of the Kafka APIs are covered in the client libraries. For example if you want to handle Kafka’s Streaming API, only Java covers that API.
One of the interesting bonuses of the Pulsar client Java libraries is that they drop in to existing Kafka producer and consumer code. The only thing that you need to do is update the client dependency in Maven. This gives you an excellent way to evaluate Pulsar without having to refactor all your code.
There are some differences between Pulsar and Kafka when it comes to reading messages. Kafka is an immutable log, with the offset controlling which is the latest message the consumer would read from. If you don’t want to get in the detail of committing your own offsets then you can let the Kafka client API do that for you.
With Pulsar you have a choice of two consuming methods:
- The consumer interface – this behaves in the same way as a Kafka consumer, reading the latest available message from the log.
- The reader interface – this enables the application to read a specific message regardless of ordering in the log.

Reading and Persisting Data from External Sources
For anyone who remembers writing producers and consumers that handled database data, it was a difficult process and difficult to scale.

Within Kafka the Kafka Connect system provided a convenient method of either sourcing data to topics or persisting data to a sink.
Apache Pulsar has a similar method called Pulsar IO. It has the same source/sink method of acquiring data or persisting it. The disadvantage here is the support for those external systems.
For some systems such as Apache Cassandra, both systems are supported. If it’s JDBC operations that you want to do, once again both are supported well. Other open source systems like Flume, Debezium, Hadoop HDFS, Solr and ElasticSearch are supported by both systems. There are far more supported vendors for Kafka Connect than there are for Pulsar IO. While you can write your own plugins it is far easier to use an off the shelf one. In terms of connector availability Kafka Connect is an easy choice.
Please note that not all connectors for Kafka are free, some of them you will have to purchase with a licence from Confluent (the commercial arm of Kafka).
If the ease of availability and implementation is important to you then the Kafka connector support is far superior to the Pulsar option.
SQL Type Operations
Using SQL like queries on message streams can speed up the development of basic applications and bypassing any code development being required. These SQL engines also make the use of aggregating data (counting frequencies of certain keys, averages and so on) very easy.
There are SQL engines for both Kafka and Pulsar. The Kafka KSQL engine is a standalone product produced by Confluent and does not come with the Apache Kafka binaries. It is licenced under the Conflent Community Licence.
Apache Pulsar uses the Presto SQL engine to query messages with a schema stored in its schema register. Messages are required to be ingested first and then queried, where KSQL streams the data in the same way a Streaming API application would continuously run and apply the queries.
While there are a few issues with KSQL once you go beyond the basics, I prefer it over Pulsar’s read and then query mechanism.
Long Term Storage
The ability to store old data beyond the retention period of the brokers is one that’s often overlooked. It has become more important as machine learning is being used on the data for recommendation systems, or replaying the data as a system of a record.
Before Kafka Connect it was common for developers to write their own streaming jobs to persist to the likes of Amazon S3 or other types of storage buckets. Tiered storage appeared in Kafka only recently and is only available in the Confluent Kafka Platform 6.0.0 onwards as a paid for option. Persistence is to Amazon S3, Google Cloud Storage or Pure Storage FlashBlade.
Pulsar offers tiered storage as part of the open source distribution, using the Apache JCloud framework to store data to Amazon S3 or Google Cloud Storage, with other vendors planned for the future. The fact that the tiered storage is available for free and out of the box is a huge advantage for Pulsar against Kafka.
Community Support
While comparing the feature and technological aspects of Kafka and Pulsar, to me, the biggest differentiator is the community support. Everyone has questions, everyone looks for help at some point and it’s something that the Kafka community have managed to excel on, the time investment has certainly paid off.
The support in the Confluent Slack channels is excellent (if you’re not a member and you’re using Kafka, I strongly suggest you join). There are lots of meetups available online covering various aspects of the Kafka ecosystem, there is plenty going on.
Unfortunately Pulsar still has a small (but growing) community, so it can be difficult to find answers. The Kafka community support wins hands down. If it is to compete with Kafka going forward then this is the area I feel it needs to focus on the most.
Summary
As you would expect there are parts of Pulsar that shine and there are parts of Kafka that also shine. When it comes to connectivity to external sources and simple querying of the message data then Kafka definitely comes out on top.
The more core elements of the broker systems, Pulsar offers a lot upfront, especially when it comes to using Bookies for expanding persistent storage and the ability to use tiered storage out of the box for free. If you are using frameworks like Kubernetes for deployment then Pulsar’s proxy addressing makes broker access far easier and can be load balanced if you are running multiple proxies. Pulsar also wins on multi datacenter replication out of the box, the ability to block consumers until a message is populated fully is a big benefit.
If the features that Pulsar provides are important to you then you really should consider Pulsar – its ease of scale, tiered storage and multi-dc support are compelling features for any streaming application.
However, community support is vitally important also. Access to help when you need it and getting answers from those who have already done those tasks is immensely advantageous when you are deploying a streaming message system. Confluent has invested heavily in supporting the Kafka community and its ecosystem. At this point I would advise anyone wanting to learn and get up and running quickly to consider Kafka.

Jason Bell
DevOps Engineer and Developer
With over 30 years’ of experience in software, customer loyalty data and big data, Jason now focuses his energy on Kafka and Hadoop. He is also the author of Machine Learning: Hands on for Developers and Technical Professionals. Jason is considered a stalwart in the Kafka community. Jason is a regular speaker on Kafka technologies, AI and customer and client predictions with data.
Related Articles
Getting started with Kafka Cassandra Connector
If you want to understand how to easily ingest data from Kafka topics into Cassandra than this blog can show you how with the DataStax Kafka Connector.
K3s – lightweight kubernetes made ready for production – Part 3
Do you want to know securely deploy k3s kubernetes for production? Have a read of this blog and accompanying Ansible project for you to run.
K3s – lightweight kubernetes made ready for production – Part 2
Do you want to know securely deploy k3s kubernetes for production? Have a read of this blog and accompanying Ansible project for you to run.
The post Apache Kafka vs Apache Pulsar appeared first on digitalis.io.
]]>The post Apache Kafka and Regulatory Compliance appeared first on digitalis.io.
]]>Digitalis has extensive experience in designing, building and maintaining data streaming systems across a wide variety of use cases. Often in financial services, government, healthcare and other highly regulated industries.
This blog is intended to aid readers’ understanding of how Apache Kafka as a technology can support enterprises in meeting regulatory standards and compliance when used as an event broker to Security Information and Event Management (SIEM) systems.
As businesses continue to grow in complexity and embrace more and more diverse, distributed, technologies; the risk of cyber-attacks grows. This brings its own challenges from both a technical and compliance perspective; to this end we need to understand how the adoption of new technologies impact cyber risk and how we can address these through the use of modern event streaming, aggregation, correlation, and forensic techniques.
Apart from the technical considerations of any event management or SIEM system, enterprises need to understand regional legislation, laws and other compliance requirements. Virtually every regulatory compliance regime or standard such as GDPR, ISO 27001, PCI DSS, HIPAA, FERPA, Sarbanes-Oxley (SOX), FISMA, and SOC 2 have some requirements of log management to preserve audit trails of activity that addresses the CIA (Confidentiality, Integrity, and Availability) triad.
Why Event Streaming?
We need to look beyond the traditional view of data and logging, in that things happen, and you process that event which produces data, you then take that data and put it in a log or database for use at some point in the future. However, this no longer meets the security needs of modern enterprises, who need to be able to react quickly to security events.
In reality all your data is event streamed, where events happen, be it sensor readings or a transaction requests against a business system. These events happen and you process them, where a user does something, or a device does something, typically these events fall firmly in the business domain. Log files reside in the operational domain and are another example of event streams, new events can be written to the end of a log file, aka an event queue, creating a list of chronological events.
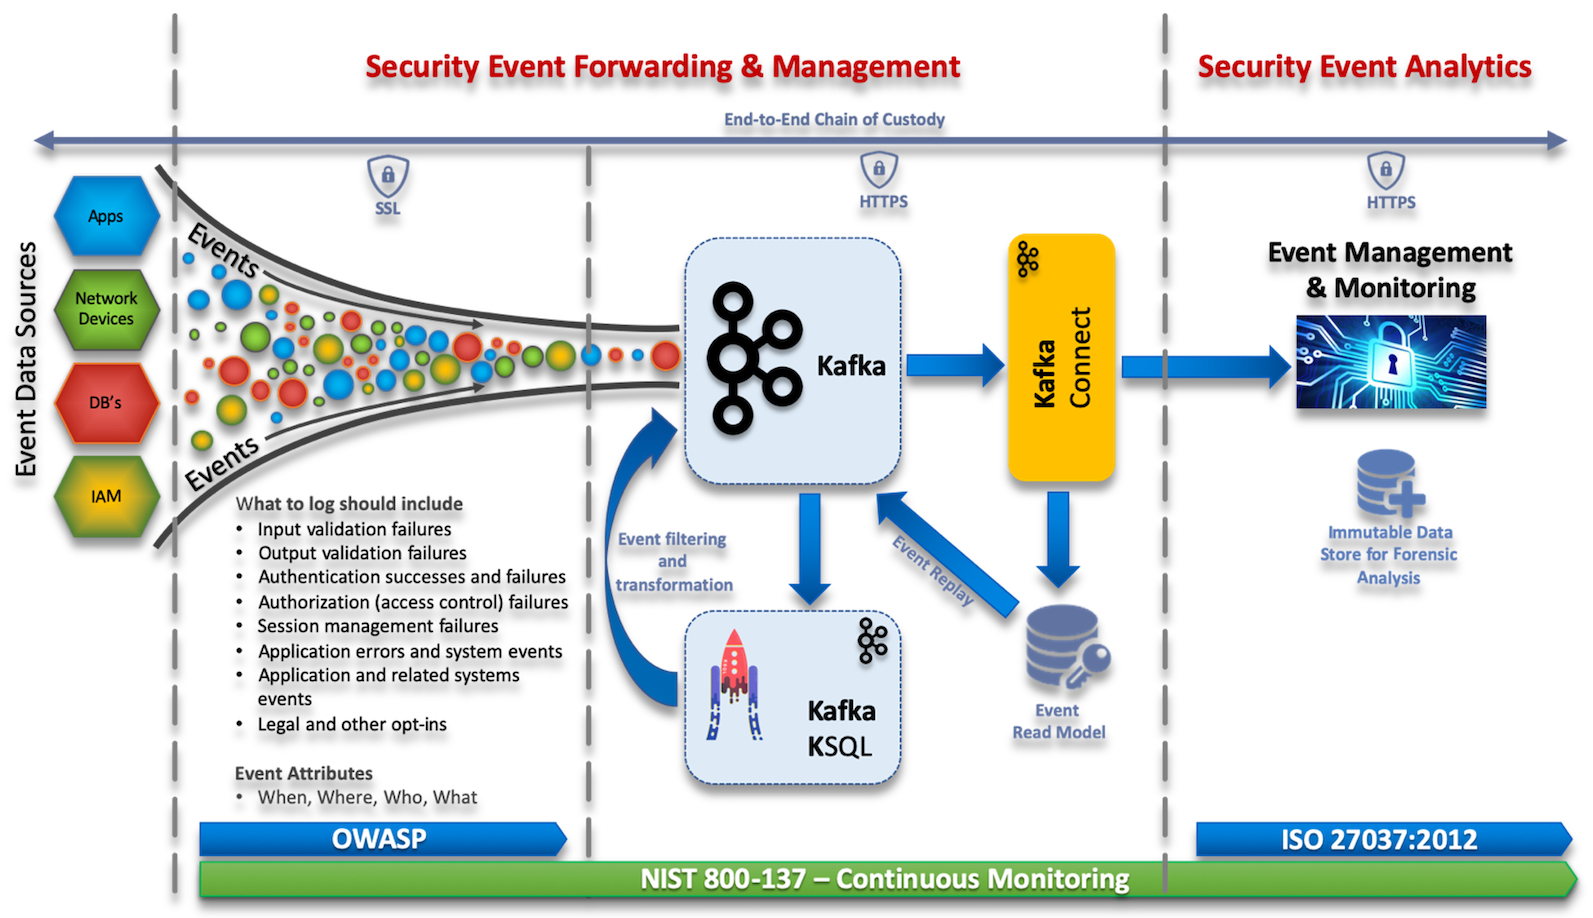
What becomes interesting is when we’re able to take events from the various enterprise systems, intersect this operational and business data and correlate events between them to provide real-time analytics. Using Apache Kafka, KSQL, and Kafka Connect, enterprises are now able to manipulate and route events in real-time to downstream analytics tools, such as SIEM systems, allowing organisations to make fast, informed decisions against complex security threats.
Apache Kafka is a massively scalable event streaming platform enabling back-end systems to share real-time data feeds (events) with each other through Kafka topics. Used alongside Kafka is KSQL, a streaming SQL engine, enabling real-time data processing against Apache Kafka. Kafka Connect is a framework to stream data into and out of Apache Kafka.
Standards & Guidance
- OWSAP Logging – Provides developers with guidance on building application logging mechanisms, especially related to security logging.
- ISO 27037:2012 – Provides guidelines for specific activities in the handling of digital evidence, which are identification, collection, acquisition and preservation of potential digital evidence that can be of evidential value.
- NIST 800-137 – Provides details for Information Security Continuous Monitoring.
Event Management & Compliance
The ability to secure event data end-to-end, from the time it leaves a client to the time it’s streamed into your event management tool is critical in guaranteeing the confidentiality, integrity and availability of this data. Kafka can help meet this by protecting data-in-motion, data-at-rest and data-in-use, through the use of three security components, encryption, authentication, and authorisation.
From a Kafka perspective this could be achieved though encryption of data-in-transit between your applications and Kafka brokers, this ensures your applications always uses encryption when reading and writing data to and from Kafka.
From a client authentication perspective, you can define that only specific applications are allowed to connect to your Kafka cluster. Authorisation usually exists under the context of authentication, where you can define that only specific applications are allowed to read from a Kafka topic. You can also restrict write access to Kafka topics to prevent data pollution or fraudulent activities.
For example, to secure client/broker communications, we would:
- Encrypt data-in transit (network traffic) via SSL/TLS
- Authentication via SASL, TLS or Kerberos
- Authorization via access control lists (ACLs) to topics
Securing data-at-rest, Kafka supports cluster encryption and authentication, including a mix of authenticated and unauthenticated, and encrypted and non-encrypted clients.
In order to be able to perform effective investigations and audits, and if needed take legal action, we need to do two things. Firstly, prove the integrity of the data through a Chain of Custody and secondly ensure the event data is handled appropriately and contains enough data to be Compliant with Regulations.
Chain of Custody
It’s critical to maintain the integrity and protection of digital evidence from the time it was created to the time it’s used in a court of law. This can be achieved through the technical controls mentioned above and operational handling processes of the data. Any break in the chain of custody or if the integrity of the data is not preserved, including any time the evidence may have been in an unsecured location, may lead to evidence presented in court being challenged and ruled inadmissible.
ISO 27037:2012 – provides guidelines for specific activities in the handling of digital evidence, which are identification, collection, acquisition and preservation of potential digital evidence that can be of evidential value.
What do we mean when we say Compliant?
This is not an easy question to answer and is dependant on the market sector and geographic location of your organisation (or in some instances where your data is hosted), as this will determine the compliance regimes that need to be followed for IT compliance. There are some commonalities between the regulative bodies for IT compliance, as a minimum you would at least have to:
- Record the time the event occurred and what has happened
- Define the scope of the information to be captured (OWASP provides guidance for logging security related events)
- Log all relevant events
- Have a documented process for handling events, breaches and threats
- Document where event data and associated records are stored
- Have a policy defining the management of event data and associated records throughout its life cycle: from creation and initial storage to the time when it becomes obsolete and is deleted
- Document what is classified as an event or incident. ITIL defines an incident as “an unplanned interruption to or quality reduction of an IT service” and an event is a “change of state that has significance for the management of an IT service or other configuration item (CI)”
- Define which events are considered a threat
Remember compliance is more about people & process than purely technical controls.
IT Compliance
The focus of IT compliance is ensuring due diligence is practiced by organisations for securing its digital assets. This is usually centred around the requirements defined by a third party, such as government, standards, frameworks, and laws. Depending on the country in which your organisation is based there are several regulation acts that require compliance reports:
ISO 27001
(International Standard)
ISO 27001 is a specification for an information security management system (ISMS) and is based on a “Plan-Do-Check-Act” four-stage process for the information security controls. An ISMS is a framework of policies and procedures that includes all legal, physical and technical controls involved in an organisation’s information risk management processes.
This framework clearly states that organisations must ensure they develop best practices in log management of their security operations, ensuring they are kept in sufficient detail to meet audit and compliance requirements.
Essentially, organisations must demonstrate their processes for confidentiality, integrity, and availability when it comes to information assets.
GDPR
(European Union Legal Framework)
The General Data Protection Regulation (GDPR) is a legal framework that sets guidelines for the collection and processing of personal information from individuals who live in the European Union (EU).
GDPR explains the general data protection regime that applies to most UK businesses and organisations. It covers the General Data Protection Regulation as it applies in the UK, tailored by the Data Protection Act 2018.
Any system would need to demonstrate demonstrable compliance with GDPR Article 25 (Data protection by design and by default) and article 32 (Security of processing).
PCI DSS
(Worldwide Payment Card Industry Data Security Standard)
The Payment Card Industry Data Security Standard (PCI DSS) consists of a set of security standards designed to ensure that ALL organisations that accept, process, store or transmit credit card information maintain a secure environment.
To become compliant, small to medium size organisations should:
- Complete the appropriate self-assessment Questionnaire (SAQ).
- Complete and obtain evidence of a passing vulnerability scan with a PCI SSC Approved Scanning Vendor (ASV). Note scanning does not apply to all merchants. It is required for SAQ A-EP, SAQ B-IP, SAQ C, SAQ D-Merchant and SAQ D-Service Provider.
- Complete the relevant Attestation of compliance in its entirety.
- Submit the SAQ, evidence of a passing scan (if applicable), and the Attestation of compliance, along with any other requested documentation.
HIPAA
(US legislation for data privacy and security of medical information)
The Health Insurance Portability and Accountability Act (HIPAA), is a US law designed to provide privacy standards to protect patients’ medical records and other personal information. There are two rules within the ACT that have an impact on log management and processing, the Security Rule and the Privacy Rule.
The HIPAA Security Rule establishes national standards to protect individuals’ electronic personal health information that is created, received, used, or maintained by a covered entity. The Security Rule requires appropriate administrative, physical and technical safeguards to ensure the confidentiality, integrity, and security of electronic protected health information.
The HIPAA Privacy Rule establishes national standards to protect individuals’ medical records. The Rule requires appropriate safeguards to protect the privacy of personal health information and sets limits and conditions on the uses and disclosures that may be made of such information without patient authorisation.
According to the act, entities covered by it must:
- Ensure the confidentiality, integrity, and availability of all e-PHI they create, receive, maintain or transmit
- Identify and protect against reasonably anticipated threats to the security or integrity of the information
- Protect against reasonably anticipated, impermissible uses or disclosures
- Ensure compliance by their workforce
FISMA
(US framework for protecting information)
The Federal Information Security Management Act (FISMA) is United States legislation that defines a comprehensive framework to protect government information, operations and assets against natural or man-made threats.
FISMA states that “any federal agency document and implement controls of information technology systems which are in support to their assets and operations.” The National Institute of Standards and Technology (NIST) has developed further the guidance to support FISMA, “NIST SP 800-92 Guide to Computer Security Log Management”.
- Organisations should establish policies and procedures for log management
- Organisations should prioritize log management appropriately throughout the organisation
- Organisations should create and maintain a log management infrastructure.
- Organisations should provide proper support for all staff with log management responsibilities.
- Organisations should establish standard log management operational processes.
FERPA
(US federal law protecting the privacy of student education records)
FERPA (Family Educational Rights and Privacy Act of 1974) is federal legislation in the United States that protects the privacy of students’ personally identifiable information (PII), educational information and directory information. As far as IT compliance is concerned, there are several activities your organisations can implement to support compliance:
- Encryption will help secure your data on a physical level
- Find and Eliminate Vulnerabilities. Perform vulnerability scans on your systems and databases
- Use Compliance-Monitoring Mechanisms
- Ensure that you have a data breach policy set in place
- Ensure that you have well-developed policies and procedures, such as an information security plan
Implementation of a SIEM and log management tools can support organisation in achieving FERPA compliance.
SOC 2 Compliance
There are three types of SOC reports, but SOC 2 focuses explicitly on the security protecting financial transactions. SOC 2 compliance requires organisations to submit a written overview of how their system works and the measures in place to protect it. External auditors assess the extent to which an organisation complies with one or more of the five trust principles based on the systems and processes in place.
- Security
- Availability
- Processing Integrity
- Confidentiality
- Privacy
References: Regulation acts and standards
- GDPR
https://eugdpr.eu/ - SOC 2
https://www.aicpa.org/content/dam/aicpa/interestareas/frc/assuranceadvisoryservices/downloadabledocuments/trust-services-criteria.pdf - Sarbanes Oxley
http://www.sarbanes-oxley-101.com/ - FISMA
https://www.dhs.gov/sites/default/files/publications/FY%202018%20CIO%20FISMA%20Metrics_V2.0.1_final_0.pdf - PCI DSS
https://www.pcisecuritystandards.org/document_library - HIPPA
https://www.hhs.gov/hipaa/for-professionals/security/laws-regulations/index.html - FERPA
https://www2.ed.gov/policy/gen/guid/fpco/ferpa/index.html - ISO 27001
https://www.iso.org/isoiec-27001-information-security.html
Related Articles
Getting started with Kafka Cassandra Connector
If you want to understand how to easily ingest data from Kafka topics into Cassandra than this blog can show you how with the DataStax Kafka Connector.
K3s – lightweight kubernetes made ready for production – Part 3
Do you want to know securely deploy k3s kubernetes for production? Have a read of this blog and accompanying Ansible project for you to run.
K3s – lightweight kubernetes made ready for production – Part 2
Do you want to know securely deploy k3s kubernetes for production? Have a read of this blog and accompanying Ansible project for you to run.
The post Apache Kafka and Regulatory Compliance appeared first on digitalis.io.
]]>The post Confirming Kafka Topic Time Based Retention Policies appeared first on digitalis.io.
]]>Anyone who is involved in maintaining a production Kafka cluster will worry about the messages that are within the system. There are a number of retention policies within the core Kafka framework, they work perfectly well and as you expect them to. It is, however, worthwhile kicking the tyres to confirm assumptions.
In this post I will create a Kafka topic and, using the command line tools to alter the retention policy and then confirm that messages are being retained as we would expect them too.
Kafka Topic Retention
Message retention is based on time, the size of the message or on both measurements. In most cases, that I’m aware of, using retention based on time is preferred by most companies.
For time based retention, the message log retention is based on either hours, minutes or milliseconds. In terms of priority to be actioned by the cluster milliseconds will win, always. You can set all three but the lowest unit size will be used.
retention.ms takes priority over retention.minutes which takes priority over retention.hours.
Where possible I advise you to use only one retention setting type, I use the retention.ms setting as a rule, this gives me the complete control I need.
A Prototype Example
- Create a topic with a retention time of 3 minutes.
- Send a message to the topic with an obvious time in the payload.
- Alter the topic configuration and add another 30 minutes of retention time.
- Consume the message after the original three minute period and see if it’s still there.
Create a Topic
I’m using a standalone Kafka instance so there’s only one partition and one replica. The interesting part in this exercise is the configuration at the end. Using the retention.ms setting I’m setting the topic retention time to three minutes (3 minutes x 60 seconds x 1000 milliseconds = 180000 milliseconds).
$ bin/kafka-topics –zookeeper localhost:2181 –create –topic rtest2 –partitions 1 –replication-factor 1 –config retention.ms=180000
Send a Test Message
I’m using the kafka-console-producer command to send a plain text message to the topic. The topic doesn’t have a schema so I can send any type of message I wish, in this example I’m sending JSON as a string.
$ bin/kafka-console-producer –broker-list localhost:9092 –topic rtest2
>{“name”:”This is a test message, this was sent at 16:15″}
The message is now in the topic log and will be deleted just after 16:18. But I’m now going to extend the retention period to preserve that message a little longer.
Alter the Topic Retention
$ bin/kafka-configs –alter –zookeeper localhost:2181 –add-config retention.ms=1800000 –entity-type topics –entity-name rtest2
Completed Updating config for entity: topic ‘rtest2’.
Check the Topic by Consuming Messages
Leaving the cluster alone for 10-15 minutes will give enough time for the original message being committed to the message log after the configuration change. Running the consumer from the earliest offset will bring back the original messages. If the configuration change has worked as expected then the original message sent at 16:15 will be output.
$ bin/kafka-console-consumer –bootstrap-server localhost:9092 –topic rtest2 –from-beginning
{“name”:”This is a test message, this was sent at 16:15″}
Processed a total of 1 messages
Okay that’s worked perfectly well as expected, now I’ll try it again because I want to confirm it again. I’ll add the date this time for added confirmation.
$ date ; bin/kafka-console-consumer –bootstrap-server localhost:9092 –topic rtest2 –from-beginning
Fri 3 Apr 16:24:18 BST 2020
{“name”:”This is a message, this was sent at 16:15″}
Processed a total of 1 messages
Looking good. I’m going to do it again because I want to make sure. While I know it’s not an accident I like to check again.
$ date ; bin/kafka-console-consumer –bootstrap-server localhost:9092 –topic rtest2 –from-beginning
Fri 3 Apr 16:24:50 BST 2020
{“name”:”This is a message, this was sent at 16:15″}
Conclusion
In this brief post I’ve proved that messages written prior to the retention change have been preserved. To confirm the assumption creating a topic, sending a message and then altering the retention time gave us the evidence we require.
Related Articles
Getting started with Kafka Cassandra Connector
If you want to understand how to easily ingest data from Kafka topics into Cassandra than this blog can show you how with the DataStax Kafka Connector.
K3s – lightweight kubernetes made ready for production – Part 3
Do you want to know securely deploy k3s kubernetes for production? Have a read of this blog and accompanying Ansible project for you to run.
K3s – lightweight kubernetes made ready for production – Part 2
Do you want to know securely deploy k3s kubernetes for production? Have a read of this blog and accompanying Ansible project for you to run.
The post Confirming Kafka Topic Time Based Retention Policies appeared first on digitalis.io.
]]>We recently deployed a Kafka Connect environment to consume Avro messages from a topic and write them into an Oracle database. Everything seemed to be functioning just fine until we got a message from the team saying their connectors had suddenly stopped working.
On further investigation we found errors like this in the Kafka Connect logs:
2020-01-17 12:56:48 ERROR Uncaught exception in thread 'kafka-producer-network-thread | producer-25':
java.lang.OutOfMemoryError: Java heap space

2020-01-17 13:02:54 ERROR Uncaught exception in thread 'kafka-producer-network-thread | producer-57':
java.lang.OutOfMemoryError: Direct buffer memory
Our first thought was that Kafka Connect just needed more heap space so we increased it from the defaults (256MB-1GB) up to a fixed 8GB heap but the errors kept coming. We increased it further up to 20GB and the errors were still happening. The machine was receiving one message every few seconds but the Kafka Connect process was using around 97% of the RAM and over 80% CPU. This machine has 8 CPUs and 32GB RAM so clearly something wasn’t right!
In this case we were using a custom Kafka Connect plugin to convert messages from the topic into the required format to be inserted into Oracle so the first thought was, do we have a memory leak in our code? We went over and over our plugin code and could not see anywhere that could possibly be leaking memory so we looked back at Kafka Connect itself.
What we could see was that our sink connectors would run until an invalid message was pushed into the topic, at which point the OutOfMemoryError exceptions started appearing in the logs. This made sense as the errors were only ever logged from producer threads and this Kafka Connect instance was only running Sink connectors, so it must be related to pushing the invalid messages to dead letter queues.
A typical connector configuration for this use case looks something like this:
{
  "name": "oracle-sink-test",
  "config": {
    "connector.class": "com.mydomain.PluginClass",
    "connector.type": "sink",
    "tasks.max": "1",
    "topics": "source_topic",
    "topic.type": "avro",
    "connection.user": "DBUserName",
    "connection.password": "DBPassword",
    "connection.url": "jdbc:oracle:thin:@(DESCRIPTION=(ADDRESS=(PROTOCOL=TCP)(HOST=oracle1)(PORT=9020))(CONNECT_DATA=(SERVER=DEDICATED)(SERVICE_NAME=SINKTEST)))",
    "db.driver": "oracle.jdbc.driver.OracleDriver",
    "key.converter": "org.apache.kafka.connect.storage.StringConverter",
    "value.converter": "io.confluent.connect.avro.AvroConverter",
    "value.converter.schema.registry.url": "https://schemaregistry:8443",
    "errors.tolerance": "all",
    "errors.deadletterqueue.topic.name":"dlq_sink_test",
    "errors.deadletterqueue.topic.replication.factor": 1,
    "errors.deadletterqueue.context.headers.enable": true
  }
}
As you can see in the example configuration our connectors were configured with dead letter queues and so we tried changing the connectors to and removing the dead letter queue config. As we had hoped, this change meant the connectors would now fail with an error when they encountered an invalid message but we also observed much lower CPU and RAM usage while the connectors were running. The next thing we tried was leaving set to and putting the dead letter queue config back into the connector. This resulted in the CPU and RAM use going back up again and instead of failing on an invalid message the connector job would hang and its consumer would eventually get timed out by the broker.
For a detailed explanation of error handling in Kafka Connect see this blog post which explains it far better than I ever could: https://www.confluent.io/blog/kafka-connect-deep-dive-error-handling-dead-letter-queues/.
So what was going on?
For a hint, here is an example of what the end of our looked like:
bootstrap.servers=broker1:9095,broker2:9095
security.protocol=SSL
ssl.truststore.location=/path/to/truststore.jks
ssl.truststore.password=truststorepassword
ssl.keystore.location=/path/to/keystore.jks
ssl.keystore.password=keystorepassword
ssl.key.password=keypassword

consumer.bootstrap.servers=broker1:9095,broker2:9095
consumer.security.protocol=SSL
consumer.ssl.truststore.location=/path/to/truststore.jks
consumer.ssl.truststore.password=truststorepassword
consumer.ssl.keystore.location=/path/to/keystore.jks
consumer.ssl.keystore.password=keystorepassword
consumer.ssl.key.password=keypassword
As you can see we have SSL enabled on the brokers. We didn’t give this much thought because there are SSL settings in there, we had no SSL-related errors in the logs and nothing else suggested that the issue was related to SSL. After much investigation and Googling for answers we found this open issue in the Kafka bug tracker: “JVM runs into OOM if (Java) client uses a SSL port without setting the security protocol” (https://issues.apache.org/jira/browse/KAFKA-4090). This was the hint we needed to fix our problem.
We had configured SSL settings for Kafka Connect’s internal connections and for the consumers but we had not configured SSL for the producer threads. This was possibly an oversight as we were only running Sink connectors on this environment, but of course there are producer threads running to push invalid messages to the dead letter queues. Based on the information in KAFKA-4090 we decided to add explicit SSL settings for the producer threads like this:
producer.bootstrap.servers=broker1:9095,broker2:9095
producer.security.protocol=SSL
producer.ssl.truststore.location=/path/to/truststore.jks
producer.ssl.truststore.password=truststorepassword
producer.ssl.keystore.location=/path/to/keystore.jks
producer.ssl.keystore.password=keystorepassword
producer.ssl.key.password=keypassword
After making this change we restarted Kafka Connect and suddenly the CPU use went from 80-90% down to 5% and the RAM use went down from 95% to just the Java heap size plus a little (around 300MB in total as the heap was now set to 256MB-1GB).
We reverted the connector configuration back to with the dead letter queue configured and hey presto! messages started being consumed from the topic and the invalid messages were being correctly pushed to the dead letter queue.
So in summary, if you are seeing unexpected out of memory exceptions in Kafka Connect and you are using SSL to communicate with the brokers, make sure you configure the SSL settings individually for all three types of connection – internal connections, consumers and producers.
Related Articles
K3s – lightweight kubernetes made ready for production – Part 3
Do you want to know securely deploy k3s kubernetes for production? Have a read of this blog and accompanying Ansible project for you to run.
K3s – lightweight kubernetes made ready for production – Part 2
Do you want to know securely deploy k3s kubernetes for production? Have a read of this blog and accompanying Ansible project for you to run.
K3s – lightweight kubernetes made ready for production – Part 1
Do you want to know securely deploy k3s kubernetes for production? Have a read of this blog and accompanying Ansible project for you to run.
The post Kafka Connect gotcha – SSL appeared first on digitalis.io.
]]>