
Introduction
At Digitalis we enable SSL by default to all our deployments, without exception. This is our part of a security by design core. However, more often that we would like we encounter customers that are not using SSL for their services and they find it difficult.
It is not exception with Kubernetes. There are some good applications that will come with a default SSL configuration. Many others don’t, and it’s down to the the administrators to do this.
In my opinion, even a self-signed cert is better than no SSL at all.
Luckily for us there is a fantastic operator for Kubernetes to simplify this. It’s been around for many years and we use it in all our K8s deployments. We do find again and again that this is often overlooked so I thought it would be good to review it.
Meet cert-manager
The tool I am referring to is, of course, cert-manager. Over the last few years, it has cemented itself as the de facto standard for certificate management within the Kubernetes ecosystem. It functions as a native Kubernetes controller, automating the issuance and renewal of TLS certificates while ensuring that certificates are valid and up to date. It attempts to renew certificates at a configured time before expiry, effectively eliminating the risk of service downtime due to forgotten manual renewals.
What makes cert-manager particularly powerful is its flexibility. It does not limit you to a single source of truth. Instead, it allows you to issue certificates from a variety of supported sources, including Let’s Encrypt, HashiCorp Vault, OpenBao, a simple signing key pair, or even self-signed configurations. For us at Digitalis, this versatility is crucial because it allows us to standardise our control plane while adapting the backend trust source depending on whether the service is public-facing or internal.
How do we use it?
The main ways we incorporate cert-manager into our clusters are via annotations for LoadBalancer Services or Ingress controllers, and directly through the Certificate custom resource. In a typical scenario, a website will be fronted by an Ingress or exposed via a load balancer, and from there the only thing developers need to worry about is adding the correct annotation and hostname. Once that is in place, cert-manager takes over, requests the appropriate certificate from the configured issuer, and ensures the resulting secret is wired into the Ingress or Service so that traffic is encrypted end to end.
This pattern works particularly well for public-facing HTTPS endpoints because it keeps the contract extremely simple. Platform engineers define the cluster-wide issuers and standardise on a small set of annotations, while application teams just declare the hostnames they need and a TLS secret name. There is no need for anyone to manually generate CSRs, track expiry dates, or raise tickets with an infosec team to get a new certificate approved; the platform handles the lifecycle automatically.
For internal services that do not sit behind an Ingress controller, we often go one level deeper and use the Certificate custom resource directly. In this case, a team defines a Certificate object that targets its internal Service, and cert-manager issues and renews the underlying TLS material in the same way as for external traffic. This approach is particularly useful for gRPC services, databases, message brokers, or any workload that speaks TLS natively but is never exposed to the public internet, allowing us to extend the same “SSL by default” standard across internal service-to-service communication as well as external entry points.
The example below shows a simple Ingress configuration using Traefik. The annotations would be identical if you were to be using the Gateway API or any other ingress provider.
Remember that NGinX ingress has been retired. You should consider other approaches like Traefik or the native Gateway API.
1apiVersion: networking.k8s.io/v1
2kind: Ingress
3metadata:
4  name: traefik-dashboard
5  annotations:
6    # Tell cert-manager to use our Vault issuer
7    cert-manager.io/cluster-issuer: vault-issuer
8    # Traefik-specific: limit this rule to the HTTPS entrypoint
9    traefik.ingress.kubernetes.io/router.entrypoints: websecure
10    # Traefik-specific: force TLS termination
11    traefik.ingress.kubernetes.io/router.tls: "true"
12spec:
13  ingressClassName: traefik
14  tls:
15  - hosts:
16    - traefik.internal.digitalis.io
17    secretName: traefik-tls
18  rules:
19  - host: traefik.internal.digitalis.io
20    http:
21      paths:
22      - path: /
23        pathType: Prefix
24        backend:
25          service:
26            name: traefik-dashboard-service
27            port:
28              number: 8080
29
How It Works Under the Hood
The configuration above might look simple, but it triggers a powerful automation chain. When you apply this Ingress resource, three distinct actions happen in sequence:
- Detection: The cert-manager controller observes the new Ingress resource and spots the cert-manager.io/cluster-issuer annotation. This is its signal to take action.
- Issuance: It automatically generates a certificate request for raefik.internal.digitalis.io and submits it to the specified issuer (in our case, the vault-issuer). Once the issuer validates the request and signs the certificate, cert-manager retrieves the final public certificate and private key.
- Storage & Usage: Finally, cert-manager stores these credentials inside a standard Kubernetes Secret named traefik-tls - the exact name references in the tlssection of your Ingress. Traefik watches for this secret to exist; the moment it appears, it loads the certificate and begins serving secure HTTPS traffic immediately.
This declarative model means you never actually create the traefik-tls secret yourself. You simply declare that you need it, and the platform ensures it exists.
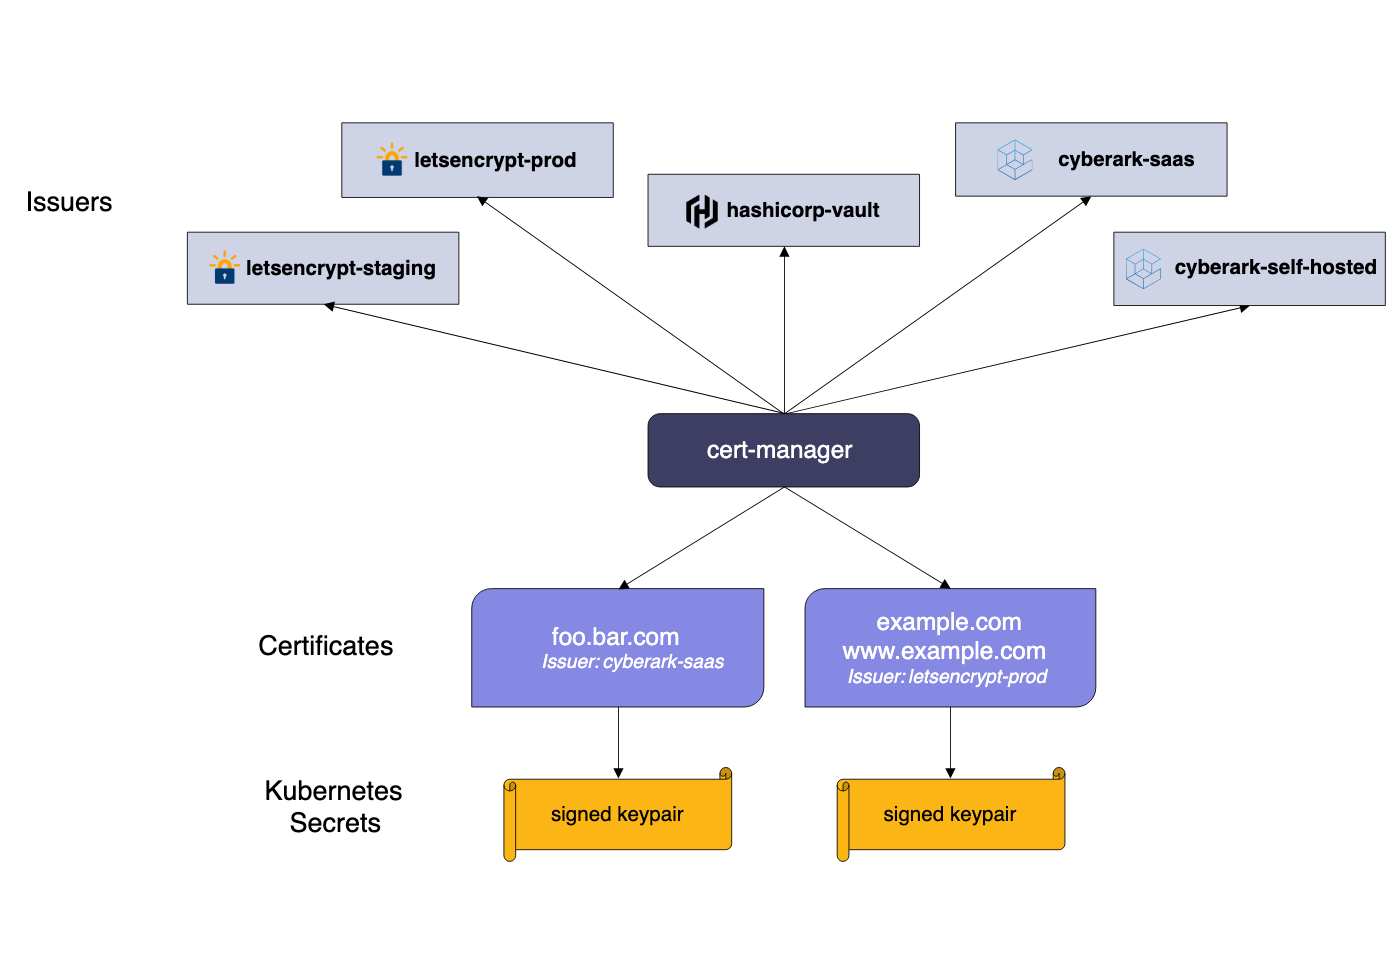
The Architecture of Trust
To understand how cert-manager simplifies operations, one must look at its core components: Issuers and Certificates. An Issuer (or ClusterIssuer) represents a certificate authority (CA) that is able to generate signed certificates by honouring certificate signing requests.
We generally prefer using the ClusterIssuer resource because it is scoped globally across the entire cluster. This approach reduces administrative overhead significantly. By defining our trusted authorities once at the cluster level - whether that is a connection to our corporate Vault PKI or a production Let's Encrypt endpoint, developers working in individual namespaces do not need to understand the intricacies of the handshake. They simply consume the resource.
Defining a Cluster Issuer
To illustrate how we bridge the gap between Kubernetes and our internal PKI, here is a practical example of a ClusterIssuer configuration. This resource tells cert-manager how to communicate with HashiCorp Vault or OpenBao. In this setup, we use the Kubernetes authentication method, which allows the issuer to authenticate with Vault using a service account token rather than managing long-lived credentials.
1apiVersion: cert-manager.io/v1
2kind: ClusterIssuer
3metadata:
4  name: vault-issuer
5spec:
6  vault:
7    server: https://vault.internal.digitalis.io:8200
8    path: pki/sign/k8s-cluster-01
9    auth:
10      kubernetes:
11        mountPath: /v1/auth/kubernetes
12        role: cert-manager
13        secretRef:
14          name: issuer-token
15          key: token
16
Once this issuer is active, securing an application becomes a trivial task for any developer on the platform. They simply need to define their Ingress resource with the correct annotation. There is no need for them to generate keys, submit tickets to the security team, or manually paste certificate data into Secrets.
The following snippet demonstrates how a standard Ingress resource consumes the vault-issuer we defined above. Note the specific annotation cert-manager.io/cluster-issuer, which triggers the automation.
When this resource is applied, cert-manager observes the annotation, requests a certificate from Vault for grafana.internal.digitalis.io, and creates the grafana-tls secret automatically. If the certificate nears its expiration, cert-manager rotates it without any human intervention, ensuring the dashboard remains secure and accessible.
With cert-manager, this entire process is abstracted away. By adding a simple annotation to the Ingress resource, cert-manager detects the requirement, negotiates with the backend Authority (such as Let's Encrypt), solves the DNS-01 or HTTP-01 challenge automatically to prove domain ownership, fetches the certificate, and stores it in a Kubernetes Secret. The Ingress controller then reloads to apply the new security settings immediately.
Why We Connect It to HashiCorp Vault and OpenBao
While Let's Encrypt is excellent for public endpoints, we frequently work with enterprise customers requiring strict internal trust chains. This is where the synergy between cert-manager and HashiCorp Vault (or its free cousin OpenBao that we use more now) becomes invaluable. We configure cert-manager to authenticate against Vault using Kubernetes Service Accounts.
In this architecture, cert-manager requests a certificate, and Vault acts as the intermediate CA to sign it. This setup provides short-lived, automatically rotating certificates for internal service-to-service communication without exposing our root CA keys. It brings the same "set and forget" convenience of public web security to the deepest layers of our private infrastructure.
Requesting a custom SSL
Have you ever felt the soul-crushing pain of hand-cranking JKS files for a Java service? Same here, especially after too many long days with Apache Kafka and Apache Cassandra. Instead of wrestling with keytool incantations yet again, let cert-manager take the heat. In the example below, taken from an Apache Cassandra cluster in a office lab, cert-manager quietly does all the heavy lifting in the background.
All that is left to do is mount the generated secret into the container at a sensible path, such as /etc/cassandra/certs, and point Cassandra at it in the configuration. No more copy‑pasting key commands, no more mystery keystores - just clean, automated certificate management that lets you get back to building things instead of babysitting TLS.
1apiVersion: cert-manager.io/v1
2kind: Certificate
3metadata:
4  name: my-cassandra-tls
5spec:
6  commonName: my-cassandra.sergio.svc.cluster.local
7  dnsNames:
8  - my-cassandra.sergio.svc.cluster.local
9  - '*.my-cassandra.sergio.svc.cluster.local'
10  - my-cassandra-0.my-cassandra.sergio.svc.cluster.local
11  duration: 43800h
12  issuerRef:
13    kind: ClusterIssuer
14    name: vault-issuer
15  keystores:
16    jks:
17      create: true
18      passwordSecretRef:
19        key: password
20        name: my-cassandra-keystore-password
21    pkcs12:
22      create: true
23      passwordSecretRef:
24        key: password
25        name: my-cassandra-keystore-password
26  privateKey:
27    algorithm: RSA
28    encoding: PKCS1
29    size: 2048
30  renewBefore: 720h
31  secretName: my-cassandra-tls-cert
32  usages:
33  - digital signature
34  - key encipherment
35  - server auth
36  - client auth
Closing Thoughts
Implementing SSL/TLS should not be a hurdle that prevents you from deploying secure applications. By leveraging cert-manager, we transform a complex security requirement into a standard, automated infrastructure primitive. Whether you are running a massive distributed database on Kubernetes or a simple web frontend, there is no longer a valid excuse for running over plain HTTP.
If you are struggling to enforce encryption across your clusters or looking to integrate your PKI with modern container orchestration, it might be time to look at how your operators are configured. Security is only effective when it is easier than the alternative, and cert-manager makes secure traffic the path of least resistance.
I for one welcome our new robot overlords


.png)