If you want to understand how to easily ingest data from Kafka topics into Cassandra than this blog can show you how with the DataStax Kafka Connector.
The post Getting started with Kafka Cassandra Connector appeared first on digitalis.io.
]]>This blog provides step by step instructions on using Kafka Connect with Apache Cassandra. It provides a fully working docker-compose project on Github allowing you to explore the various features and options available to you.
If you would like to know more about how to implement modern data and cloud technologies into to your business, we at Digitalis do it all: from cloud and Kubernetes migration to fully managed services, we can help you modernize your operations, data, and applications – on-premises, in the cloud and hybrid.
We provide consulting and managed services on wide variety of technologies including Apache Cassandra and Apache Kafka.
Contact us today for more information or to learn more about each of our services.
What is a Kafka connect
Kafka Connect streams data between Apache Kafka and other data systems. Kafka Connect can copy data from applications to Kafka topics for stream processing. Additionally data can be copied from Kafka topics to external data systems like Elasticsearch, Cassandra and lots of others. There is a wide set of pre-existing Kafka Connectors for you to use and its straightforward to build your own.
If you have not come across it before, here is an introductory video from Confluent giving you an overview of Kafka Connect.
Kafka connect can be run either standalone mode for quick testing or development purposes or can be run distributed mode for scalability and high availability.
Ingesting data from Kafka topics into Cassandra
As mentioned above, Kafka Connect can be used for copying data from Kafka to Cassandra. DataStax Apache Kafka Connector is an open-source connector for copying data to Cassandra tables.
The diagram below illustrates how the Kafka Connect fits into the ecosystem. Data is published onto Kafka topics and then it is consumed and inserted into Apache Cassandra by Kafka Connect.
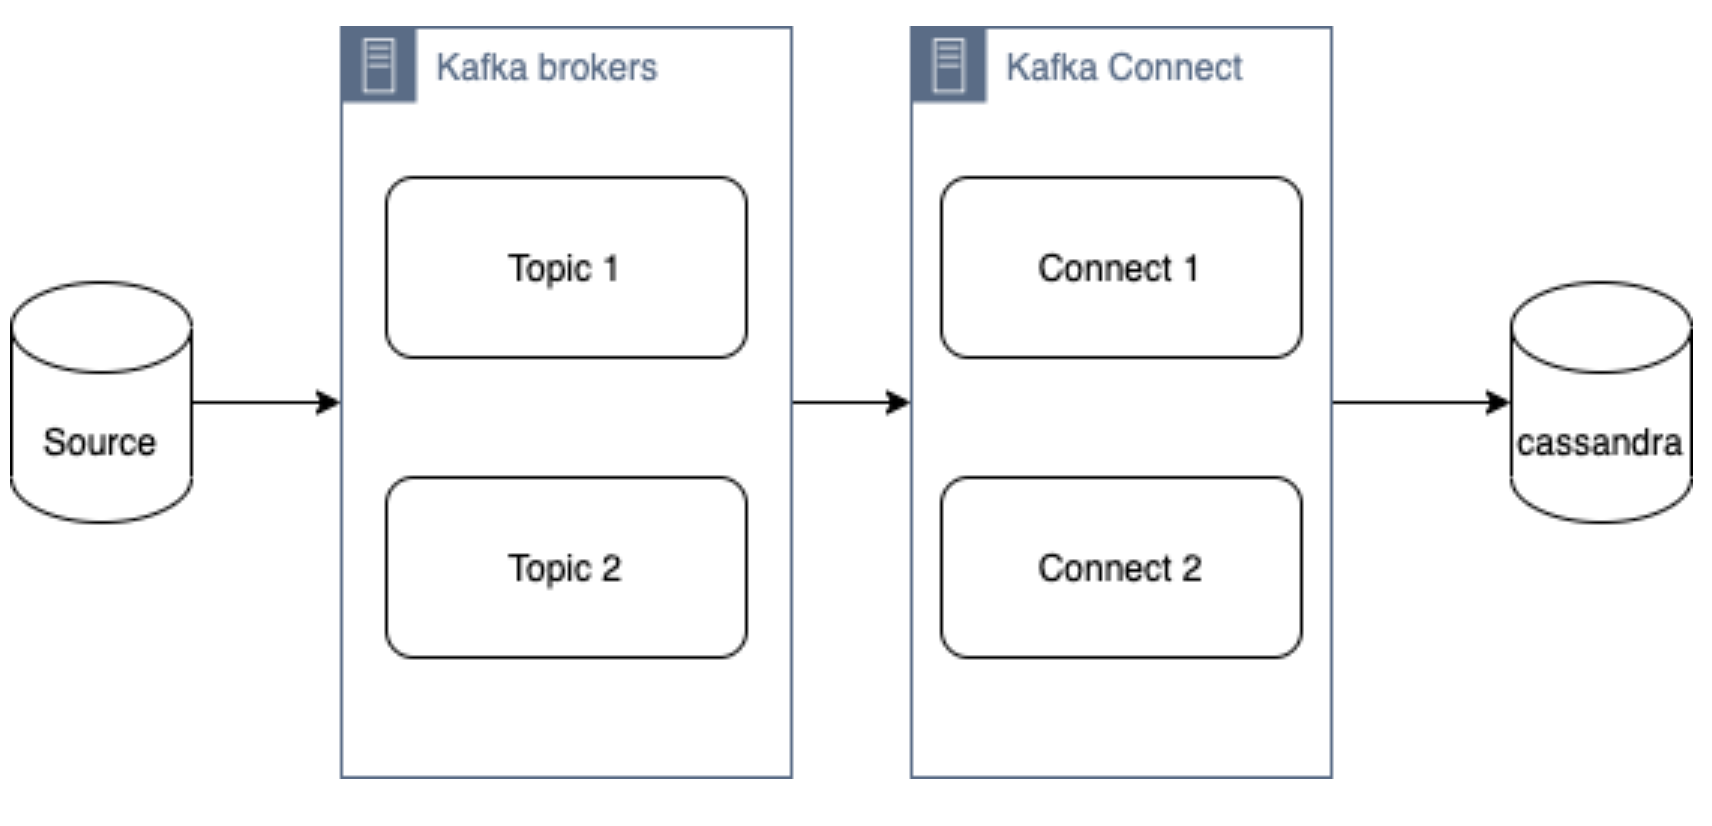
DataStax Apache Kafka Connector
The DataStax Apache Kafka Connector can be used to push data to the following databases:
- Apache Cassandra 2.1 and later
- DataStax Enterprise (DSE) 4.7 and later
Kafka Connect workers can run one or more Cassandra connectors and each one creates a DataStax java driver session. A single connector can consume data from multiple topics and write to multiple tables. Multiple connector instances are required for scenarios where different global connect configurations are required such as writing to different clusters, data centers etc.
Kafka topic to Cassandra table mapping
The DataStax connector gives you several option on how to configure it to map data on the topics to Cassandra tables.
The options below explain how each mapping option works.
Note – in all cases. you should ensure that the data types of the message field are compatible with the data type of the target table column.
Basic format
This option maps the data key and the value to the Cassandra table columns. See here for more detail.
JSON format
This option maps the individual fields in the data key or value JSON to Cassandra table fields. See here for more detail.
AVRO format
Kafka Struct
CQL query
This option maps the individual fields in the data key or value JSON to Cassandra table fields. See here for more detail.
Let’s try it!
All required files are in https://github.com/digitalis-io/kafka-connect-cassandra-blog. Just clone the repo to get started.
The examples are using docker and docker-compose .It is easy to use docker and docker-compose for testing locally. Installation instructions for docker and docker-compose can be found here:
The example on github will start up containers running everything needed in this blog – Kafka, Cassandra, Connect etc..
docker-compose.yml file
The following resources are defined in the projects docker-compose.yml file:
- A bridge network called kafka-net
- Zookeeper server
- 3 Kafka broker server
- Kafka schema registry server
- Kafka connect server
- Apache Cassandra cluster with a single node
This section of the blog will take you through the fully working deployment defined in the docker-compose.yml file used to start up Kafka, Cassandra and Connect.
Bridge network
networks:
 kafka-net:
driver: bridgeApache Zookeeper is (currently) an integral part of the Kafka deployment which keeps track of the Kafka nodes, topics etc. We are using the confluent docker image (confluentinc/cp-zookeeper) for Zookeeper.
zookeeper-server:
   image: 'confluentinc/cp-zookeeper:latest'
   container_name: 'zookeeper-server'
   hostname: 'zookeeper-server'
   healthcheck:
     test: ["CMD-SHELL", "nc -z localhost 2181 || exit 1" ]
     interval: 5s
     timeout: 5s
     retries: 60
   networks:
     - kafka-net
   ports:
     - '2181:2181'
   environment:
     - ZOOKEEPER_CLIENT_PORT=2181
     - ZOOKEEPER_SERVER_ID=1
Kafka brokers
Kafka brokers store topics and messages. We are using the confluentinc/cp-kafka docker image for this.
As Kafka brokers in this setup of Kafka depend on Zookeeper, we instruct docker-compose to wait for Zookeeper to be up and running before starting the brokers. This is defined in the depends_on section.
kafka-server1:
   image: 'confluentinc/cp-kafka:latest'
   container_name: 'kafka-server1'
   hostname: 'kafka-server1'
   healthcheck:
     test: ["CMD-SHELL", "nc -z localhost 9092 || exit 1" ]
     interval: 5s
     timeout: 5s
     retries: 60
   networks:
     - kafka-net
   ports:
     - '9092:9092'
   environment:
     - KAFKA_ZOOKEEPER_CONNECT=zookeeper-server:2181
     - KAFKA_ADVERTISED_LISTENERS=PLAINTEXT://kafka-server1:9092
     - KAFKA_BROKER_ID=1
   depends_on:
     - zookeeper-server

 kafka-server2:
   image: 'confluentinc/cp-kafka:latest'
   container_name: 'kafka-server2'
   hostname: 'kafka-server2'
   healthcheck:
     test: ["CMD-SHELL", "nc -z localhost 9092 || exit 1" ]
     interval: 5s
     timeout: 5s
     retries: 60
   networks:
     - kafka-net
   ports:
     - '9093:9092'
   environment:
     - KAFKA_ZOOKEEPER_CONNECT=zookeeper-server:2181
     - KAFKA_ADVERTISED_LISTENERS=PLAINTEXT://kafka-server2:9092
     - KAFKA_BROKER_ID=2
   depends_on:
     - zookeeper-server

 kafka-server3:
   image: 'confluentinc/cp-kafka:latest'
   container_name: 'kafka-server3'
   hostname: 'kafka-server3'
   healthcheck:
     test: ["CMD-SHELL", "nc -z localhost 9092 || exit 1" ]
     interval: 5s
     timeout: 5s
     retries: 60
   networks:
     - kafka-net
   ports:
     - '9094:9092'
   environment:
     - KAFKA_ZOOKEEPER_CONNECT=zookeeper-server:2181
     - KAFKA_ADVERTISED_LISTENERS=PLAINTEXT://kafka-server3:9092
     - KAFKA_BROKER_ID=3
   depends_on:
     - zookeeper-server
Schema registry
Schema registry is used for storing schemas used for the messages encoded in AVRO, Protobuf and JSON.
The confluentinc/cp-schema-registry docker image is used.
 kafka-sr1:
   image: 'confluentinc/cp-schema-registry:latest'
   container_name: 'kafka-sr1'
   hostname: 'kafka-sr1'
   healthcheck:
     test: ["CMD-SHELL", "nc -z kafka-sr1 8081 || exit 1" ]
     interval: 5s
     timeout: 5s
     retries: 60
   networks:
     - kafka-net
   ports:
     - '8081:8081'
   environment:
     - SCHEMA_REGISTRY_KAFKASTORE_BOOTSTRAP_SERVERS=kafka-server1:9092,kafka-server2:9092,kafka-server3:9092
     - SCHEMA_REGISTRY_HOST_NAME=kafka-sr1
     - SCHEMA_REGISTRY_LISTENERS=http://kafka-sr1:8081
   depends_on:
     - zookeeper-server
Kafka connect
Kafka connect writes data to Cassandra as explained in the previous section.
 kafka-connect1:
   image: 'confluentinc/cp-kafka-connect:latest'
   container_name: 'kafka-connect1'
   hostname: 'kafka-connect1'
   healthcheck:
     test: ["CMD-SHELL", "nc -z localhost 8082 || exit 1" ]
     interval: 5s
     timeout: 5s
     retries: 60
   networks:
     - kafka-net
   ports:
     - '8082:8082'
   volumes:
     - ./vol-kafka-connect-jar:/etc/kafka-connect/jars
     - ./vol-kafka-connect-conf:/etc/kafka-connect/connectors
   environment:
     - CONNECT_BOOTSTRAP_SERVERS=kafka-server1:9092,kafka-server2:9092,kafka-server3:9092
     - CONNECT_REST_PORT=8082
     - CONNECT_GROUP_ID=cassandraConnect
     - CONNECT_CONFIG_STORAGE_TOPIC=cassandraconnect-config
     - CONNECT_OFFSET_STORAGE_TOPIC=cassandraconnect-offset
     - CONNECT_STATUS_STORAGE_TOPIC=cassandraconnect-status
     - CONNECT_KEY_CONVERTER=org.apache.kafka.connect.json.JsonConverter
     - CONNECT_VALUE_CONVERTER=org.apache.kafka.connect.json.JsonConverter
     - CONNECT_INTERNAL_KEY_CONVERTER=org.apache.kafka.connect.json.JsonConverter
     - CONNECT_INTERNAL_VALUE_CONVERTER=org.apache.kafka.connect.json.JsonConverter
     - CONNECT_KEY_CONVERTER_SCHEMAS_ENABLE=false
     - CONNECT_VALUE_CONVERTER_SCHEMAS_ENABLE=false
     - CONNECT_REST_ADVERTISED_HOST_NAME=kafka-connect
     - CONNECT_PLUGIN_PATH=/etc/kafka-connect/jars
   depends_on:
     - zookeeper-server
     - kafka-server1
     - kafka-server2
     - kafka-server3
Apache Cassandra
cassandra-server1:
   image: cassandra:latest
   mem_limit: 2g
   container_name: 'cassandra-server1'
   hostname: 'cassandra-server1'
   healthcheck:
     test: ["CMD-SHELL", "cqlsh", "-e", "describe keyspaces" ]
     interval: 5s
     timeout: 5s
     retries: 60
   networks:
     - kafka-net
   ports:
     - "9042:9042"
   environment:
     - CASSANDRA_SEEDS=cassandra-server1
     - CASSANDRA_CLUSTER_NAME=Digitalis
     - CASSANDRA_DC=DC1
     - CASSANDRA_RACK=rack1
     - CASSANDRA_ENDPOINT_SNITCH=GossipingPropertyFileSnitch
     - CASSANDRA_NUM_TOKENS=128
Kafka Connect configuration
As you may have already noticed, we have defined two docker volumes for the Kafka Connect service in the docker-compose.yml. The first one is for the Cassandra Connector jar and the second volume is for the connector configuration.
We will need to configure the Cassandra connection, the source topic for Kafka Connect to consume messages from and the mapping of the message payloads to the target Cassandra table.
Setting up the cluster
First thing we need to do is download the connector tarball file from DataStax website: https://downloads.datastax.com/#akc and then extract its contents to the vol-kafka-connect-jar folder in the accompanying github project. If you have not checked out the project, do this now.
Once you have download the tarball, extract its contents:
$ tar -zxf kafka-connect-cassandra-sink-1.4.0.tar.gz
Copy kafka-connect-cassandra-sink-1.4.0.jar to vol-kafka-connect-jar folder
$ cp kafka-connect-cassandra-sink-1.4.0/kafka-connect-cassandra-sink-1.4.0.jar vol-kafka-connect-jar
Go to the base directory of the checked out project and let’s start the containers up
$ docker-compose up -d

$ docker-compose ps
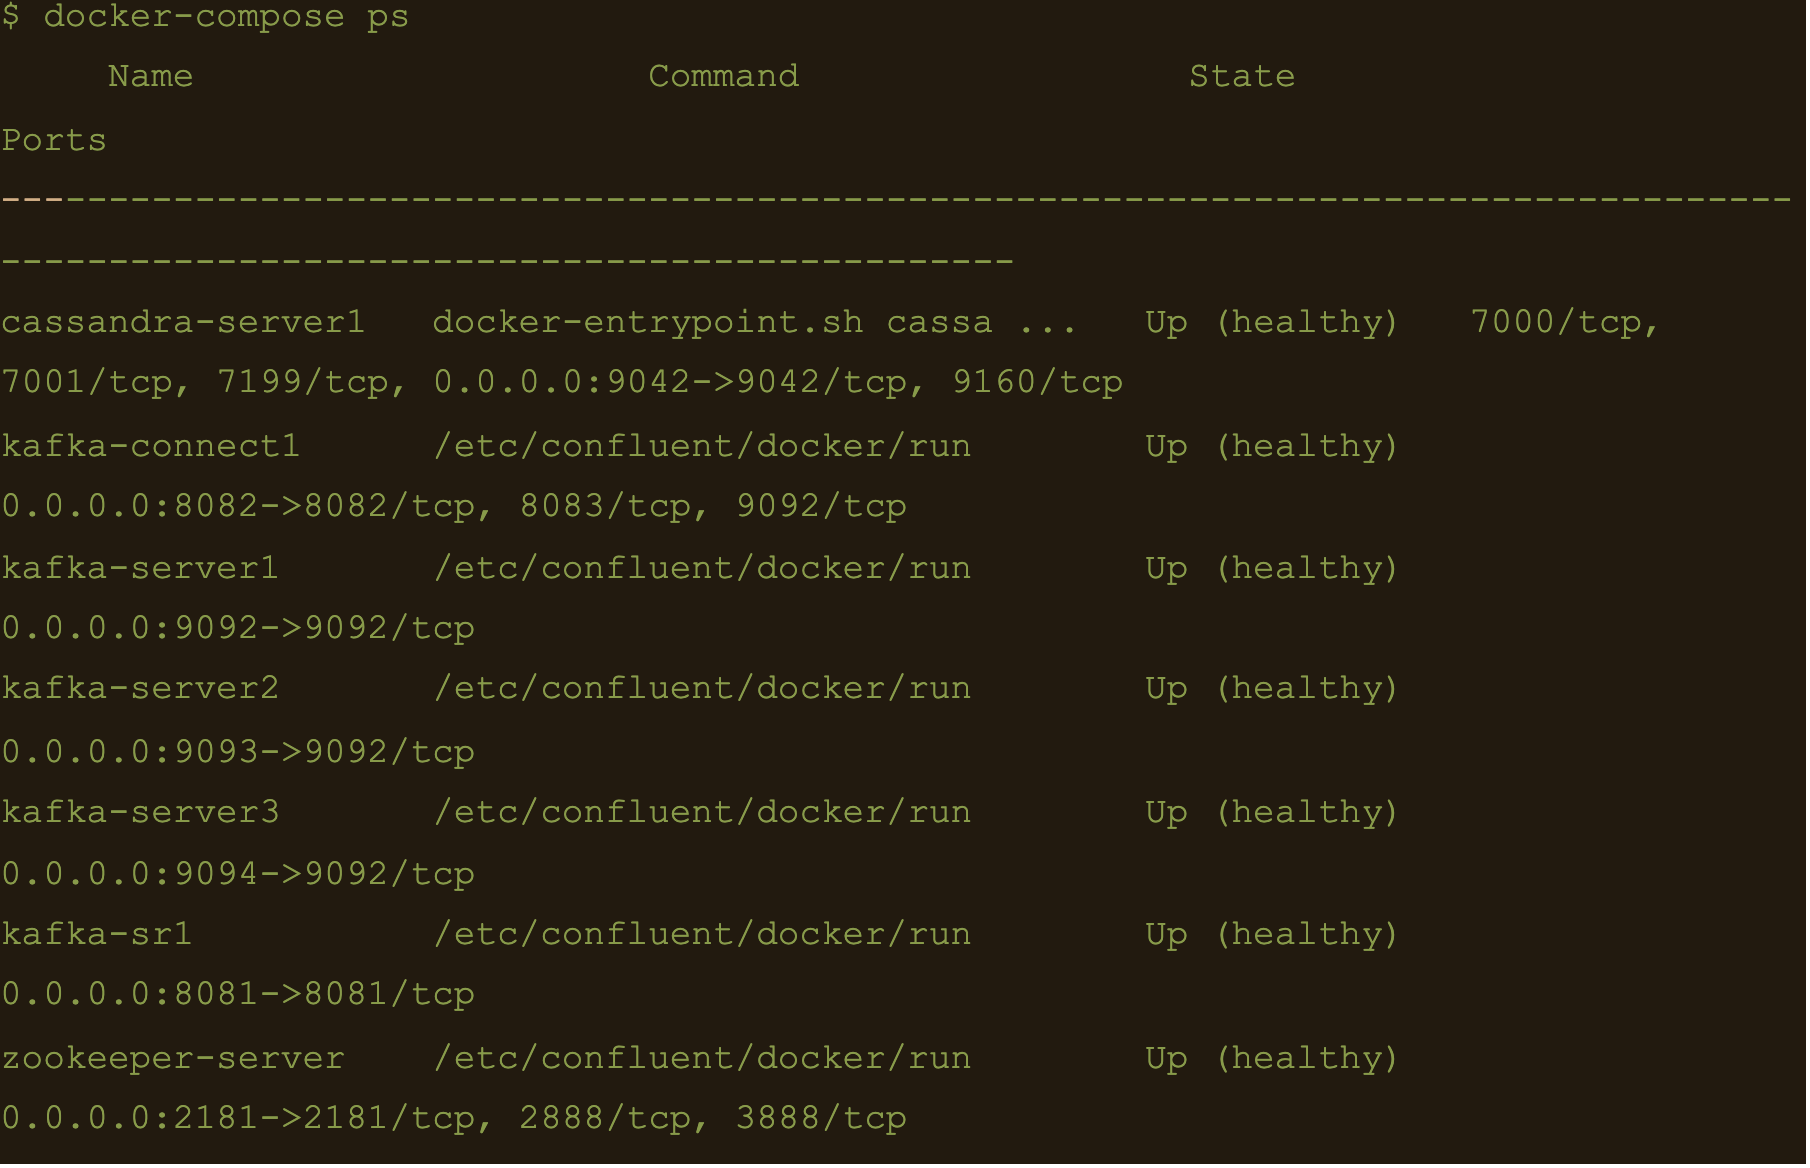
We now have Apache Cassandra, Apache Kafka and Connect all up and running via docker and docker-compose on your local machine.
You may follow the container logs and check for any errors using the following command:
$ docker-compose logs -f
Create the Cassandra Keyspace
The next thing we need to do is connect to our docker deployed Cassandra DB and create a keyspace and table for our Kafka connect to use.
Connect to the cassandra container and create a keyspace via cqlsh
$ docker exec -it cassandra-server1 /bin/bash
$ cqlsh -e “CREATE KEYSPACE connect WITH replication = {‘class’: ‘NetworkTopologyStrategy’,’DC1′: 1};”

Basic format
$ cqlsh -e “CREATE TABLE connect.basic_table (userid text PRIMARY KEY, username text);”

$ docker exec -it kafka-server1 /bin/bash
$ kafka-topics –create –topic basic_topic –zookeeper zookeeper-server:2181 –partitions 3 –replication-factor 3

$ docker exec -it kafka-connect1 /bin/bash
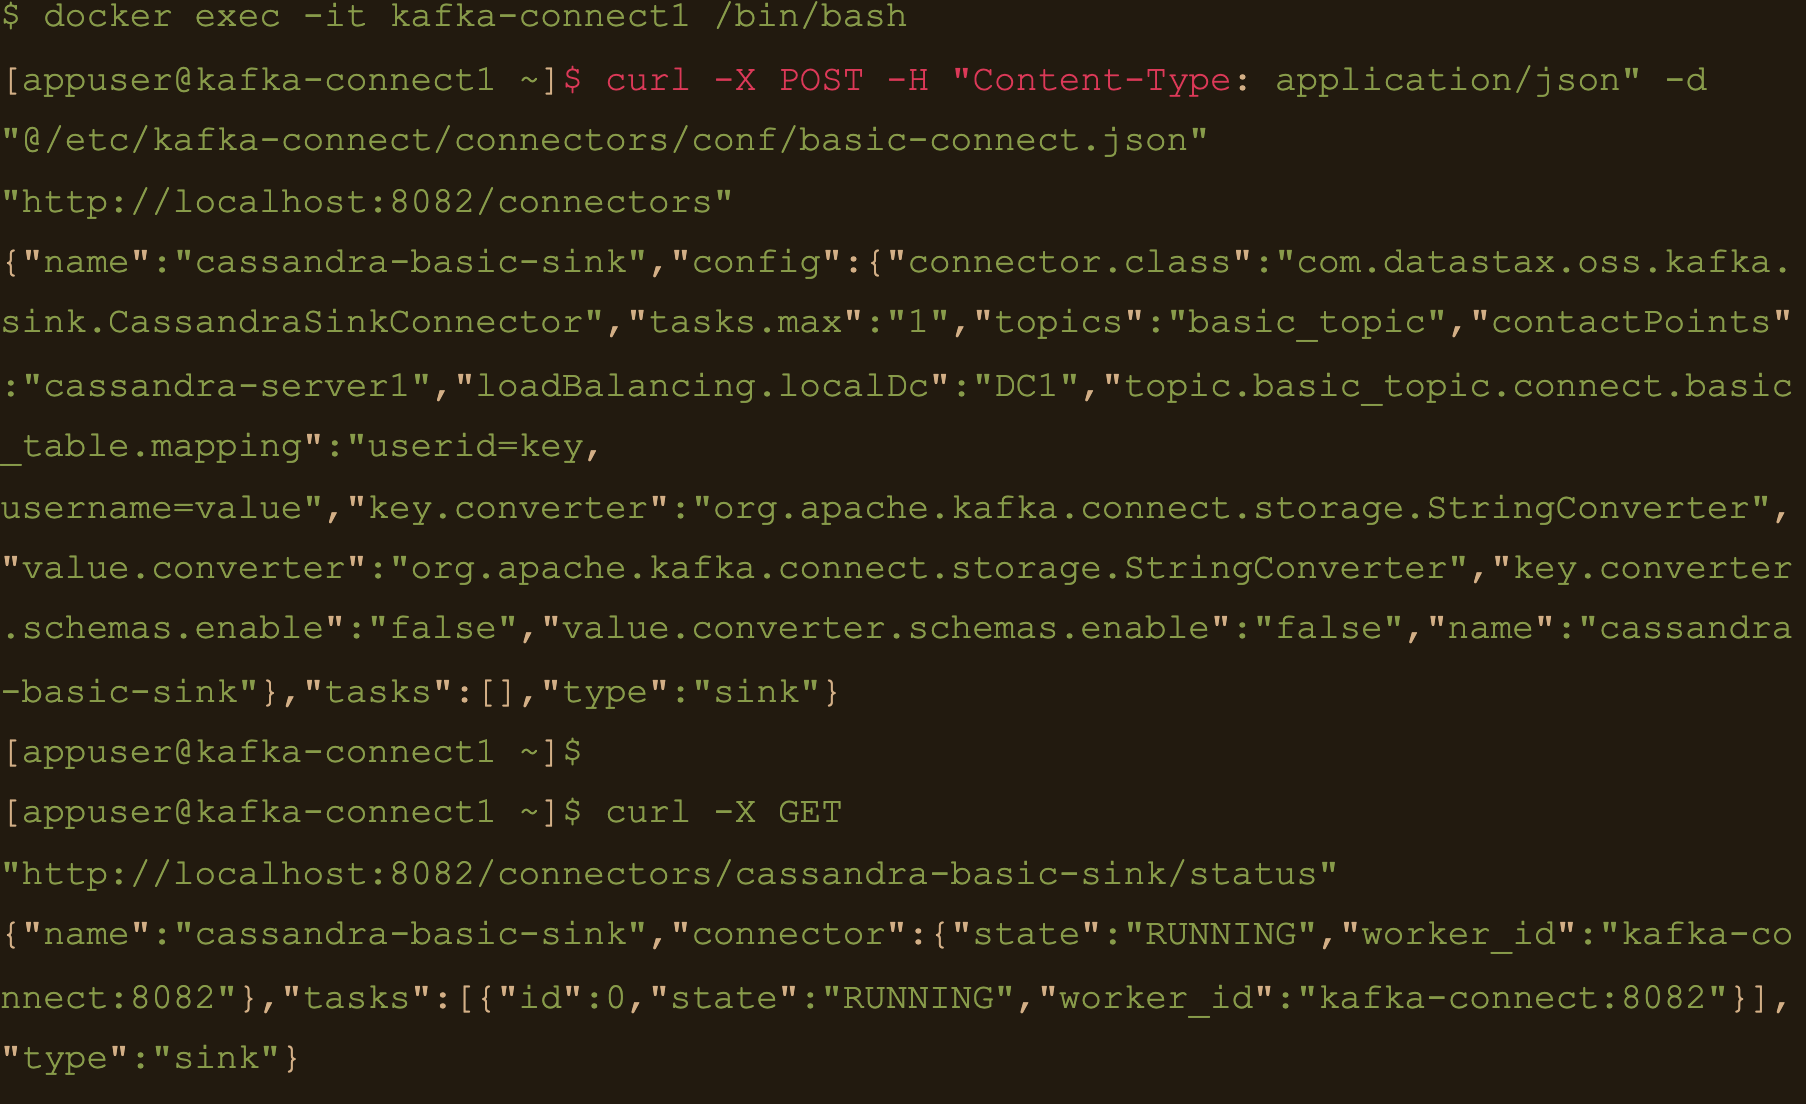
We need to create the basic connector using the basic-connect.json configuration which is mounted at /etc/kafka-connect/connectors/conf/basic-connect.json within the container
$ curl -X POST -H “Content-Type: application/json” -d “@/etc/kafka-connect/connectors/conf/basic-connect.json” “http://localhost:8082/connectors”
basic-connect.json contains the following configuration:
{
  "name": "cassandra-basic-sink", #name of the sink
  "config": {
      "connector.class": "com.datastax.oss.kafka.sink.CassandraSinkConnector", #connector class
      "tasks.max": "1", #max no of connect tasks
      "topics": "basic_topic", #kafka topic
      "contactPoints": "cassandra-server1", #cassandra cluster node
      "loadBalancing.localDc": "DC1", #cassandra DC name
      "topic.basic_topic.connect.basic_table.mapping": "userid=key, username=value", #topic to table mapping
      "key.converter": "org.apache.kafka.connect.storage.StringConverter", #use string converter for key
      "value.converter": "org.apache.kafka.connect.storage.StringConverter", #use string converter for values
      "key.converter.schemas.enable": false,  #no schema in data for the key
      "value.converter.schemas.enable": false  #no schema in data for value
  }
}
Here the key is mapped to the userid column and the value is mapped to the username column i.e
“topic.basic_topic.connect.basic_table.mapping”: “userid=key, username=value”
Both the key and value are expected in plain text format as specified in the key.converter and the value.converter configuration.
We can check status of the connector via the Kafka connect container and make sure the connector is running with the command:
$ curl -X GET “http://localhost:8082/connectors/cassandra-basic-sink/status”
$ docker exec -it kafka-server1 /bin/bash
Lets create a file containing some test data:
$ echo abc:abcvalue > data.txt
And now, using the kafka-console-producer command inject that data into the target topic:
$ kafka-console-producer –broker-list localhost:9092 –topic basic_topic –property parse.key=true –property key.separator=: < data.txt

$ docker exec -it cassandra-server1 /bin/bash
$ cqlsh -e cqlsh -e “select * from connect.basic_table;”

JSON Data
First lets create another table to store the data:
$ docker exec -it cassandra-server1 /bin/bash
$ cqlsh -e “CREATE TABLE connect.json_table (userid text PRIMARY KEY, username text, firstname text, lastname text);”

Connect to one of the Kafka brokers to create a new topic
$ docker exec -it kafka-server1 /bin/bash
$ kafka-topics –create –topic json_topic –zookeeper zookeeper-server:2181 –partitions 3 –replication-factor 3

$ docker exec -it kafka-connect1 /bin/bash
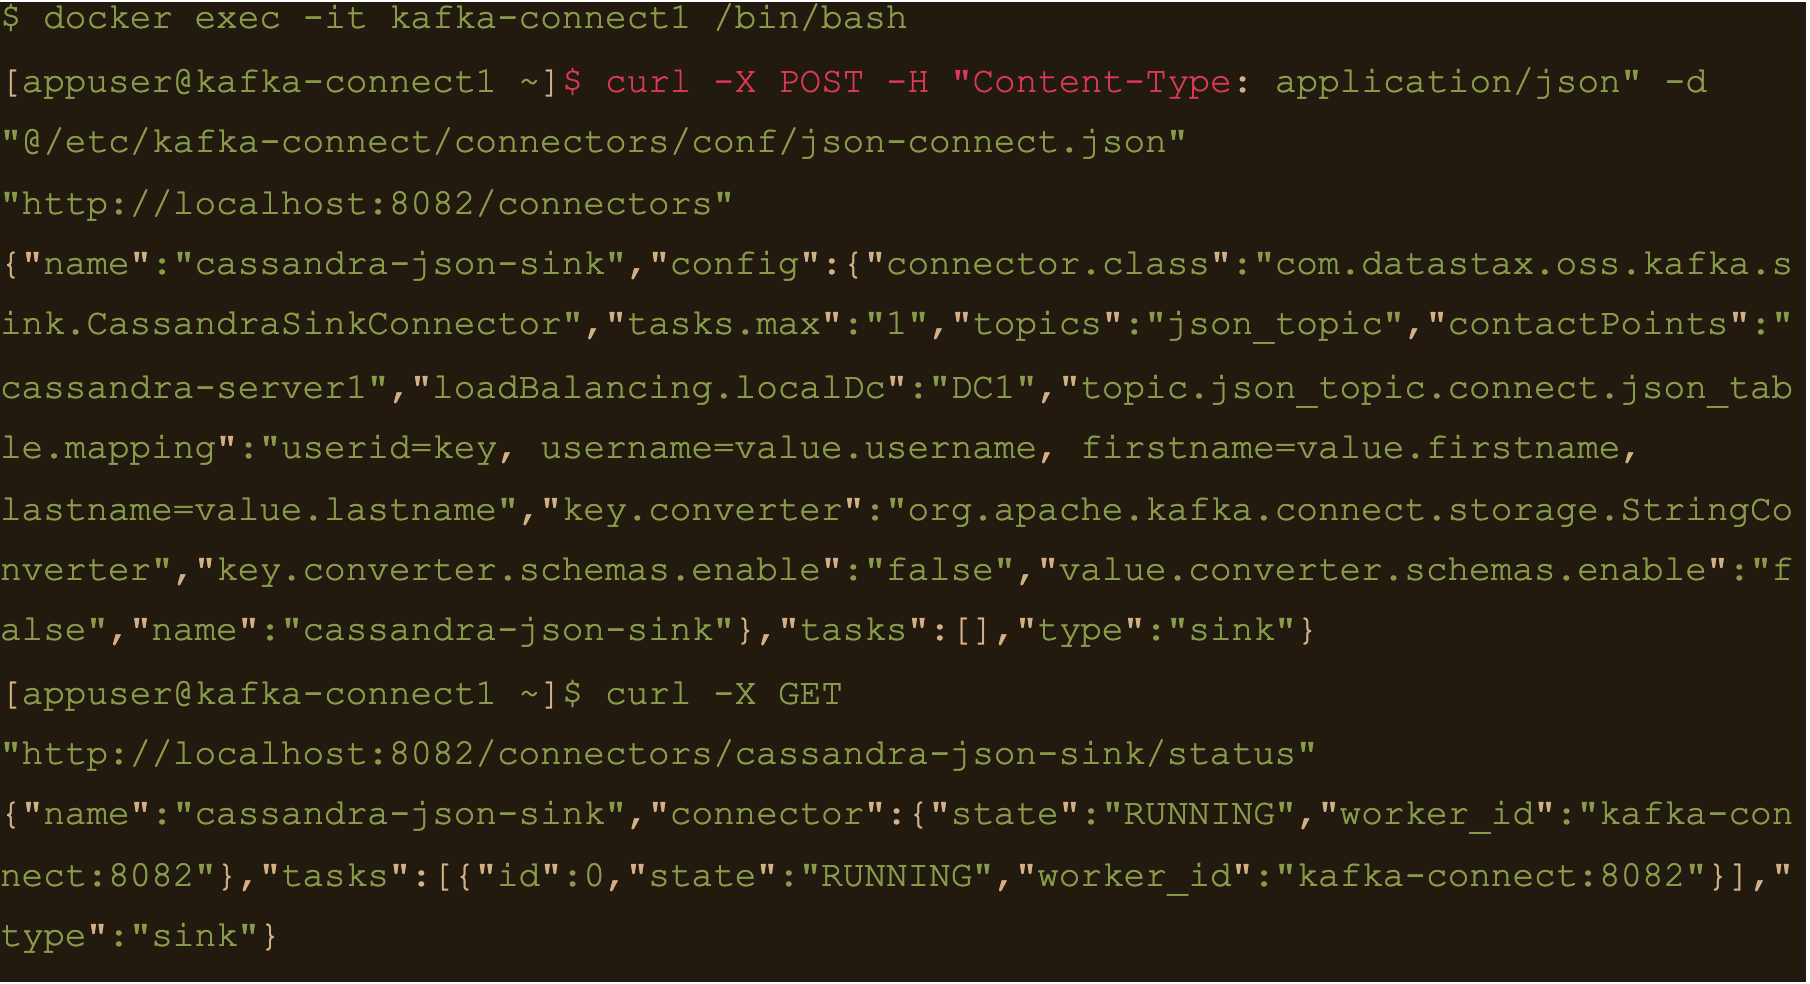
Create the connector using the json-connect.json configuration which is mounted at /etc/kafka-connect/connectors/conf/json-connect.json on the container
$ curl -X POST -H “Content-Type: application/json” -d “@/etc/kafka-connect/connectors/conf/json-connect.json” “http://localhost:8082/connectors”
Connect config has following values
{
   "name": "cassandra-json-sink",
   "config": {
       "connector.class": "com.datastax.oss.kafka.sink.CassandraSinkConnector",
       "tasks.max": "1",
       "topics": "json_topic",
       "contactPoints": "cassandra-server1",
       "loadBalancing.localDc": "DC1",
       "topic.json_topic.connect.json_table.mapping": "userid=key, username=value.username, firstname=value.firstname, lastname=value.lastname",
       "key.converter": "org.apache.kafka.connect.storage.StringConverter",
       "key.converter.schemas.enable": false,
       "value.converter.schemas.enable": false
   }
}
“topic.json_topic.connect.json_table.mapping”: “userid=key, username=value.username, firstname=value.firstname, lastname=value.lastname”
Check status of the connector and make sure the connector is running
$ docker exec -it kafka-connect1 /bin/bash
$ curl -X GET “http://localhost:8082/connectors/cassandra-json-sink/status”
Now lets connect to one of the broker nodes, generate some JSON data and then inject it into the topic we created
$ docker exec -it kafka-server1 /bin/bash
$ echo ‘abc:{“username”: “fbar”, “firstname”: “foo”, “lastname”: “bar”}’ > data.json
$ kafka-console-producer –broker-list localhost:9092 –topic json_topic –property parse.key=true –property key.separator=: < data.json

$ docker exec -it cassandra-server1 /bin/bash
$ cqlsh -e “select * from connect.json_table;”

AVRO data
First lets create a table to store the data:
$ docker exec -it cassandra-server1 /bin/bash
$ cqlsh -e “CREATE TABLE connect.avro_table (userid uuid PRIMARY KEY, username text, firstname text, lastname text);”

$ docker exec -it kafka-server1 /bin/bash
$ kafka-topics –create –topic avro_topic –zookeeper zookeeper-server:2181 –partitions 3 –replication-factor 3

$ docker exec -it kafka-connect1 /bin/bash
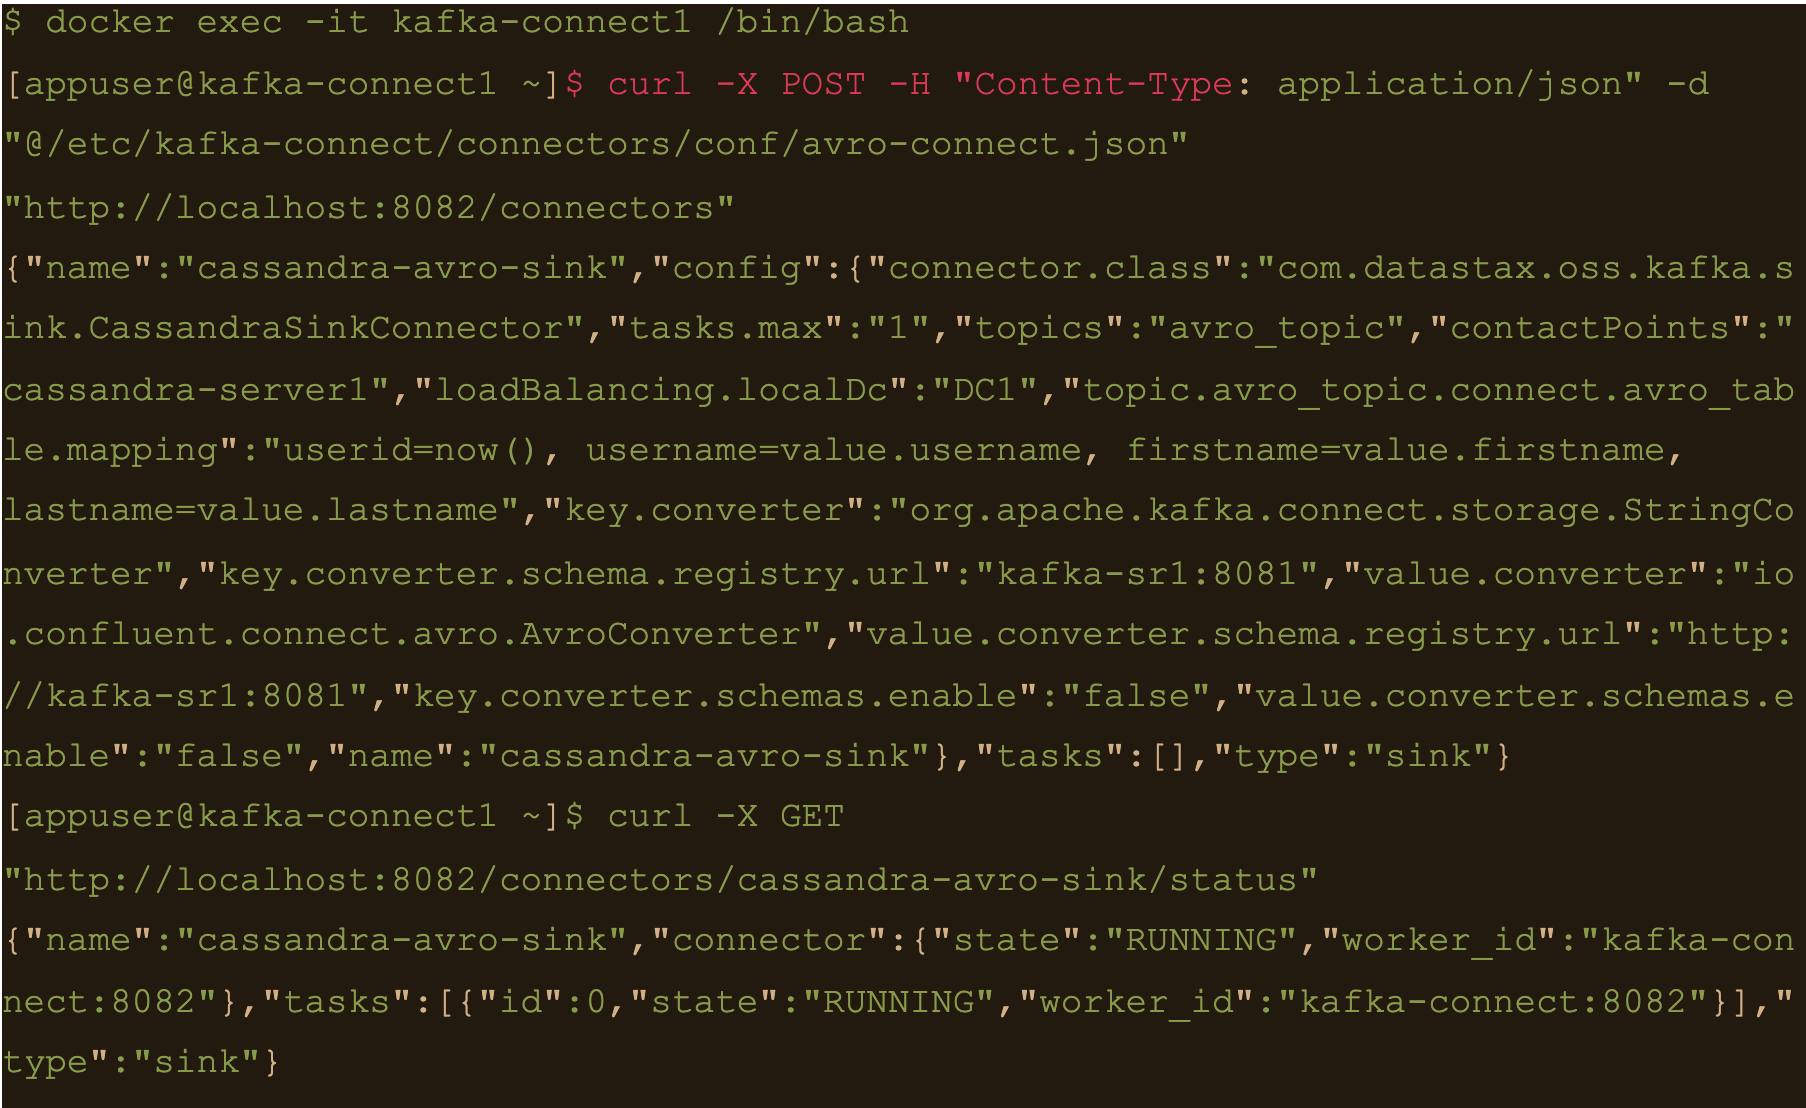
$ curl -X POST -H “Content-Type: application/json” -d “@/etc/kafka-connect/connectors/conf/avro-connect.json” “http://localhost:8082/connectors”
Avro connect configuration:
{
   "name": "cassandra-avro-sink",
   "config": {
       "connector.class": "com.datastax.oss.kafka.sink.CassandraSinkConnector",
       "tasks.max": "1",
       "topics": "avro_topic",
       "contactPoints": "cassandra-server1",
       "loadBalancing.localDc": "DC1",
       "topic.avro_topic.connect.avro_table.mapping": "userid=now(), username=value.username, firstname=value.firstname, lastname=value.lastname",
       "key.converter": "org.apache.kafka.connect.storage.StringConverter",
       "key.converter.schema.registry.url":"kafka-sr1:8081",
       "value.converter": "io.confluent.connect.avro.AvroConverter",
       "value.converter.schema.registry.url":"http://kafka-sr1:8081",
       "key.converter.schemas.enable": false,
       "value.converter.schemas.enable": false
   }
}
“topic.avro_topic.connect.avro_table.mapping”: “userid=now(), username=value.username, firstname=value.firstname, lastname=value.lastname”
Also the value converter is
“value.converter”: “io.confluent.connect.avro.AvroConverter” and its pointing at our docker deployed schema registry “value.converter.schema.registry.url”:”http://kafka-sr1:8081″
$ docker exec -it kafka-connect1 /bin/bash
$ curl -X GET “http://localhost:8082/connectors/cassandra-avro-sink/status”
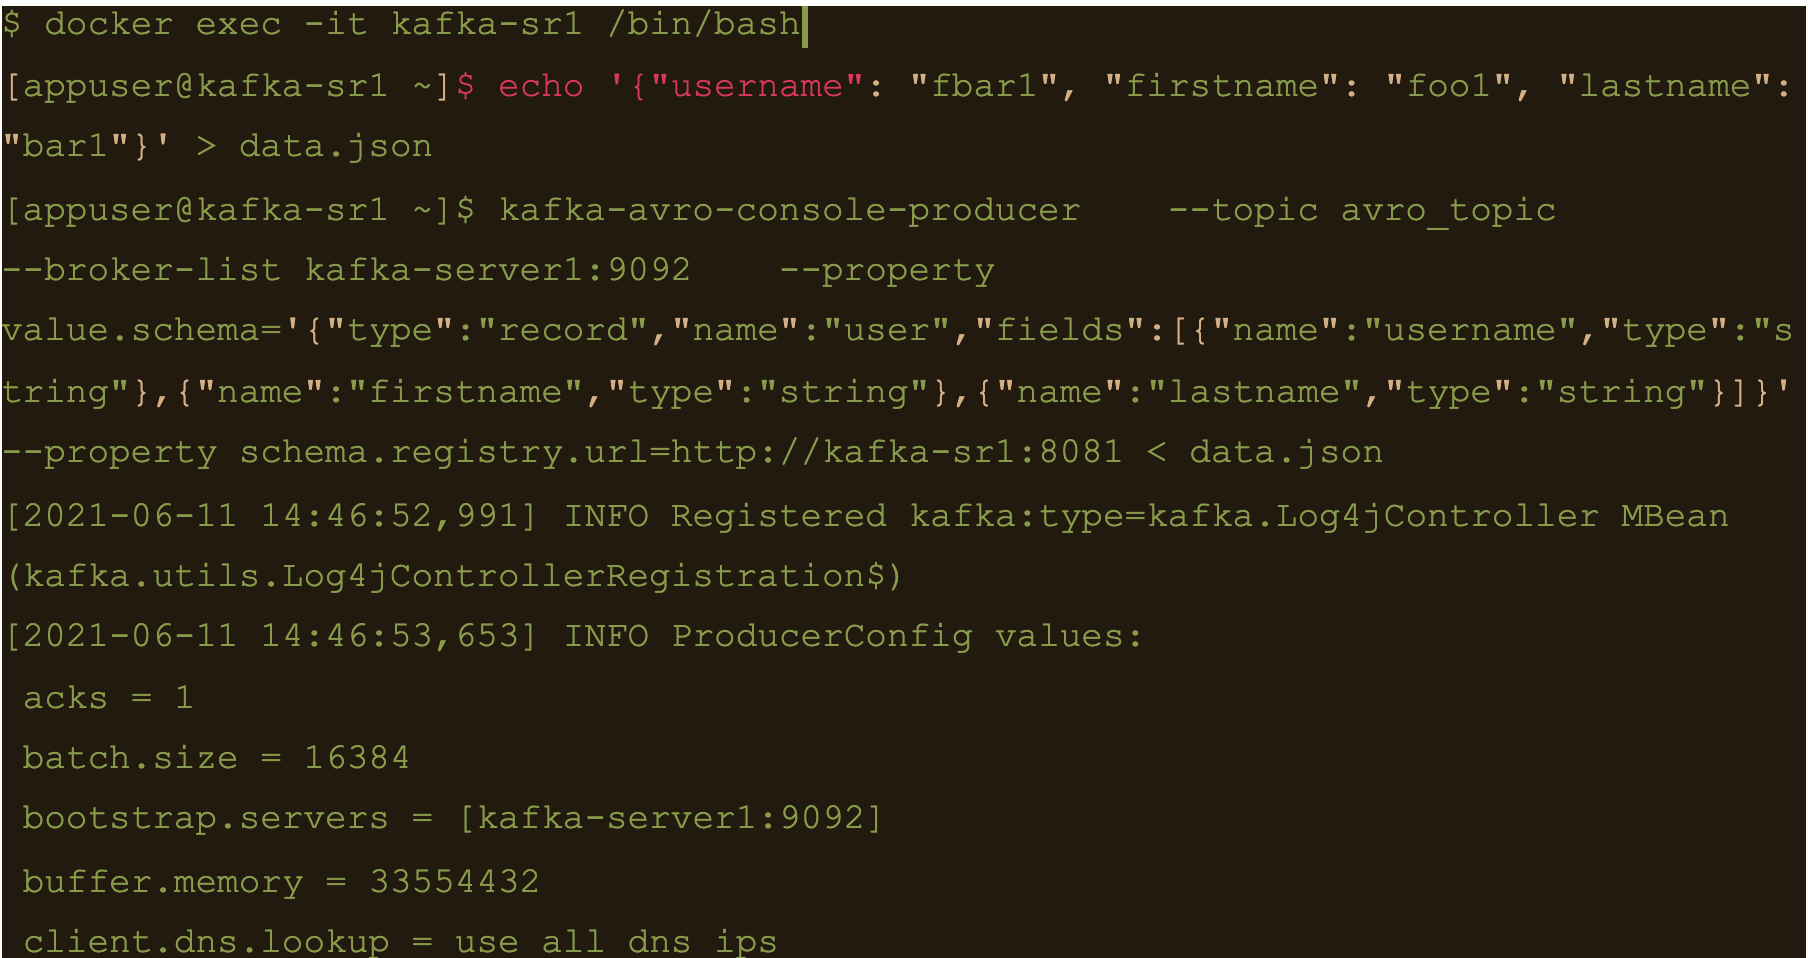
$ docker exec -it kafka-sr1 /bin/bash
Generate a data file to input to the avro producer
$ echo ‘{“username”: “fbar1”, “firstname”: “foo1”, “lastname”: “bar1”}’ > data.json
And push data using kafka-avro-console-producer
$ kafka-avro-console-producer \
–topic avro_topic \
–broker-list kafka-server1:9092 \
–property value.schema='{“type”:”record”,”name”:”user”,”fields”:[{“name”:”username”,”type”:”string”},{“name”:”firstname”,”type”:”string”},{“name”:”lastname”,”type”:”string”}]}’ \
–property schema.registry.url=http://kafka-sr1:8081 < data.json
$ cqlsh -e cqlsh -e “select * from connect.avro_table;”

Use CQL in connect
First thing to do is to create another table for the data
$ docker exec -it cassandra-server1 /bin/bash
$ cqlsh -e “CREATE TABLE connect.cql_table (userid uuid PRIMARY KEY, username text, firstname text, lastname text);”

$ docker exec -it kafka-server1 /bin/bash
$ kafka-topics –create –topic cql_topic –zookeeper zookeeper-server:2181 –partitions 3 –replication-factor 3

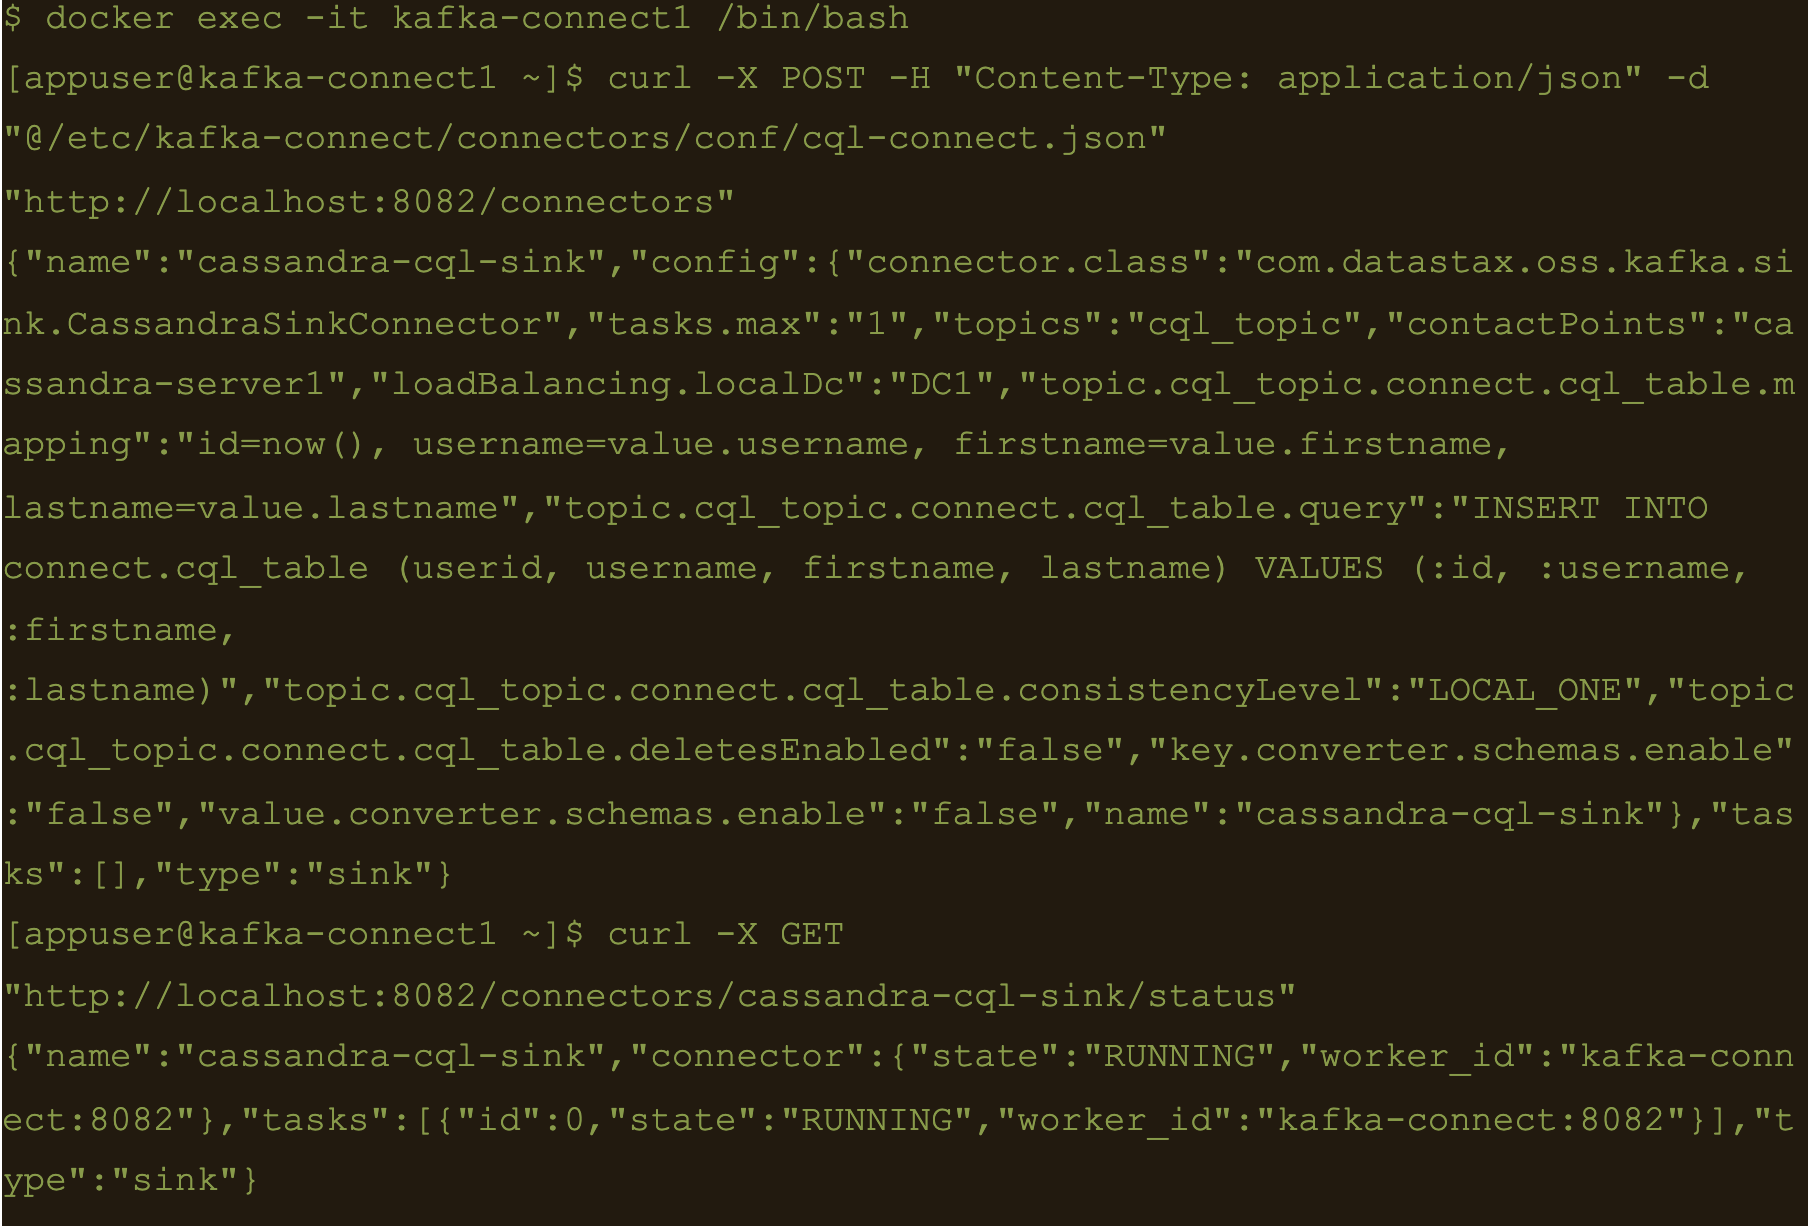
Here the file cql-connect.json contains the connect configuration:
{
	"name": "cassandra-cql-sink",
	"config": {
		"connector.class": "com.datastax.oss.kafka.sink.CassandraSinkConnector",
		"tasks.max": "1",
		"topics": "cql_topic",
		"contactPoints": "cassandra-server1",
		"loadBalancing.localDc": "DC1",
		"topic.cql_topic.connect.cql_table.mapping": "id=now(), username=value.username, firstname=value.firstname, lastname=value.lastname",
		"topic.cql_topic.connect.cql_table.query": "INSERT INTO connect.cql_table (userid, username, firstname, lastname) VALUES (:id, :username, :firstname, :lastname)",
		"topic.cql_topic.connect.cql_table.consistencyLevel": "LOCAL_ONE",
        "topic.cql_topic.connect.cql_table.deletesEnabled": false,
        "key.converter.schemas.enable": false,
        "value.converter.schemas.enable": false
	}
}- topic.cql_topic.connect.cql_table.mapping”: “id=now(), username=value.username, firstname=value.firstname, lastname=value.lastname”
- “topic.cql_topic.connect.cql_table.query”: “INSERT INTO connect.cql_table (userid, username, firstname, lastname) VALUES (:id, :username, :firstname, :lastname)”
- And the consistency with “topic.cql_topic.connect.cql_table.consistencyLevel”: “LOCAL_ONE”
$ docker exec -it kafka-connect1 /bin/bash
$ curl -X POST -H “Content-Type: application/json” -d “@/etc/kafka-connect/connectors/conf/cql-connect.json” “http://localhost:8082/connectors”
Check status of the connector and make sure the connector is running
$ curl -X GET “http://localhost:8082/connectors/cassandra-cql-sink/status”
$ docker exec -it kafka-server1 /bin/bash
$ echo ‘{“username”: “fbar”, “firstname”: “foo”, “lastname”: “bar”}’ > data.json
$ kafka-console-producer –broker-list localhost:9092 –topic cql_topic < data.json

INSERT INTO connect.cql_table (userid, username, firstname, lastname) VALUES (
The uuid will be generated using the now() function which returns TIMEUUID.
The following data will be inserted to the table and the result can be confirmed by running a select cql query on the connect.cql_table from the cassandra node.
$ docker exec -it cassandra-server1 /bin/bash
$ cqlsh -e “select * from connect.cql_table;”

Summary
Kafka connect is a scalable and simple framework for moving data between Kafka and other data systems. It is a great tool for easily wiring together and when you combined Kafka with Cassandra you get an extremely scalable, available and performant system.
Kafka Connector reliably streams data from Kaka topics to Cassandra. This blog just covers how to install and configure Kafka connect for testing and development purposes. Security and scalability is out of scope of this blog.
More detailed information about Apache Kafka Connector can be found at https://docs.datastax.com/en/kafka/doc/kafka/kafkaIntro.html
At Digitalis we have extensive experience dealing with Cassandra and Kafka in complex and critical environments. We are experts in Kubernetes, data and streaming along with DevOps and DataOps practices. If you could like to know more, please let us know.
Related Articles
What is Apache NiFi?
If you want to understand what Apache NiFi is, this blog will give you an overview of its architecture, components and security features.
Apache Kafka vs Apache Pulsar
This blog describes some of the main differences between Apache Kafka and Pulsar – two of the leading data streaming Apache projects.
The post Getting started with Kafka Cassandra Connector appeared first on digitalis.io.
]]>The post What is Apache NiFi? appeared first on digitalis.io.
]]>If you would like to know more about how to implement modern data and cloud technologies into to your business, we at Digitalis do it all: from cloud and Kubernetes migration to fully managed services, we can help you modernize your operations, data, and applications. We provide consulting and managed services on Kubernetes, cloud, data, and DevOps.
Contact us today for more information or to learn more about each of our services.
Introduction
So, what is Apache NiFi, well, in short, an open-source, flexible, feature rich, dataflow management tool. It is distributed, under the terms of the Apache License and it is managed and maintained, by a self-selected team of technical experts, who are active contributors to the project. It’s main purpose is to automate the flow of data between systems.
It has a simple, drag-and-drop, user interface (UI), which allows users to create visual dataflows and manipulate the flows in real time and it provides the user with information pertaining to audit, lineage, and backpressure.
It is easily deployed, on all standard platforms, highly configurable, data agnostic, offering loss-tolerant, guaranteed delivery, low latency, high throughput and priority-based queuing.
One can think of it as a data transfer tool, taking data from one place to another, while, optionally, doing some kind of transformation of data. The data goes through the flow in a construct known as a flow file.
It supports a number of different endpoints including, but not limited to:
File Based, Mongo, Oracle, HDFS, AMQP, JMS, FTP, SFTP, KAFKA, HTTP(S) Rest, AWS S3, AWS SNS, AWS SQS
This makes it a powerful tool for pulling data from external sources, routing, transforming, and aggregating it and finally delivering it, to its final destination.
Architecture
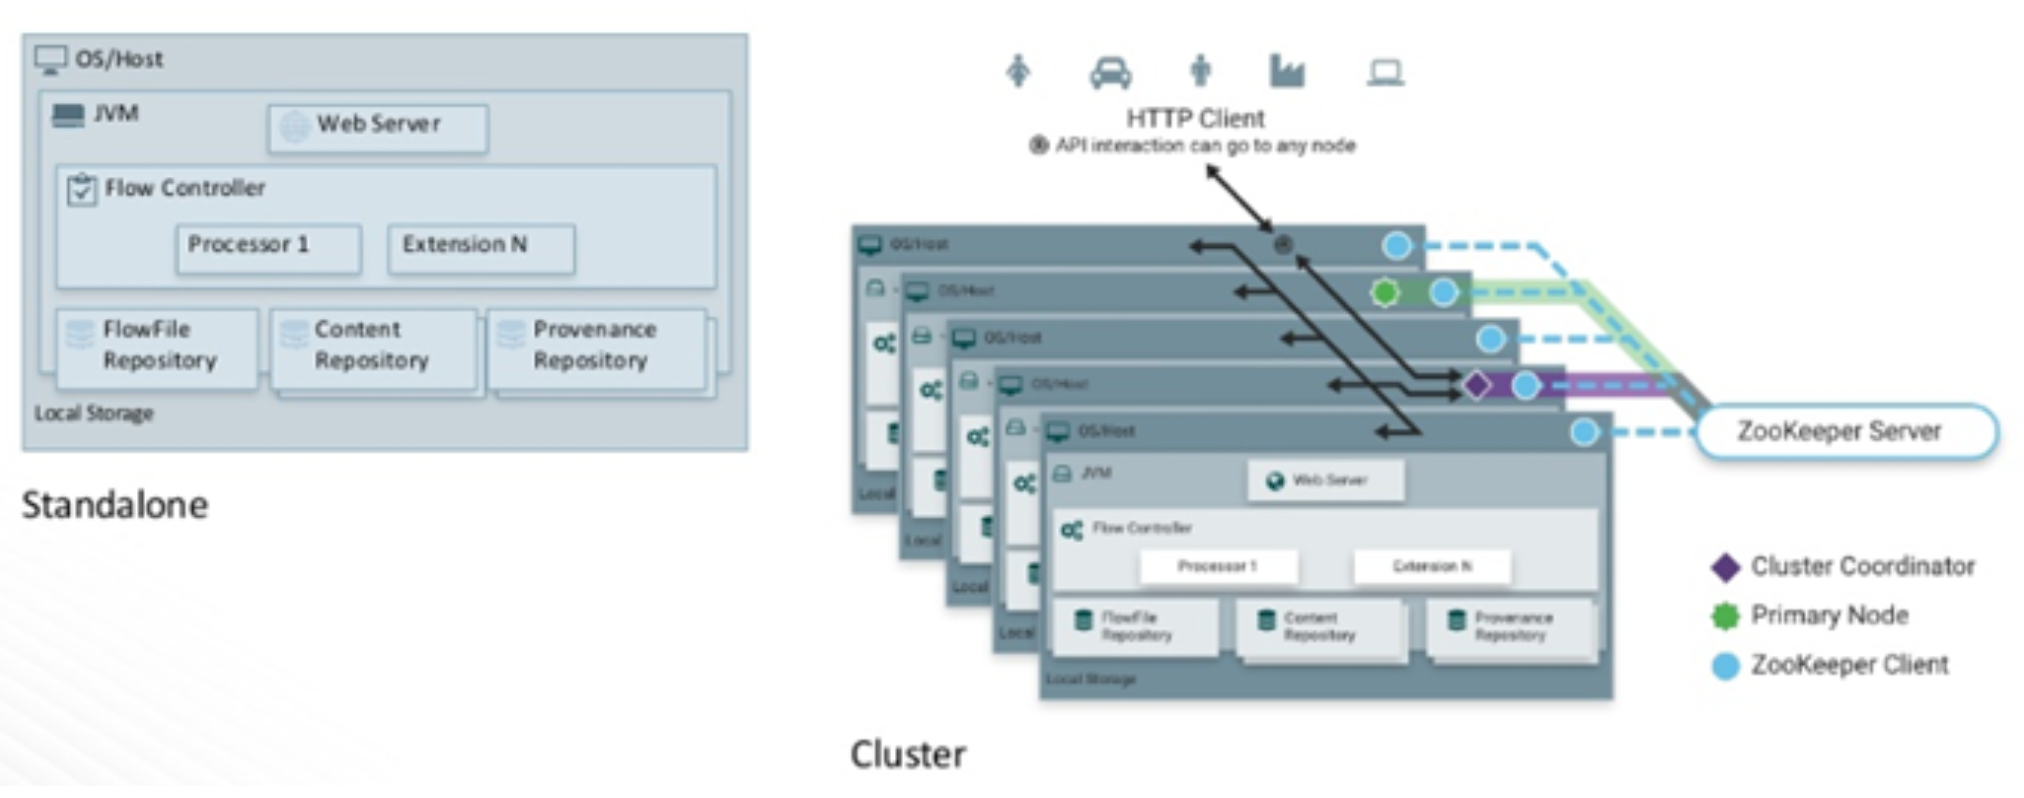
The architecture of nifi is simplistic in nature. It consists of a web server, flow controller and a processor, which runs on a Java Virtual Machine (JVM). Like most Hadoop related, open-source software, it can be deployed, in standalone mode or in cluster mode. In cluster mode, which is the normal way to deploy it, each node performs the same tasks on the data, but each operates on a different set of data.
Coordination and Cluster management in nifi is handled by Apache ZooKeeper. Zookeeper elects a single node, as the Cluster Coordinator, all cluster nodes report heartbeat and status information to the Cluster Coordinator. The Cluster Coordinator is responsible for automatic failover and disconnecting and reconnecting nodes.
Additionally, every cluster has one Primary Node, also elected by ZooKeeper. Any change you make, is replicated to all nodes in the cluster, allowing for multiple entry points.
For metadata and data flow management, nifi has 3 repositories
- Flowfile Repository which contains metadata for all the current FlowFiles in the flow.
- Content Repository which holds the content for current and past FlowFiles.
- Provenance Repository which holds the history of FlowFiles.
Apache NiFi components

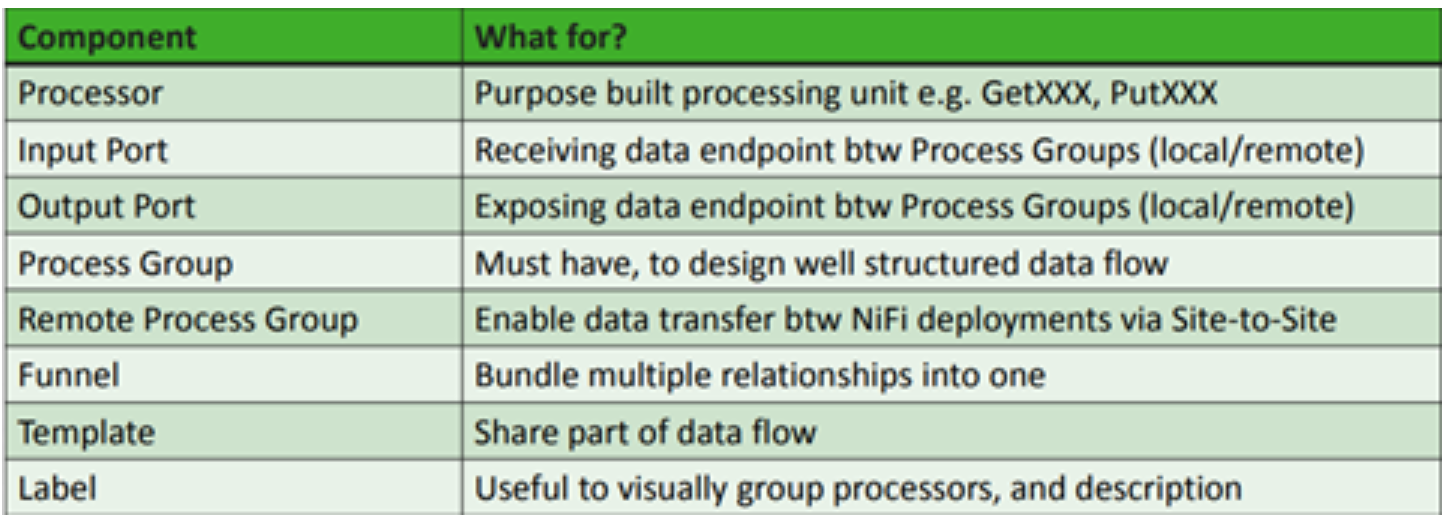
NiFi, as you can imagine, contains many different canned Processors.
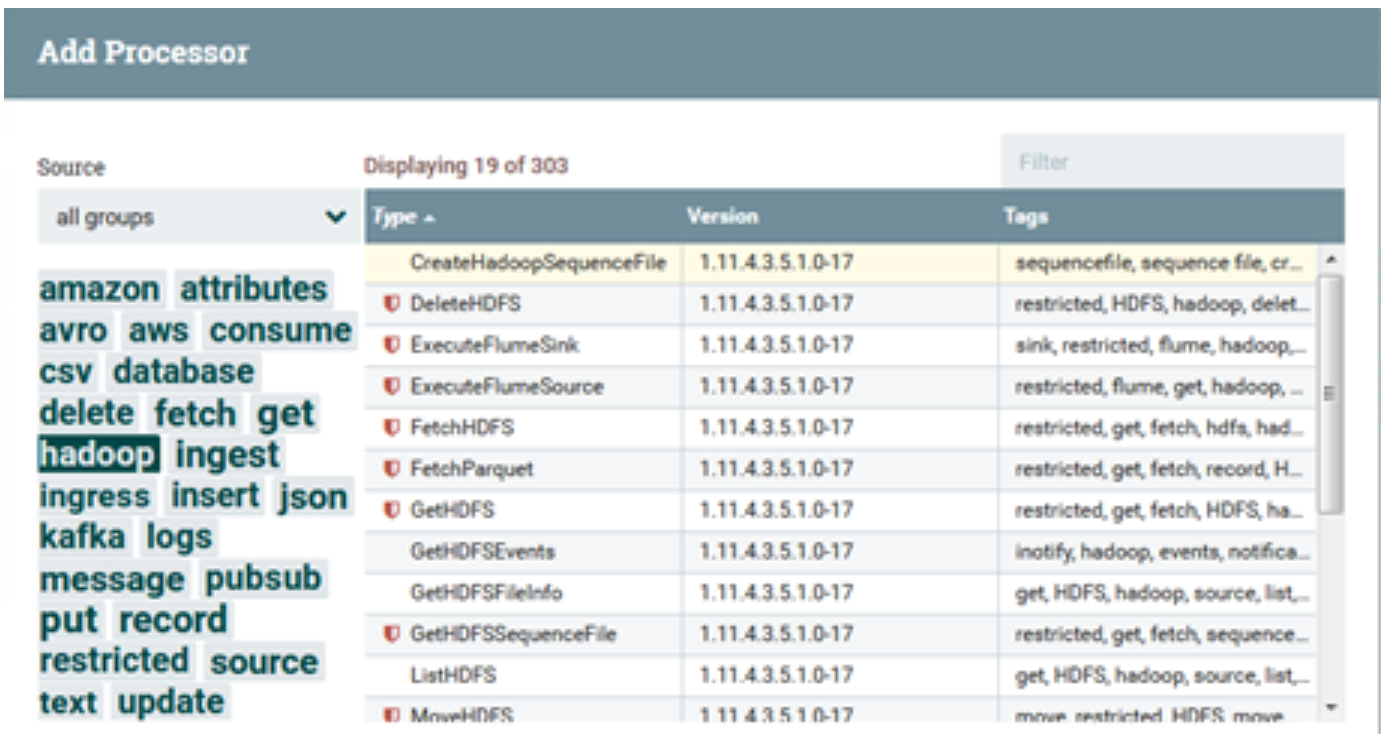
Highlighting each group displays processors associated with that group. These Processors provide capabilities to ingest data from numerous different systems, route, transform, process, split, and aggregate data and distribute data to many systems. Custom one’s can also be developed, if required, relatively easily.
Creating a workflow is a simple process, just drag and drop components onto the nifi canvas, connect them up, configure each component and start the flow. Simple as that.
Sample Flow
There are many sample flow templates available. The Apache project supplies multiple examples here. Cloudera also makes freely available sample template flows here and here.
I have chosen a basic simple flow (which you can download here). This shows how to create a flow file, generate a CSV entry, and convert that csv file to a JSON document. It demonstrates the simplicity of Nifi.
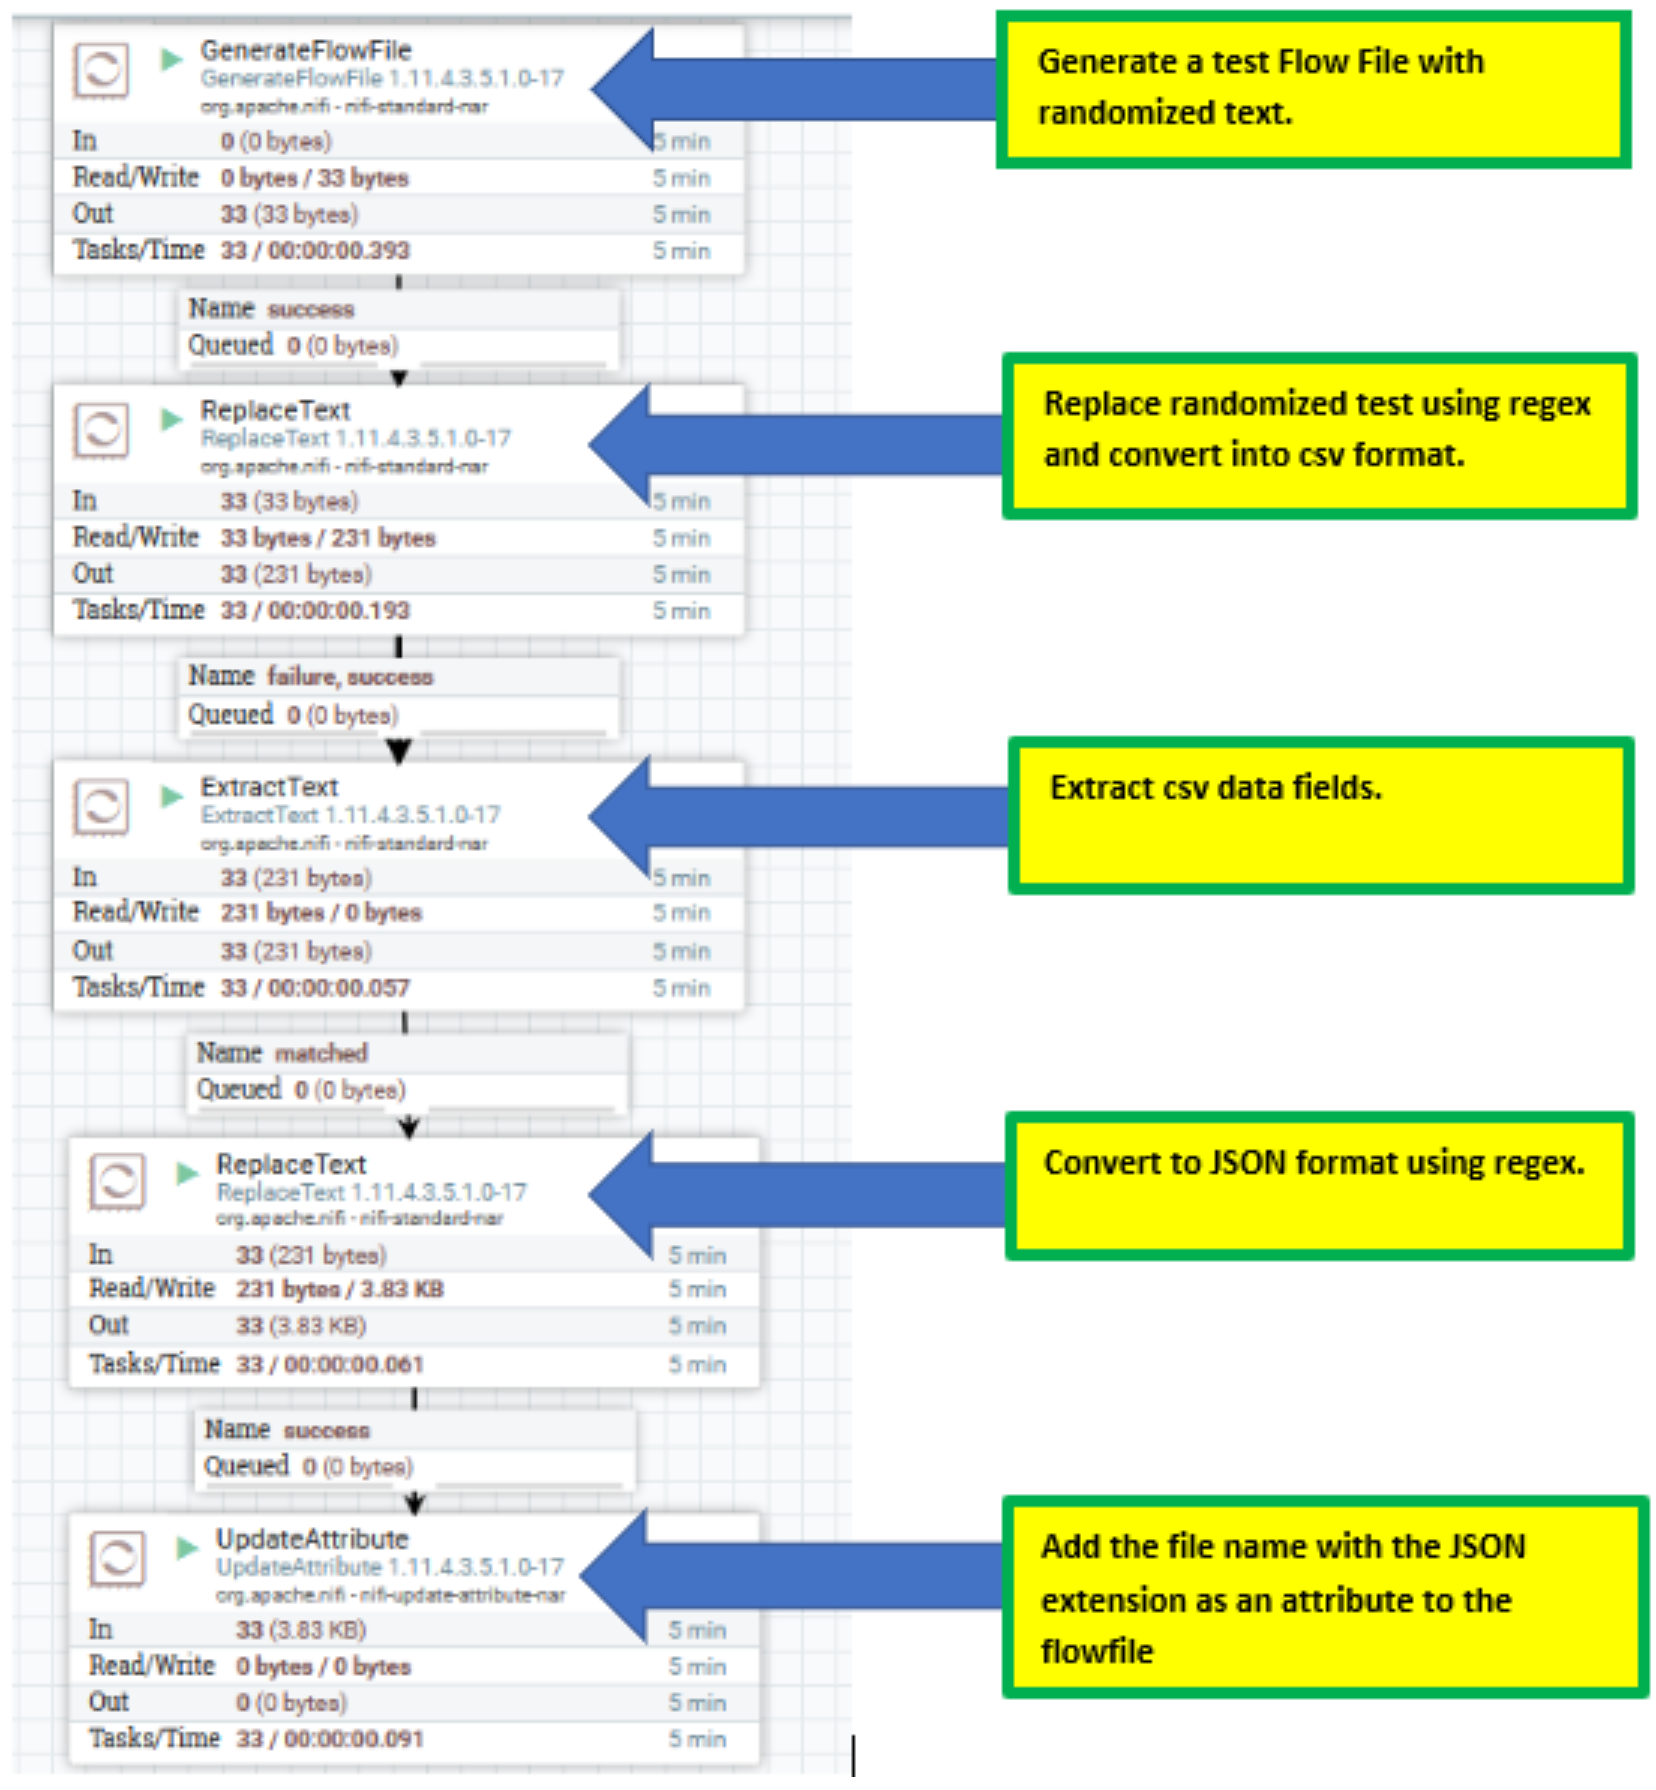
Security
Authentication
NiFi supports numerous user authentication options, such as:
- Client Certificates
- SAML
- Apache Knox
- OpenId Connect
- Login Identity Providers (such as LDAP and Kerberos).
Enabling authentication, as always, can be tricky and time consuming, but once configured, runs smoothly.
It is important to note that NiFi does not perform user authentication over HTTP. Using HTTP, all users will be granted all roles. Not Desirable.
Authorization
Multiple options are available to control who has access to the system, and of course, the level of their access. Primarily, authorization can be implemented using multi-tenant authorization. This enables multiple groups of users (tenants) to command, control, and observe different parts of the dataflow, with varying levels of authorization. When an authenticated user attempts to view or modify a NiFi resource, the system checks whether the user has privileges to perform that action. These privileges are defined by policies that you can apply system-wide or to individual components.
Handily, Nifi supplies a number of UserGroupProvider authorizers.The default one is FileUserGroupProvider. Another option nifi provides for the UserGroupProvider is LdapUserGroupProvider. This will sync users and groups from a directory server and will present them in the NiFi UI in read only form.
The most popular LdapUserGroupProvider authorizer is the Apache Ranger authorizer, which uses Apache Ranger to make access decisions. Apache Ranger provides a nice central location for managing users, groups and policies, as well as a mechanism for auditing access decisions. It’s auditing capabilities make it a more popular choice, although admittedly, this can be hard to configure.
You can, also, if required, develop your own, additional, customized UserGroupProviders, as extensions.
Encryption In Flight
Nifi provides a number of cmd line utilities. One being TLS Toolkit. This toolkit, allows one to automatically generate the required keystores, truststore, and relevant configuration files, enabling ssl encryption, in an easy and secure manner. This is especially useful for securing multiple NiFi nodes, which can be a tedious and error-prone process. For more information, see the TLS Toolkit section in the NiFi Toolkit Guide.
It is my understanding that, In future releases, hardware security modules (HSM) and external secure storage mechanisms will be integrated into nifi, but for now, an AES encryption provider is the default implementation.
Encryption At Rest
Provenance and Data Lineage
A serious concern, in any data flow routing & management platform, is tracking what happens to the data, from the point of origin, to its endpoint. NiFi allows users to answer these questions, by automatically, recording everything that happens to your data, at a very granular level.
Any event (data being created, ingested, routed, modified, tagged, viewed, exported, or deleted) is recorded, along with the time, the identity of the component that acted on it, where it was sent, what was changed, etc.
Fully configurable, users can explore the provenance chain (the directed graph representation of the provenance events) of any flowfile to review the path it followed through the data flow.
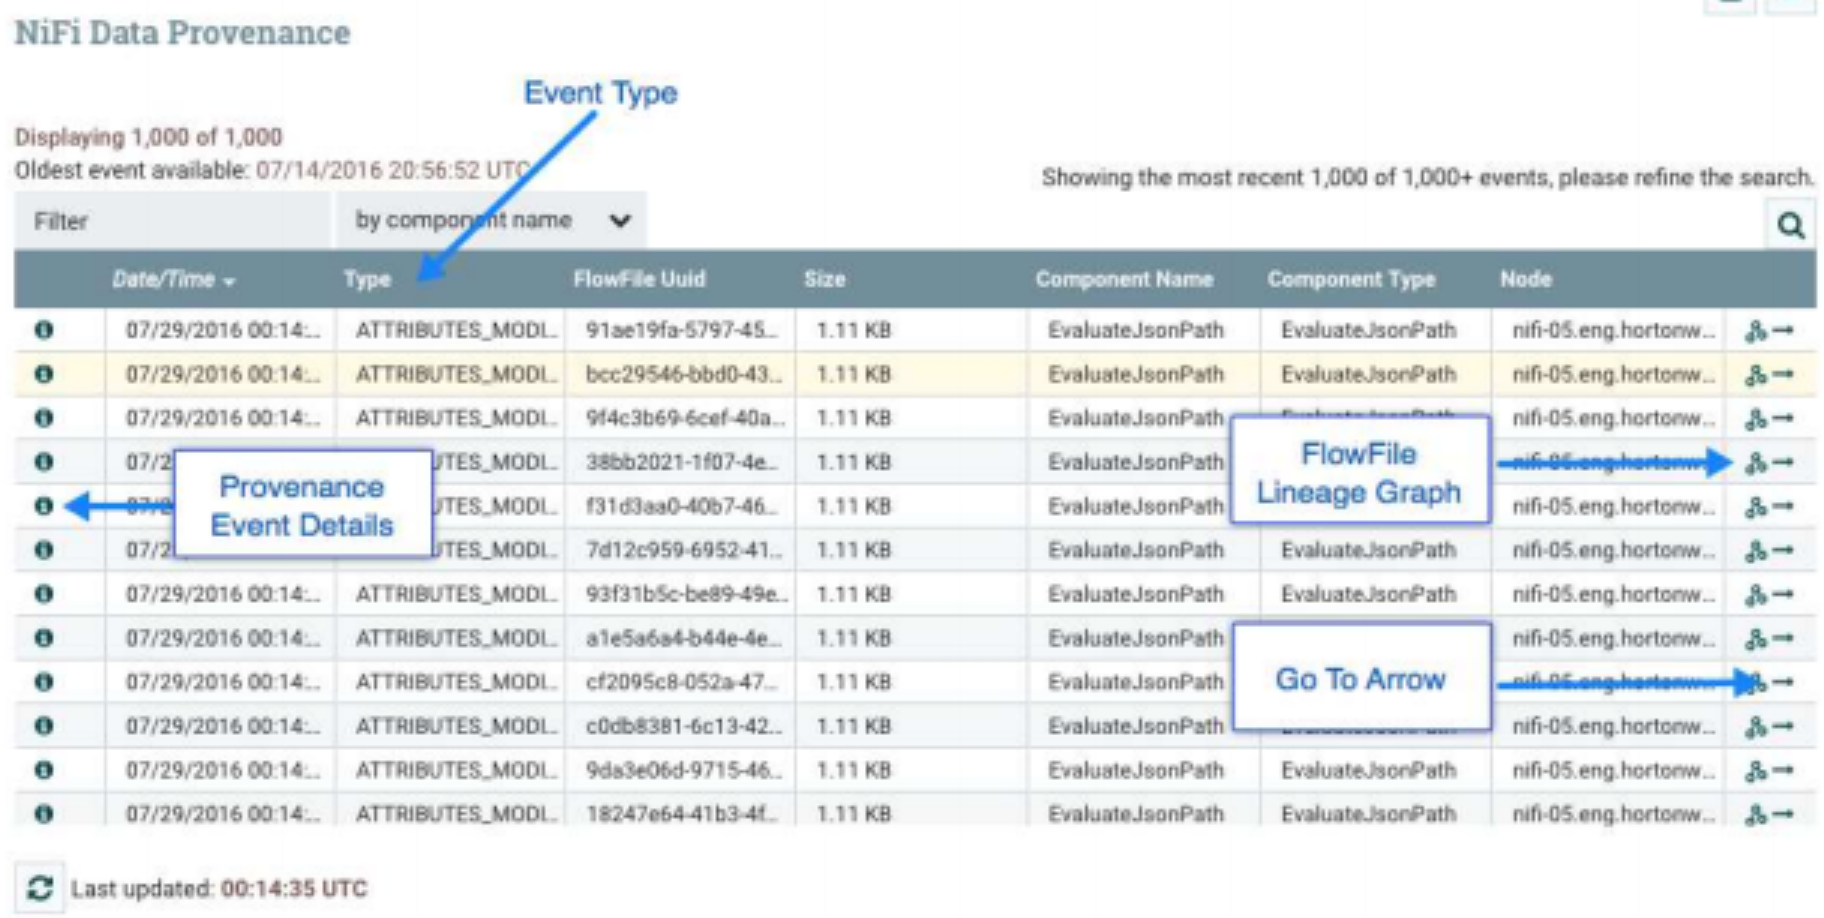
The image above, outlines how for each processor and connection, within NiFi, one can click on the component and inspect the data provenance. We are provided with a table of Provenance events based on our search criteria
In addition to viewing the details of a Provenance event, we can also view the lineage of the FlowFile involved by clicking on the Lineage Icon from the table view.
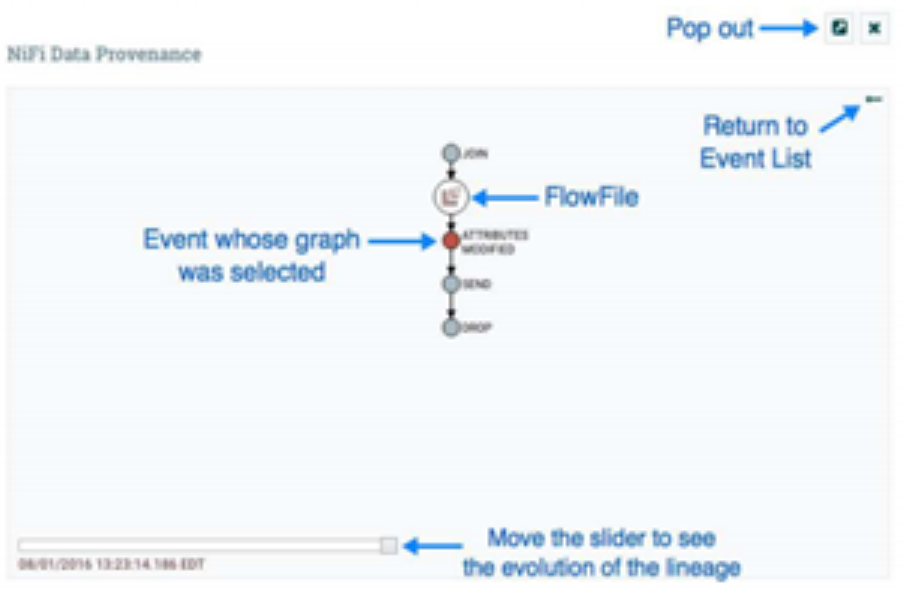
This provides us with a graphical representation of exactly what happened to that piece of data as it traversed the system. The slider in the bottom-left corner allows us to see the time at which these events occurred. By sliding it left and right, we can see which events introduced latency into the system so that we have a very good understanding of where in our system we may need to provide more resources, such as the number of Concurrent Tasks for a Processor.
In later releases of Nifi, you also have the ability to replay flowfiles. As long as the provenance data has not been archived and the referenced content is still present in the content repository, any flowfile can be replayed from any point in the flow. This greatly enhances the flow development lifecycle – rather than use a “build and deploy” cycle, this replay feature allows continuous refinement of a flow, as the data flows through different branches. This allows the end-user to understand the exact context in which the FlowFile was processed. The user is able to perform iterative development of the flow, until it is processing the data, exactly as intended.
Development
NiFi is at its core, an extendable architecture, as such, it is a platform, on which, dataflow processes, can execute and interact, in a predictable and iterative manner. Extension points include, processors, Controller Services, Reporting Tasks and Customer User Interfaces.
It provides a custom class loader model, ensuring that each extension bundle is exposed to a very limited set of dependencies. As a result, extensions can be built with little concern for dependencies with other extensions.
Nifi provides an expression language for configuring processor properties. So what does that give you, well, you can read more about it here, but a basic example would be, if a user wants to configure a property value to be the literal text Hello ${UserName}. In such a case, this can be accomplished by using an extra $ (dollar sign symbol) just before the expression to escape it (i.e., Hello $${UserName}).
It provides greater functionality than that, of course, one can utilize a wide range of in-built functions to generate dynamic flows, manipulating dynamically flow component attributes, as you wish. Functions that can be performed using the NiFi Expression Language are: String Manipulation, Maths Operations, If Then Else…. DateTime operations and encoding.
Excellent blogs have already been written around the nifi expression language, take a look here and here.
It is important to note, not all Processor properties support the Expression Language. That is determined by the developer of the Processor and how the Processor is written. However, to be fair, nifi does clearly illustrate for each Property whether or not the Expression Language is supported.
For development testing, nifi provides a nifi-mock module that can be used in conjunction with JUnit to provide extensive testing of components. The Mock Framework is mostly aimed at testing Processors, However, the framework does provide the ability to test Controller Services as well and is primarily written in the values of processor properties.
Summary
Nifi is an excellent data flow tool. It is easily extendible, highly scalable, fully secure, user friendly, performant and easy to learn. End Users can command & control flows visually and can configure error handling capabilities, relatively easily. Importantly, it guarantees delivery, even at an extremely high scale.
It has the ability to buffer queued data and handle back pressure, this makes it highly effective for flow management. From a security point of view, it delivers on all the main security tenants, that makes a product secure and enterprise ready.
From a personal point of view, it’s easy useability, feature rich content, ability to extend and scale at ease, makes me a big fan. I look forward to later releases and I sincerely hope the product grows from strength to strength.
At Digitalis we have extensive experience dealing with data in complex and critical environments. We are experts in data and streaming technologies along with DevOps and DataOps practices. If you could like to know more, please let us know.
Where To Go For More Information
Related Articles
K3s – lightweight kubernetes made ready for production – Part 3
Do you want to know securely deploy k3s kubernetes for production? Have a read of this blog and accompanying Ansible project for you to run.
K3s – lightweight kubernetes made ready for production – Part 2
Do you want to know securely deploy k3s kubernetes for production? Have a read of this blog and accompanying Ansible project for you to run.
K3s – lightweight kubernetes made ready for production – Part 1
Do you want to know securely deploy k3s kubernetes for production? Have a read of this blog and accompanying Ansible project for you to run.
The post What is Apache NiFi? appeared first on digitalis.io.
]]>

