If you want to understand how to easily ingest data from Kafka topics into Cassandra than this blog can show you how with the DataStax Kafka Connector.
The post Getting started with Kafka Cassandra Connector appeared first on digitalis.io.
]]>This blog provides step by step instructions on using Kafka Connect with Apache Cassandra. It provides a fully working docker-compose project on Github allowing you to explore the various features and options available to you.
If you would like to know more about how to implement modern data and cloud technologies into to your business, we at Digitalis do it all: from cloud and Kubernetes migration to fully managed services, we can help you modernize your operations, data, and applications – on-premises, in the cloud and hybrid.
We provide consulting and managed services on wide variety of technologies including Apache Cassandra and Apache Kafka.
Contact us today for more information or to learn more about each of our services.
What is a Kafka connect
Kafka Connect streams data between Apache Kafka and other data systems. Kafka Connect can copy data from applications to Kafka topics for stream processing. Additionally data can be copied from Kafka topics to external data systems like Elasticsearch, Cassandra and lots of others. There is a wide set of pre-existing Kafka Connectors for you to use and its straightforward to build your own.
If you have not come across it before, here is an introductory video from Confluent giving you an overview of Kafka Connect.
Kafka connect can be run either standalone mode for quick testing or development purposes or can be run distributed mode for scalability and high availability.
Ingesting data from Kafka topics into Cassandra
As mentioned above, Kafka Connect can be used for copying data from Kafka to Cassandra. DataStax Apache Kafka Connector is an open-source connector for copying data to Cassandra tables.
The diagram below illustrates how the Kafka Connect fits into the ecosystem. Data is published onto Kafka topics and then it is consumed and inserted into Apache Cassandra by Kafka Connect.
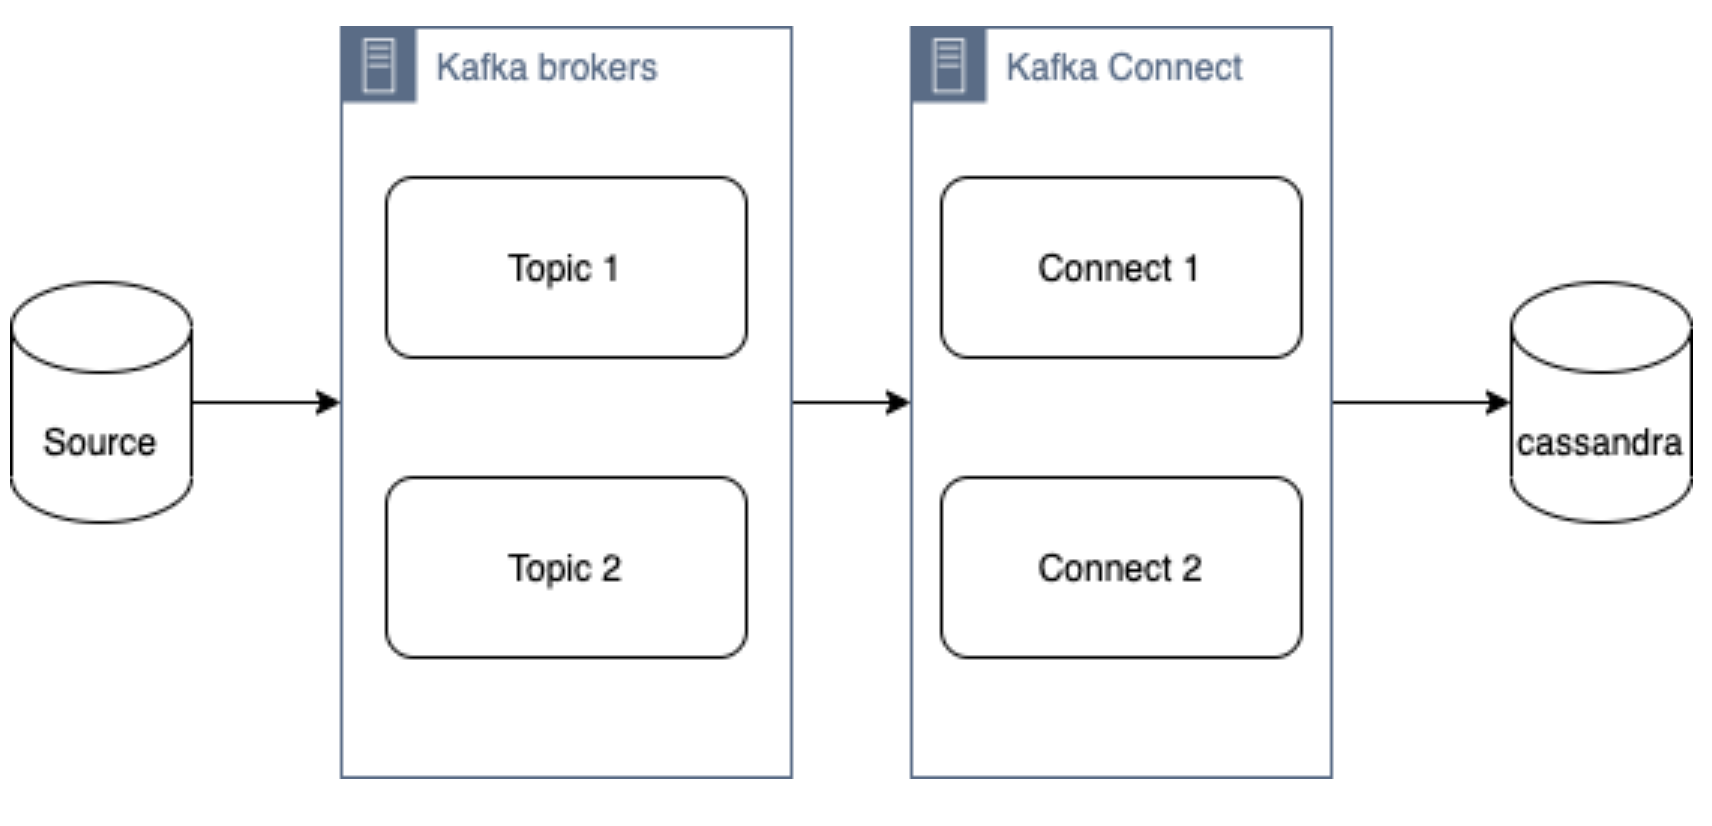
DataStax Apache Kafka Connector
The DataStax Apache Kafka Connector can be used to push data to the following databases:
- Apache Cassandra 2.1 and later
- DataStax Enterprise (DSE) 4.7 and later
Kafka Connect workers can run one or more Cassandra connectors and each one creates a DataStax java driver session. A single connector can consume data from multiple topics and write to multiple tables. Multiple connector instances are required for scenarios where different global connect configurations are required such as writing to different clusters, data centers etc.
Kafka topic to Cassandra table mapping
The DataStax connector gives you several option on how to configure it to map data on the topics to Cassandra tables.
The options below explain how each mapping option works.
Note – in all cases. you should ensure that the data types of the message field are compatible with the data type of the target table column.
Basic format
This option maps the data key and the value to the Cassandra table columns. See here for more detail.
JSON format
This option maps the individual fields in the data key or value JSON to Cassandra table fields. See here for more detail.
AVRO format
Kafka Struct
CQL query
This option maps the individual fields in the data key or value JSON to Cassandra table fields. See here for more detail.
Let’s try it!
All required files are in https://github.com/digitalis-io/kafka-connect-cassandra-blog. Just clone the repo to get started.
The examples are using docker and docker-compose .It is easy to use docker and docker-compose for testing locally. Installation instructions for docker and docker-compose can be found here:
The example on github will start up containers running everything needed in this blog – Kafka, Cassandra, Connect etc..
docker-compose.yml file
The following resources are defined in the projects docker-compose.yml file:
- A bridge network called kafka-net
- Zookeeper server
- 3 Kafka broker server
- Kafka schema registry server
- Kafka connect server
- Apache Cassandra cluster with a single node
This section of the blog will take you through the fully working deployment defined in the docker-compose.yml file used to start up Kafka, Cassandra and Connect.
Bridge network
networks:
 kafka-net:
driver: bridgeApache Zookeeper is (currently) an integral part of the Kafka deployment which keeps track of the Kafka nodes, topics etc. We are using the confluent docker image (confluentinc/cp-zookeeper) for Zookeeper.
zookeeper-server:
   image: 'confluentinc/cp-zookeeper:latest'
   container_name: 'zookeeper-server'
   hostname: 'zookeeper-server'
   healthcheck:
     test: ["CMD-SHELL", "nc -z localhost 2181 || exit 1" ]
     interval: 5s
     timeout: 5s
     retries: 60
   networks:
     - kafka-net
   ports:
     - '2181:2181'
   environment:
     - ZOOKEEPER_CLIENT_PORT=2181
     - ZOOKEEPER_SERVER_ID=1
Kafka brokers
Kafka brokers store topics and messages. We are using the confluentinc/cp-kafka docker image for this.
As Kafka brokers in this setup of Kafka depend on Zookeeper, we instruct docker-compose to wait for Zookeeper to be up and running before starting the brokers. This is defined in the depends_on section.
kafka-server1:
   image: 'confluentinc/cp-kafka:latest'
   container_name: 'kafka-server1'
   hostname: 'kafka-server1'
   healthcheck:
     test: ["CMD-SHELL", "nc -z localhost 9092 || exit 1" ]
     interval: 5s
     timeout: 5s
     retries: 60
   networks:
     - kafka-net
   ports:
     - '9092:9092'
   environment:
     - KAFKA_ZOOKEEPER_CONNECT=zookeeper-server:2181
     - KAFKA_ADVERTISED_LISTENERS=PLAINTEXT://kafka-server1:9092
     - KAFKA_BROKER_ID=1
   depends_on:
     - zookeeper-server

 kafka-server2:
   image: 'confluentinc/cp-kafka:latest'
   container_name: 'kafka-server2'
   hostname: 'kafka-server2'
   healthcheck:
     test: ["CMD-SHELL", "nc -z localhost 9092 || exit 1" ]
     interval: 5s
     timeout: 5s
     retries: 60
   networks:
     - kafka-net
   ports:
     - '9093:9092'
   environment:
     - KAFKA_ZOOKEEPER_CONNECT=zookeeper-server:2181
     - KAFKA_ADVERTISED_LISTENERS=PLAINTEXT://kafka-server2:9092
     - KAFKA_BROKER_ID=2
   depends_on:
     - zookeeper-server

 kafka-server3:
   image: 'confluentinc/cp-kafka:latest'
   container_name: 'kafka-server3'
   hostname: 'kafka-server3'
   healthcheck:
     test: ["CMD-SHELL", "nc -z localhost 9092 || exit 1" ]
     interval: 5s
     timeout: 5s
     retries: 60
   networks:
     - kafka-net
   ports:
     - '9094:9092'
   environment:
     - KAFKA_ZOOKEEPER_CONNECT=zookeeper-server:2181
     - KAFKA_ADVERTISED_LISTENERS=PLAINTEXT://kafka-server3:9092
     - KAFKA_BROKER_ID=3
   depends_on:
     - zookeeper-server
Schema registry
Schema registry is used for storing schemas used for the messages encoded in AVRO, Protobuf and JSON.
The confluentinc/cp-schema-registry docker image is used.
 kafka-sr1:
   image: 'confluentinc/cp-schema-registry:latest'
   container_name: 'kafka-sr1'
   hostname: 'kafka-sr1'
   healthcheck:
     test: ["CMD-SHELL", "nc -z kafka-sr1 8081 || exit 1" ]
     interval: 5s
     timeout: 5s
     retries: 60
   networks:
     - kafka-net
   ports:
     - '8081:8081'
   environment:
     - SCHEMA_REGISTRY_KAFKASTORE_BOOTSTRAP_SERVERS=kafka-server1:9092,kafka-server2:9092,kafka-server3:9092
     - SCHEMA_REGISTRY_HOST_NAME=kafka-sr1
     - SCHEMA_REGISTRY_LISTENERS=http://kafka-sr1:8081
   depends_on:
     - zookeeper-server
Kafka connect
Kafka connect writes data to Cassandra as explained in the previous section.
 kafka-connect1:
   image: 'confluentinc/cp-kafka-connect:latest'
   container_name: 'kafka-connect1'
   hostname: 'kafka-connect1'
   healthcheck:
     test: ["CMD-SHELL", "nc -z localhost 8082 || exit 1" ]
     interval: 5s
     timeout: 5s
     retries: 60
   networks:
     - kafka-net
   ports:
     - '8082:8082'
   volumes:
     - ./vol-kafka-connect-jar:/etc/kafka-connect/jars
     - ./vol-kafka-connect-conf:/etc/kafka-connect/connectors
   environment:
     - CONNECT_BOOTSTRAP_SERVERS=kafka-server1:9092,kafka-server2:9092,kafka-server3:9092
     - CONNECT_REST_PORT=8082
     - CONNECT_GROUP_ID=cassandraConnect
     - CONNECT_CONFIG_STORAGE_TOPIC=cassandraconnect-config
     - CONNECT_OFFSET_STORAGE_TOPIC=cassandraconnect-offset
     - CONNECT_STATUS_STORAGE_TOPIC=cassandraconnect-status
     - CONNECT_KEY_CONVERTER=org.apache.kafka.connect.json.JsonConverter
     - CONNECT_VALUE_CONVERTER=org.apache.kafka.connect.json.JsonConverter
     - CONNECT_INTERNAL_KEY_CONVERTER=org.apache.kafka.connect.json.JsonConverter
     - CONNECT_INTERNAL_VALUE_CONVERTER=org.apache.kafka.connect.json.JsonConverter
     - CONNECT_KEY_CONVERTER_SCHEMAS_ENABLE=false
     - CONNECT_VALUE_CONVERTER_SCHEMAS_ENABLE=false
     - CONNECT_REST_ADVERTISED_HOST_NAME=kafka-connect
     - CONNECT_PLUGIN_PATH=/etc/kafka-connect/jars
   depends_on:
     - zookeeper-server
     - kafka-server1
     - kafka-server2
     - kafka-server3
Apache Cassandra
cassandra-server1:
   image: cassandra:latest
   mem_limit: 2g
   container_name: 'cassandra-server1'
   hostname: 'cassandra-server1'
   healthcheck:
     test: ["CMD-SHELL", "cqlsh", "-e", "describe keyspaces" ]
     interval: 5s
     timeout: 5s
     retries: 60
   networks:
     - kafka-net
   ports:
     - "9042:9042"
   environment:
     - CASSANDRA_SEEDS=cassandra-server1
     - CASSANDRA_CLUSTER_NAME=Digitalis
     - CASSANDRA_DC=DC1
     - CASSANDRA_RACK=rack1
     - CASSANDRA_ENDPOINT_SNITCH=GossipingPropertyFileSnitch
     - CASSANDRA_NUM_TOKENS=128
Kafka Connect configuration
As you may have already noticed, we have defined two docker volumes for the Kafka Connect service in the docker-compose.yml. The first one is for the Cassandra Connector jar and the second volume is for the connector configuration.
We will need to configure the Cassandra connection, the source topic for Kafka Connect to consume messages from and the mapping of the message payloads to the target Cassandra table.
Setting up the cluster
First thing we need to do is download the connector tarball file from DataStax website: https://downloads.datastax.com/#akc and then extract its contents to the vol-kafka-connect-jar folder in the accompanying github project. If you have not checked out the project, do this now.
Once you have download the tarball, extract its contents:
$ tar -zxf kafka-connect-cassandra-sink-1.4.0.tar.gz
Copy kafka-connect-cassandra-sink-1.4.0.jar to vol-kafka-connect-jar folder
$ cp kafka-connect-cassandra-sink-1.4.0/kafka-connect-cassandra-sink-1.4.0.jar vol-kafka-connect-jar
Go to the base directory of the checked out project and let’s start the containers up
$ docker-compose up -d

$ docker-compose ps
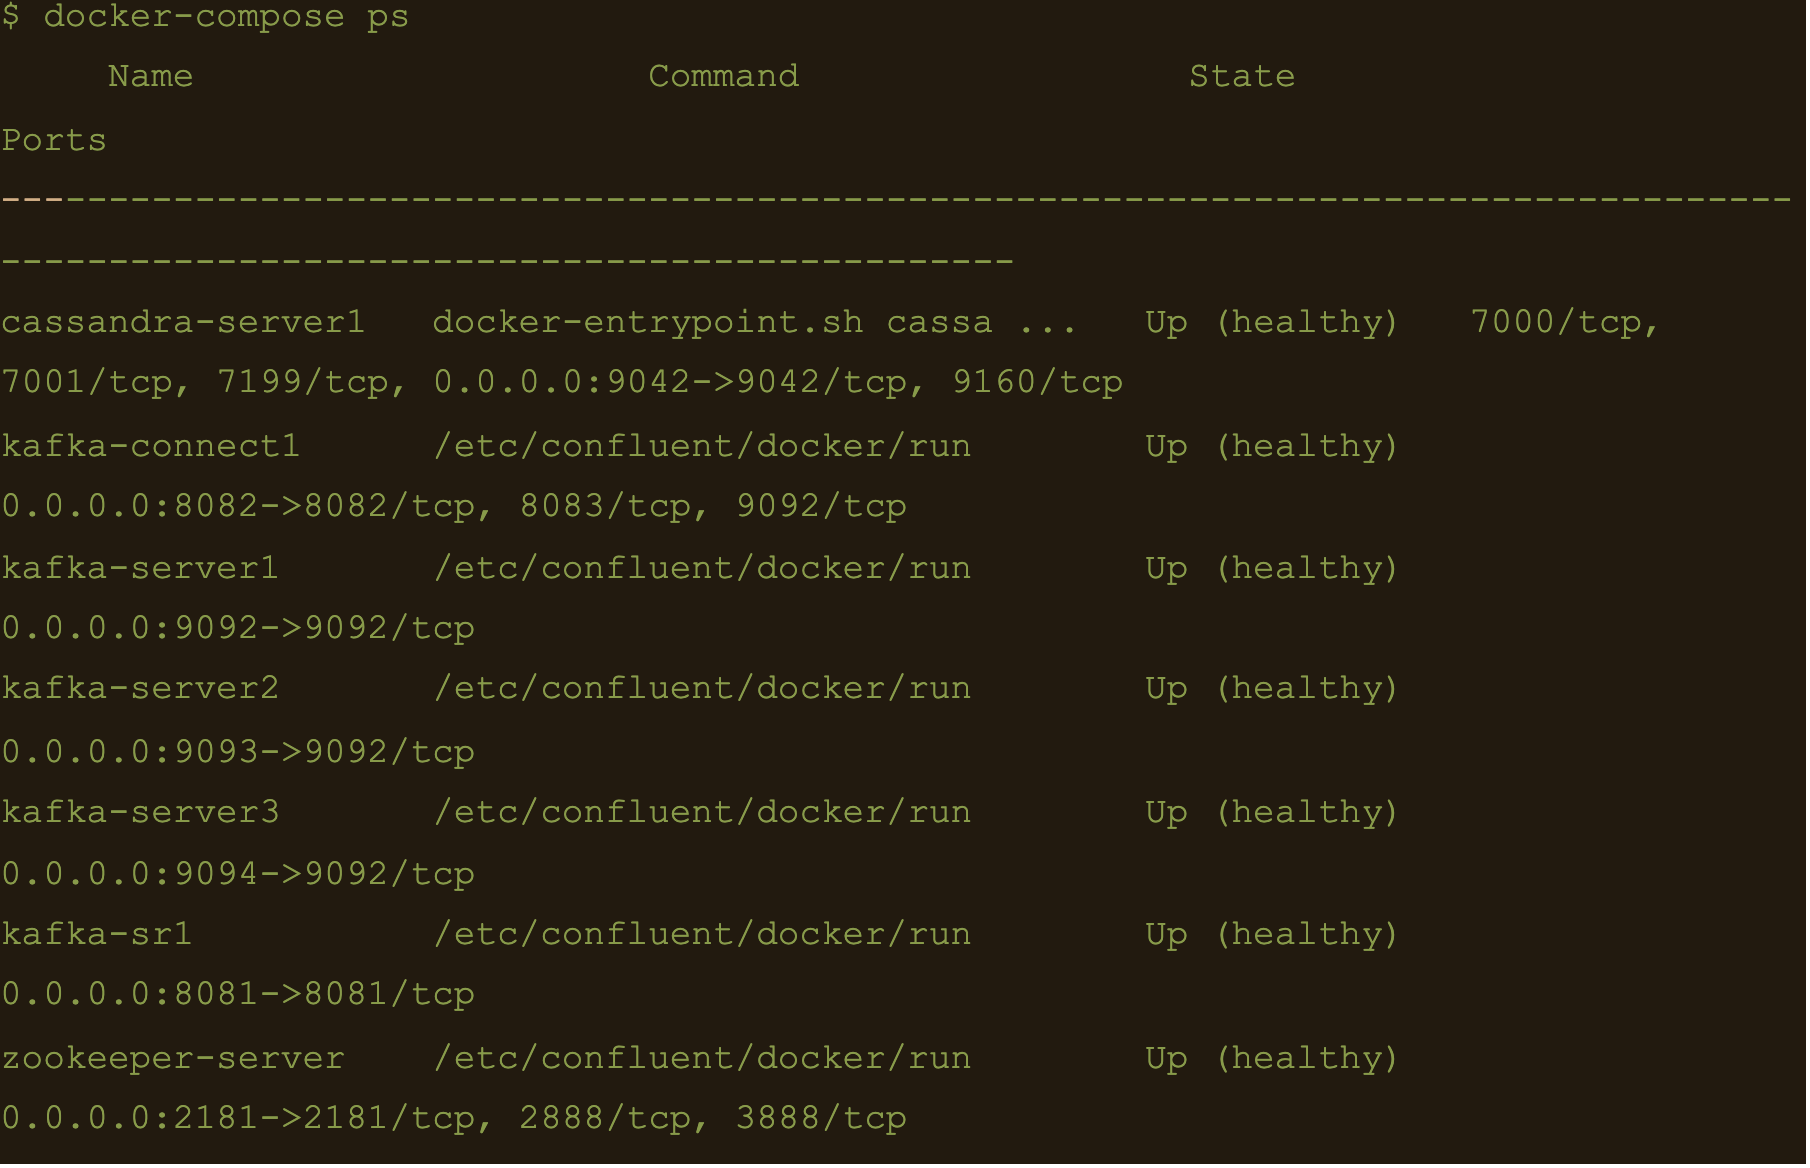
We now have Apache Cassandra, Apache Kafka and Connect all up and running via docker and docker-compose on your local machine.
You may follow the container logs and check for any errors using the following command:
$ docker-compose logs -f
Create the Cassandra Keyspace
The next thing we need to do is connect to our docker deployed Cassandra DB and create a keyspace and table for our Kafka connect to use.
Connect to the cassandra container and create a keyspace via cqlsh
$ docker exec -it cassandra-server1 /bin/bash
$ cqlsh -e “CREATE KEYSPACE connect WITH replication = {‘class’: ‘NetworkTopologyStrategy’,’DC1′: 1};”

Basic format
$ cqlsh -e “CREATE TABLE connect.basic_table (userid text PRIMARY KEY, username text);”

$ docker exec -it kafka-server1 /bin/bash
$ kafka-topics –create –topic basic_topic –zookeeper zookeeper-server:2181 –partitions 3 –replication-factor 3

$ docker exec -it kafka-connect1 /bin/bash
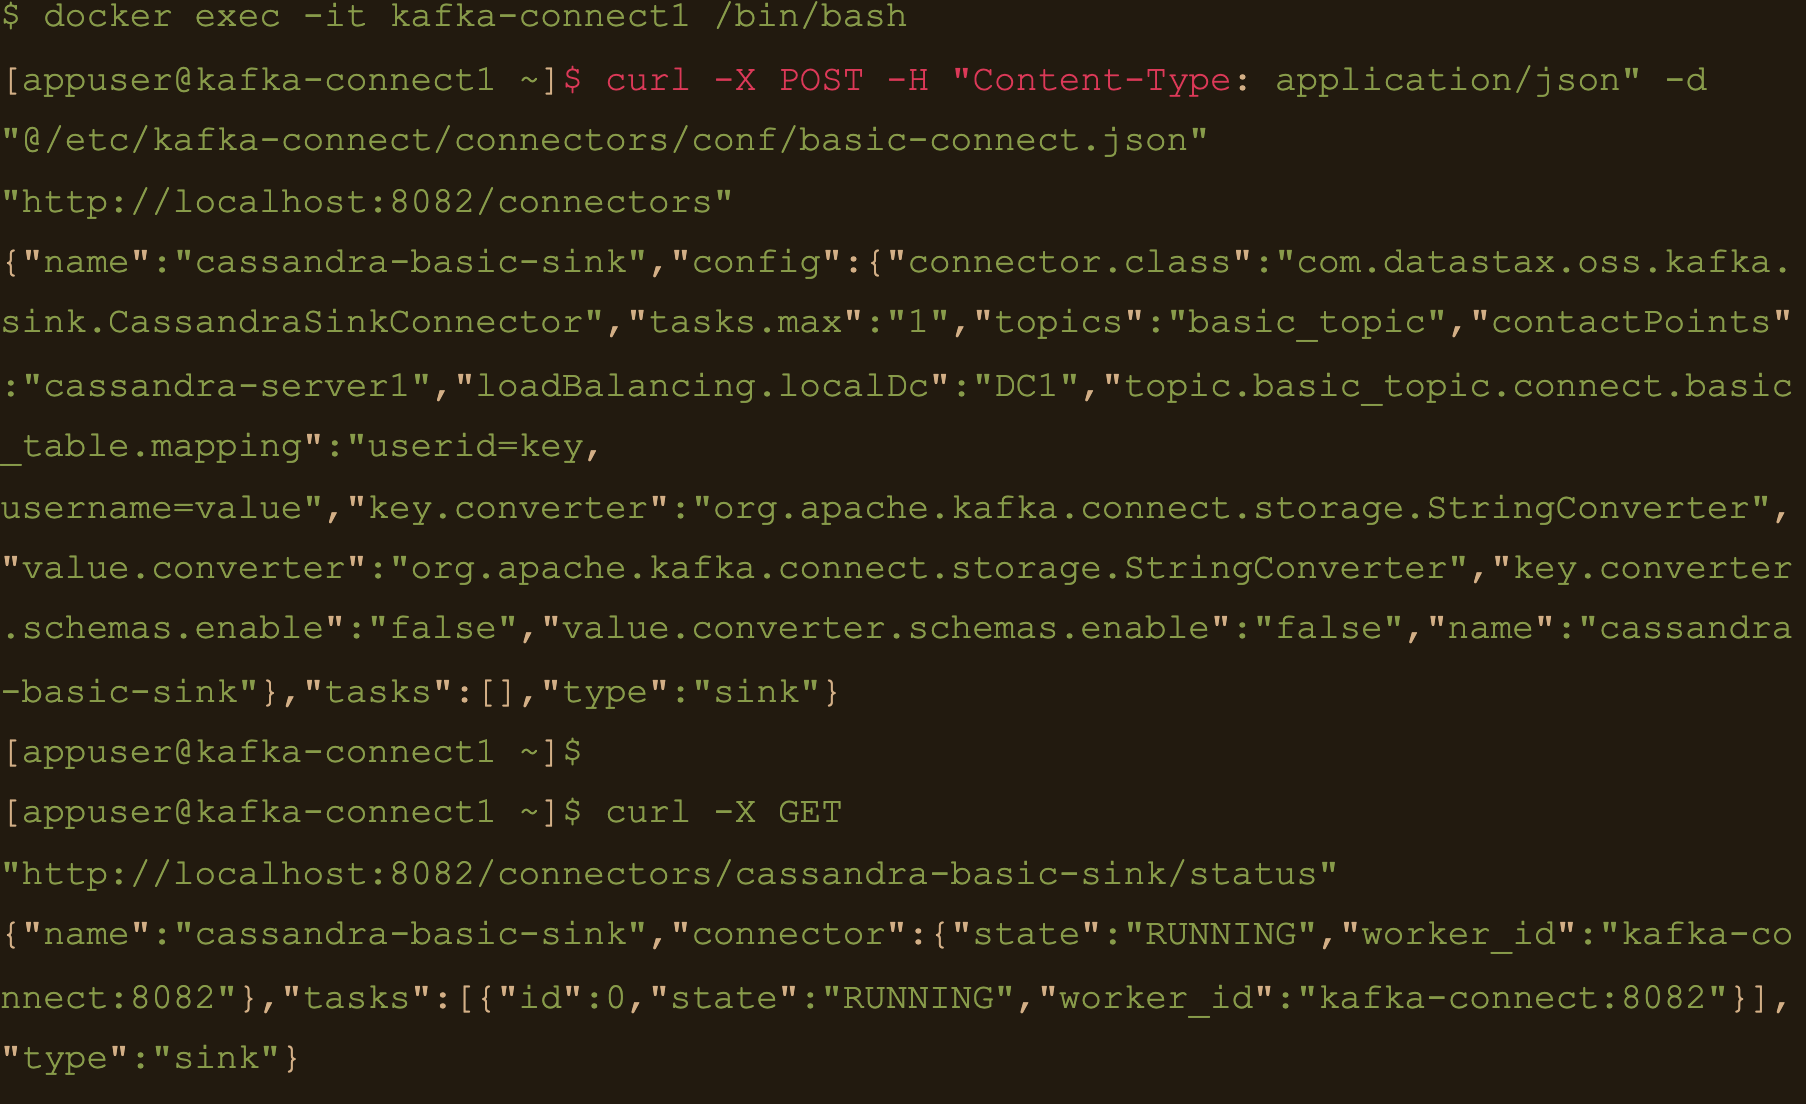
We need to create the basic connector using the basic-connect.json configuration which is mounted at /etc/kafka-connect/connectors/conf/basic-connect.json within the container
$ curl -X POST -H “Content-Type: application/json” -d “@/etc/kafka-connect/connectors/conf/basic-connect.json” “http://localhost:8082/connectors”
basic-connect.json contains the following configuration:
{
  "name": "cassandra-basic-sink", #name of the sink
  "config": {
      "connector.class": "com.datastax.oss.kafka.sink.CassandraSinkConnector", #connector class
      "tasks.max": "1", #max no of connect tasks
      "topics": "basic_topic", #kafka topic
      "contactPoints": "cassandra-server1", #cassandra cluster node
      "loadBalancing.localDc": "DC1", #cassandra DC name
      "topic.basic_topic.connect.basic_table.mapping": "userid=key, username=value", #topic to table mapping
      "key.converter": "org.apache.kafka.connect.storage.StringConverter", #use string converter for key
      "value.converter": "org.apache.kafka.connect.storage.StringConverter", #use string converter for values
      "key.converter.schemas.enable": false,  #no schema in data for the key
      "value.converter.schemas.enable": false  #no schema in data for value
  }
}
Here the key is mapped to the userid column and the value is mapped to the username column i.e
“topic.basic_topic.connect.basic_table.mapping”: “userid=key, username=value”
Both the key and value are expected in plain text format as specified in the key.converter and the value.converter configuration.
We can check status of the connector via the Kafka connect container and make sure the connector is running with the command:
$ curl -X GET “http://localhost:8082/connectors/cassandra-basic-sink/status”
$ docker exec -it kafka-server1 /bin/bash
Lets create a file containing some test data:
$ echo abc:abcvalue > data.txt
And now, using the kafka-console-producer command inject that data into the target topic:
$ kafka-console-producer –broker-list localhost:9092 –topic basic_topic –property parse.key=true –property key.separator=: < data.txt

$ docker exec -it cassandra-server1 /bin/bash
$ cqlsh -e cqlsh -e “select * from connect.basic_table;”

JSON Data
First lets create another table to store the data:
$ docker exec -it cassandra-server1 /bin/bash
$ cqlsh -e “CREATE TABLE connect.json_table (userid text PRIMARY KEY, username text, firstname text, lastname text);”

Connect to one of the Kafka brokers to create a new topic
$ docker exec -it kafka-server1 /bin/bash
$ kafka-topics –create –topic json_topic –zookeeper zookeeper-server:2181 –partitions 3 –replication-factor 3

$ docker exec -it kafka-connect1 /bin/bash
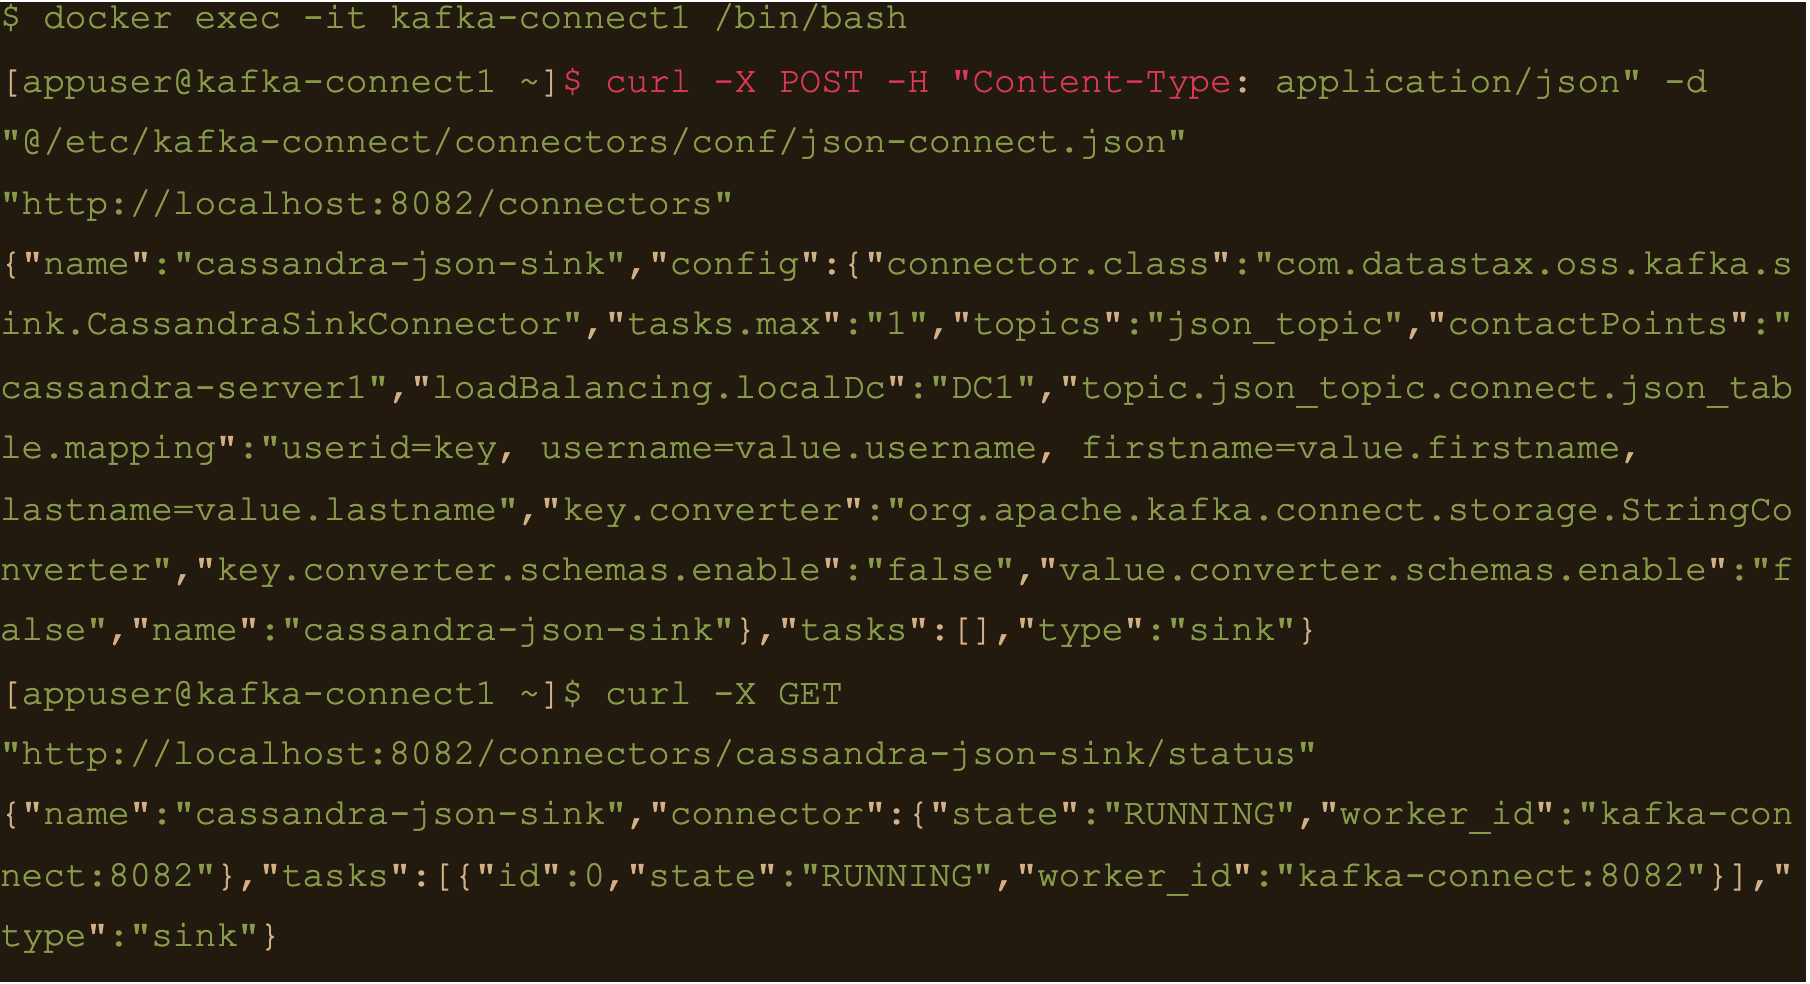
Create the connector using the json-connect.json configuration which is mounted at /etc/kafka-connect/connectors/conf/json-connect.json on the container
$ curl -X POST -H “Content-Type: application/json” -d “@/etc/kafka-connect/connectors/conf/json-connect.json” “http://localhost:8082/connectors”
Connect config has following values
{
   "name": "cassandra-json-sink",
   "config": {
       "connector.class": "com.datastax.oss.kafka.sink.CassandraSinkConnector",
       "tasks.max": "1",
       "topics": "json_topic",
       "contactPoints": "cassandra-server1",
       "loadBalancing.localDc": "DC1",
       "topic.json_topic.connect.json_table.mapping": "userid=key, username=value.username, firstname=value.firstname, lastname=value.lastname",
       "key.converter": "org.apache.kafka.connect.storage.StringConverter",
       "key.converter.schemas.enable": false,
       "value.converter.schemas.enable": false
   }
}
“topic.json_topic.connect.json_table.mapping”: “userid=key, username=value.username, firstname=value.firstname, lastname=value.lastname”
Check status of the connector and make sure the connector is running
$ docker exec -it kafka-connect1 /bin/bash
$ curl -X GET “http://localhost:8082/connectors/cassandra-json-sink/status”
Now lets connect to one of the broker nodes, generate some JSON data and then inject it into the topic we created
$ docker exec -it kafka-server1 /bin/bash
$ echo ‘abc:{“username”: “fbar”, “firstname”: “foo”, “lastname”: “bar”}’ > data.json
$ kafka-console-producer –broker-list localhost:9092 –topic json_topic –property parse.key=true –property key.separator=: < data.json

$ docker exec -it cassandra-server1 /bin/bash
$ cqlsh -e “select * from connect.json_table;”

AVRO data
First lets create a table to store the data:
$ docker exec -it cassandra-server1 /bin/bash
$ cqlsh -e “CREATE TABLE connect.avro_table (userid uuid PRIMARY KEY, username text, firstname text, lastname text);”

$ docker exec -it kafka-server1 /bin/bash
$ kafka-topics –create –topic avro_topic –zookeeper zookeeper-server:2181 –partitions 3 –replication-factor 3

$ docker exec -it kafka-connect1 /bin/bash
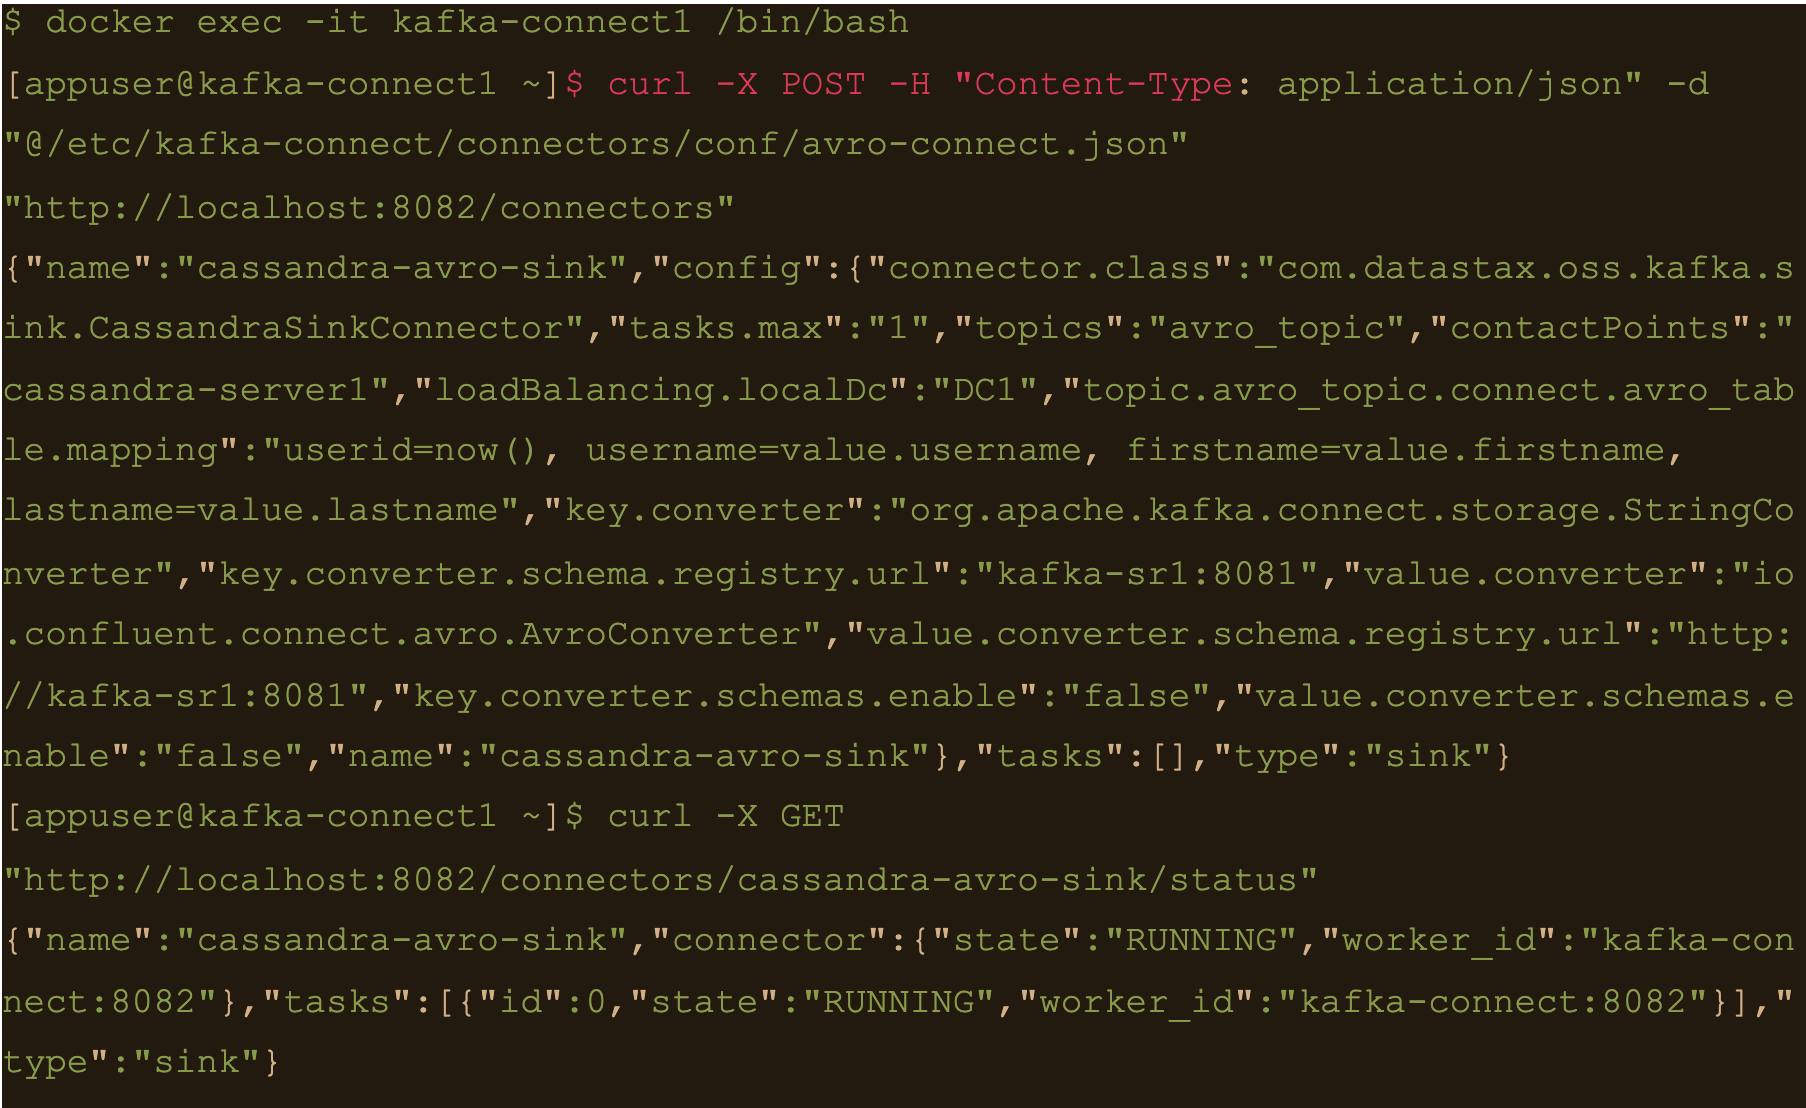
$ curl -X POST -H “Content-Type: application/json” -d “@/etc/kafka-connect/connectors/conf/avro-connect.json” “http://localhost:8082/connectors”
Avro connect configuration:
{
   "name": "cassandra-avro-sink",
   "config": {
       "connector.class": "com.datastax.oss.kafka.sink.CassandraSinkConnector",
       "tasks.max": "1",
       "topics": "avro_topic",
       "contactPoints": "cassandra-server1",
       "loadBalancing.localDc": "DC1",
       "topic.avro_topic.connect.avro_table.mapping": "userid=now(), username=value.username, firstname=value.firstname, lastname=value.lastname",
       "key.converter": "org.apache.kafka.connect.storage.StringConverter",
       "key.converter.schema.registry.url":"kafka-sr1:8081",
       "value.converter": "io.confluent.connect.avro.AvroConverter",
       "value.converter.schema.registry.url":"http://kafka-sr1:8081",
       "key.converter.schemas.enable": false,
       "value.converter.schemas.enable": false
   }
}
“topic.avro_topic.connect.avro_table.mapping”: “userid=now(), username=value.username, firstname=value.firstname, lastname=value.lastname”
Also the value converter is
“value.converter”: “io.confluent.connect.avro.AvroConverter” and its pointing at our docker deployed schema registry “value.converter.schema.registry.url”:”http://kafka-sr1:8081″
$ docker exec -it kafka-connect1 /bin/bash
$ curl -X GET “http://localhost:8082/connectors/cassandra-avro-sink/status”
$ docker exec -it kafka-sr1 /bin/bash
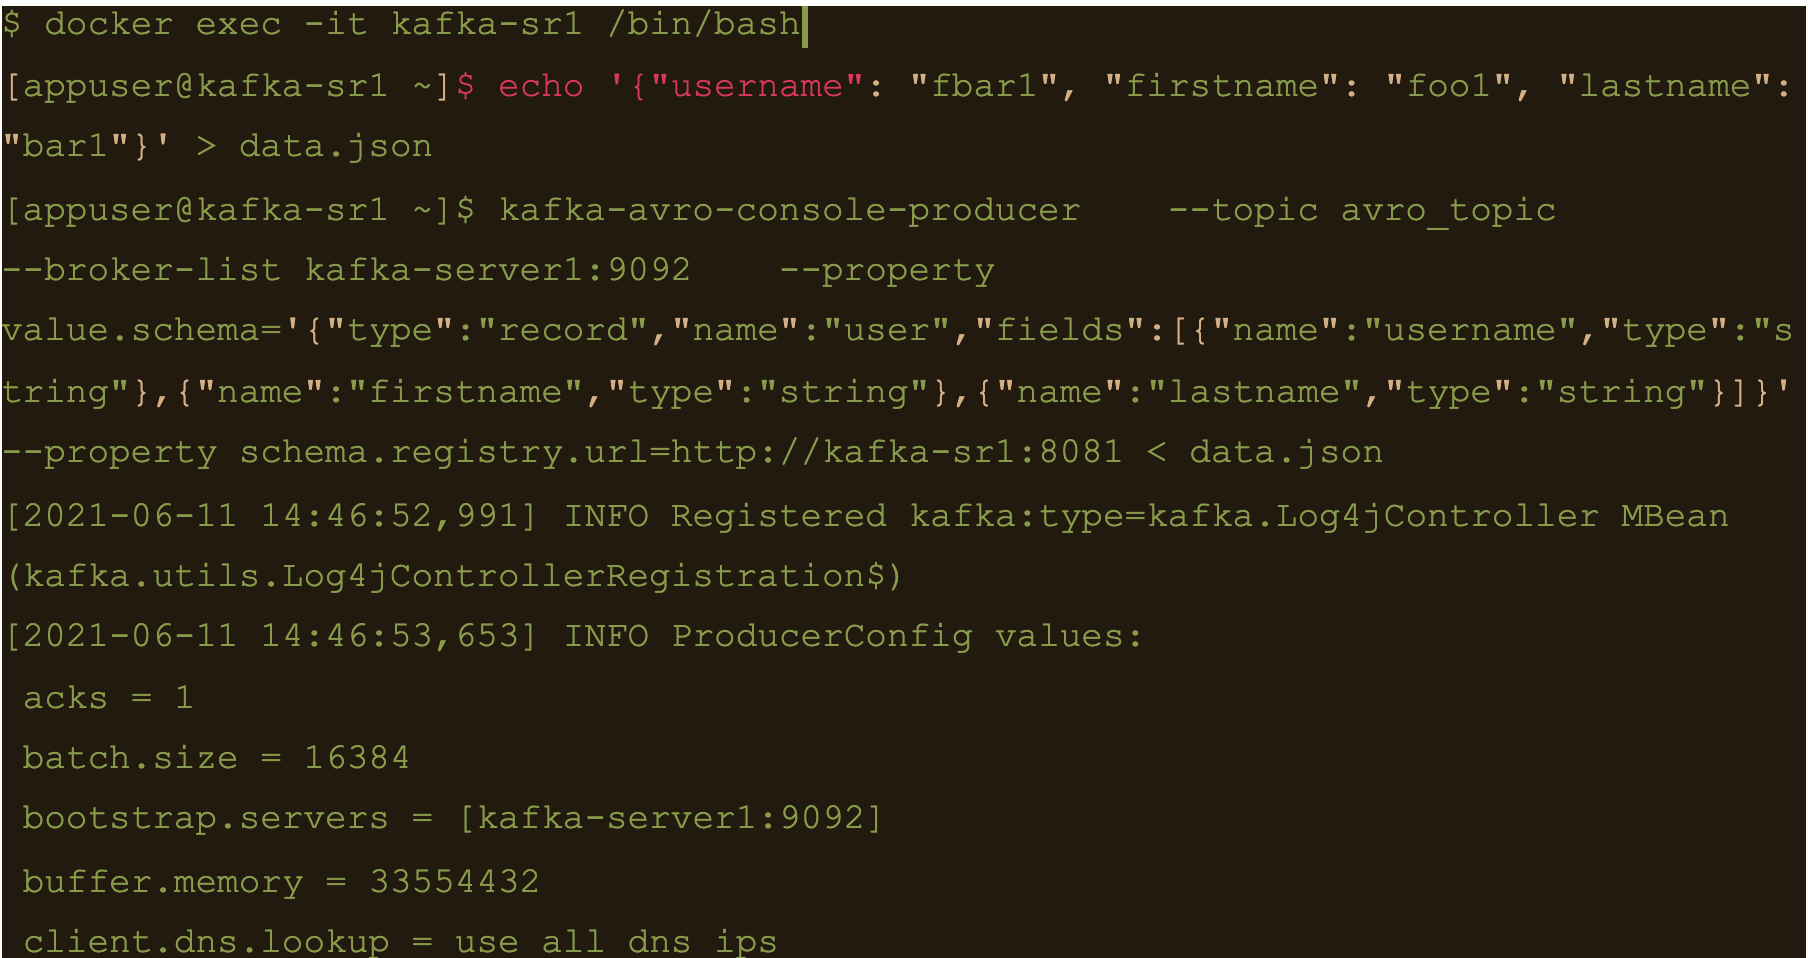
Generate a data file to input to the avro producer
$ echo ‘{“username”: “fbar1”, “firstname”: “foo1”, “lastname”: “bar1”}’ > data.json
And push data using kafka-avro-console-producer
$ kafka-avro-console-producer \
–topic avro_topic \
–broker-list kafka-server1:9092 \
–property value.schema='{“type”:”record”,”name”:”user”,”fields”:[{“name”:”username”,”type”:”string”},{“name”:”firstname”,”type”:”string”},{“name”:”lastname”,”type”:”string”}]}’ \
–property schema.registry.url=http://kafka-sr1:8081 < data.json
$ cqlsh -e cqlsh -e “select * from connect.avro_table;”

Use CQL in connect
First thing to do is to create another table for the data
$ docker exec -it cassandra-server1 /bin/bash
$ cqlsh -e “CREATE TABLE connect.cql_table (userid uuid PRIMARY KEY, username text, firstname text, lastname text);”

$ docker exec -it kafka-server1 /bin/bash
$ kafka-topics –create –topic cql_topic –zookeeper zookeeper-server:2181 –partitions 3 –replication-factor 3

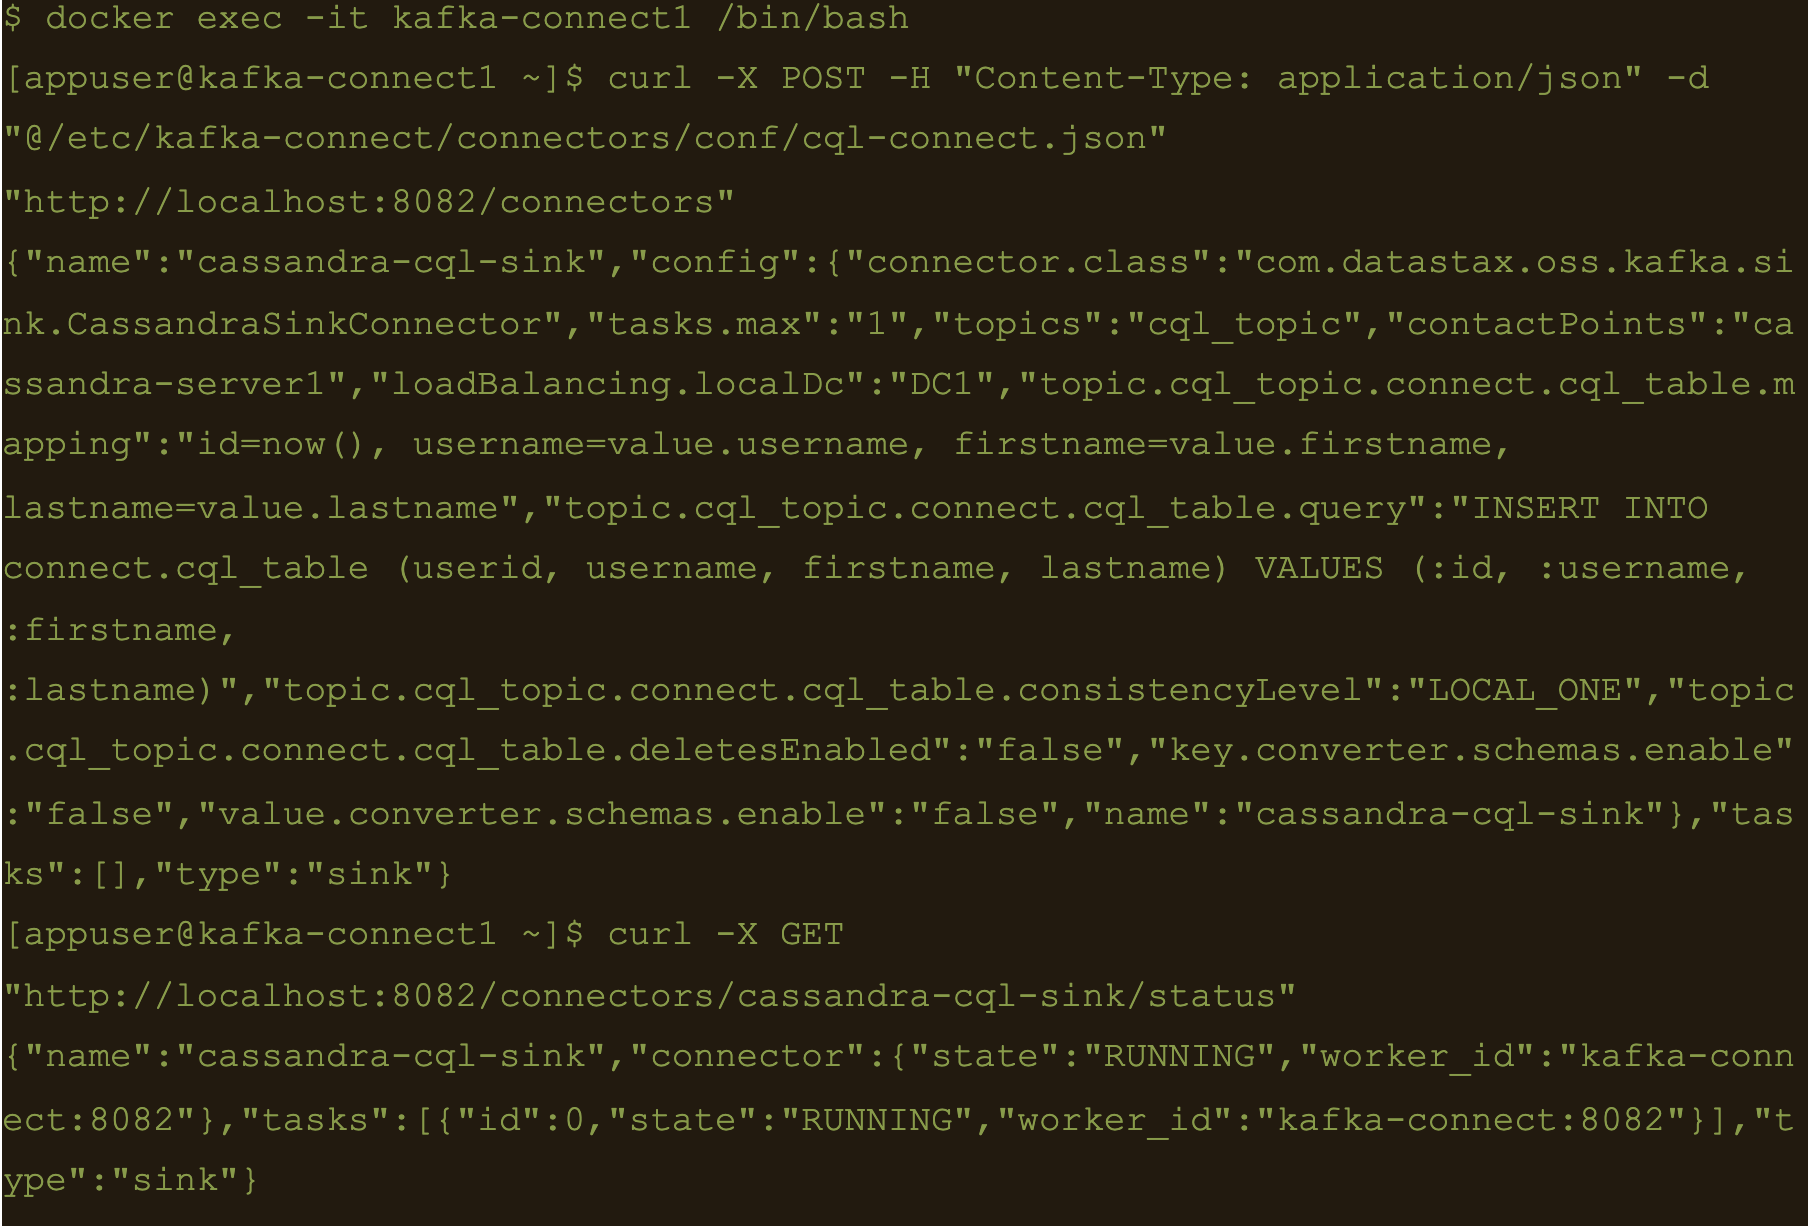
Here the file cql-connect.json contains the connect configuration:
{
	"name": "cassandra-cql-sink",
	"config": {
		"connector.class": "com.datastax.oss.kafka.sink.CassandraSinkConnector",
		"tasks.max": "1",
		"topics": "cql_topic",
		"contactPoints": "cassandra-server1",
		"loadBalancing.localDc": "DC1",
		"topic.cql_topic.connect.cql_table.mapping": "id=now(), username=value.username, firstname=value.firstname, lastname=value.lastname",
		"topic.cql_topic.connect.cql_table.query": "INSERT INTO connect.cql_table (userid, username, firstname, lastname) VALUES (:id, :username, :firstname, :lastname)",
		"topic.cql_topic.connect.cql_table.consistencyLevel": "LOCAL_ONE",
        "topic.cql_topic.connect.cql_table.deletesEnabled": false,
        "key.converter.schemas.enable": false,
        "value.converter.schemas.enable": false
	}
}- topic.cql_topic.connect.cql_table.mapping”: “id=now(), username=value.username, firstname=value.firstname, lastname=value.lastname”
- “topic.cql_topic.connect.cql_table.query”: “INSERT INTO connect.cql_table (userid, username, firstname, lastname) VALUES (:id, :username, :firstname, :lastname)”
- And the consistency with “topic.cql_topic.connect.cql_table.consistencyLevel”: “LOCAL_ONE”
$ docker exec -it kafka-connect1 /bin/bash
$ curl -X POST -H “Content-Type: application/json” -d “@/etc/kafka-connect/connectors/conf/cql-connect.json” “http://localhost:8082/connectors”
Check status of the connector and make sure the connector is running
$ curl -X GET “http://localhost:8082/connectors/cassandra-cql-sink/status”
$ docker exec -it kafka-server1 /bin/bash
$ echo ‘{“username”: “fbar”, “firstname”: “foo”, “lastname”: “bar”}’ > data.json
$ kafka-console-producer –broker-list localhost:9092 –topic cql_topic < data.json

INSERT INTO connect.cql_table (userid, username, firstname, lastname) VALUES (
The uuid will be generated using the now() function which returns TIMEUUID.
The following data will be inserted to the table and the result can be confirmed by running a select cql query on the connect.cql_table from the cassandra node.
$ docker exec -it cassandra-server1 /bin/bash
$ cqlsh -e “select * from connect.cql_table;”

Summary
Kafka connect is a scalable and simple framework for moving data between Kafka and other data systems. It is a great tool for easily wiring together and when you combined Kafka with Cassandra you get an extremely scalable, available and performant system.
Kafka Connector reliably streams data from Kaka topics to Cassandra. This blog just covers how to install and configure Kafka connect for testing and development purposes. Security and scalability is out of scope of this blog.
More detailed information about Apache Kafka Connector can be found at https://docs.datastax.com/en/kafka/doc/kafka/kafkaIntro.html
At Digitalis we have extensive experience dealing with Cassandra and Kafka in complex and critical environments. We are experts in Kubernetes, data and streaming along with DevOps and DataOps practices. If you could like to know more, please let us know.
Related Articles
What is Apache NiFi?
If you want to understand what Apache NiFi is, this blog will give you an overview of its architecture, components and security features.
Apache Kafka vs Apache Pulsar
This blog describes some of the main differences between Apache Kafka and Pulsar – two of the leading data streaming Apache projects.
The post Getting started with Kafka Cassandra Connector appeared first on digitalis.io.
]]>The post ECS Container monitoring using cAdvisor appeared first on digitalis.io.
]]>In this topic, I will explain how to monitor docker containers running on an ECS cluster. Even though AWS CloudWatch is the preferred tool for monitoring and collecting container metrics, in some scenarios it is required to use alternative solutions.
cAdvisor is an open-source project for understanding the resource usage of running containers.
Metrics collected using cAdvisor can be analyzed using its own web UI or can be exported to various storage drivers. Here I will explain how to use cAdvisor to collect metrics from ECS and ship it to Prometheus for further use.
Prometheus is a widely used open-source tool for monitoring and alerting systems. It can collect metrics from targets and trigger alerts based on conditions and rules evaluation.
But we have CloudWatch?
Yes, CloudWatch may be the easiest solution for metrics collection for ECS. But I was already using Prometheus for storing and alerting metrics from various other systems. So I needed a solution to export the metrics to Prometheus and leverage my well tested and trusted monitoring and alerting ecosystem.
Running cAdvisor cAdvisor can be run either as a docker container or standalone. It is run as an ECS task as there is already an ECS cluster for scheduling and running docker containers.
Create an ECS cluster and a task definition to start with.
ECS cluster creation guide is available here – https://docs.aws.amazon.com/AmazonECS/latest/developerguide/create_cluster.html
Follow this AWS guide to create task definition- https://docs.aws.amazon.com/AmazonECS/latest/developerguide/create-task-definition.html.
A sample task definition is provided below for reference.
{
  "ipcMode": null,
  "executionRoleArn": "arn:aws:iam::123456789012:role/TaskExecutionRole",
  "containerDefinitions": [
    {
      "dnsSearchDomains": null,
      "environmentFiles": null,
      "logConfiguration": null,
      "entryPoint": null,
      "portMappings": [
        {
          "hostPort": 8080,
          "protocol": "tcp",
          "containerPort": 8080
        }
      ],
      "command": null,
      "linuxParameters": null,
      "cpu": 0,
      "environment": [],
      "resourceRequirements": null,
      "ulimits": null,
      "dnsServers": null,
      "mountPoints": [
        {
          "readOnly": true,
          "containerPath": "/rootfs",
          "sourceVolume": "root"
        },
        {
          "readOnly": false,
          "containerPath": "/var/run",
          "sourceVolume": "var_run"
        },
        {
          "readOnly": true,
          "containerPath": "/sys",
          "sourceVolume": "sys"
        },
        {
          "readOnly": true,
          "containerPath": "/var/lib/docker",
          "sourceVolume": "var_lib_docker"
        }
      ],
      "workingDirectory": null,
      "secrets": null,
      "dockerSecurityOptions": null,
      "memory": 256,
      "memoryReservation": null,
      "volumesFrom": [],
      "stopTimeout": null,
      "image": "google/cadvisor",
      "startTimeout": null,
      "firelensConfiguration": null,
      "dependsOn": null,
      "disableNetworking": null,
      "interactive": null,
      "healthCheck": null,
      "essential": true,
      "links": null,
      "hostname": null,
      "extraHosts": null,
      "pseudoTerminal": null,
      "user": null,
      "readonlyRootFilesystem": null,
      "dockerLabels": {
        "PROMETHEUS_EXPORTER_PORT": "8080",
        "PROMETHEUS_EXPORTER_JOB_NAME": "prometheus-ecs-discovery"
      },
      "systemControls": null,
      "privileged": null,
      "name": "cadvisor"
    }
  ],
  "placementConstraints": [],
  "memory": "256",
  "taskRoleArn": "arn:aws:iam::123456789012:role/DefaultTaskRole",
  "compatibilities": [
    "EC2"
  ],
  "taskDefinitionArn": "arn:aws:ecs:us-east-1:123456789012:task-definition/cAdvisor:1",
  "family": "cAdvisor",
  "requiresAttributes": [
    {
      "targetId": null,
      "targetType": null,
      "value": null,
      "name": "com.amazonaws.ecs.capability.task-iam-role"
    },
    {
      "targetId": null,
      "targetType": null,
      "value": null,
      "name": "com.amazonaws.ecs.capability.docker-remote-api.1.18"
    },
    {
      "targetId": null,
      "targetType": null,
      "value": null,
      "name": "ecs.capability.task-eni"
    }
  ],
  "pidMode": null,
  "requiresCompatibilities": [
    "EC2"
  ],
  "networkMode": "awsvpc",
  "cpu": "512",
  "revision": 4,
  "status": "ACTIVE",
  "inferenceAccelerators": null,
  "proxyConfiguration": null,
  "volumes": [
    {
      "fsxWindowsFileServerVolumeConfiguration": null,
      "efsVolumeConfiguration": null,
      "name": "root",
      "host": {
        "sourcePath": "/"
      },
      "dockerVolumeConfiguration": null
    },
    {
      "fsxWindowsFileServerVolumeConfiguration": null,
      "efsVolumeConfiguration": null,
      "name": "var_run",
      "host": {
        "sourcePath": "/var/run"
      },
      "dockerVolumeConfiguration": null
    },
    {
      "fsxWindowsFileServerVolumeConfiguration": null,
      "efsVolumeConfiguration": null,
      "name": "sys",
      "host": {
        "sourcePath": "/sys"
      },
      "dockerVolumeConfiguration": null
    },
    {
      "fsxWindowsFileServerVolumeConfiguration": null,
      "efsVolumeConfiguration": null,
      "name": "var_lib_docker",
      "host": {
        "sourcePath": "/var/lib/docker/"
      },
      "dockerVolumeConfiguration": null
    }
  ]
}
Create a new service using this task definition.
Follow AWS guide on service creation. https://docs.aws.amazon.com/AmazonECS/latest/developerguide/create-service.html.
It is important to choose the DAEMON service type as cAdvisor needs to be running on all ECS EC2 instances.
Create an Application Load Balancer to access cAdvisor service, which is listening on port 8080, and attach this ALB to the cAdvisor service. This step is optional and is only required if it is required to access cAdvisor directly.
https://docs.aws.amazon.com/AmazonECS/latest/developerguide/service-load-balancing.html.
Once the cAdvisor task is started, the Web UI can be accessed using the ALB DNS name.
Shipping metrics to Prometheus
It requires adding the cAdvisor endpoints in Prometheus to ship the metrics exposed by cAdvisor.
As cAdvisor is running as a container, the IP address of the cAdvisor endpoints will be dynamically assigned and will be changed when the task is restarted. This requires Prometheus to discover and register the targets dynamically.
Prometheus Amazon ECS discovery (https://github.com/teralytics/prometheus-ecs-discovery) discovers and registers these dynamic endpoints in Prometheus. It generates the list of cAdvisor endpoints in a file. Prometheus then can utilize the file_sd_config option to read targets from the file. Sample Prometheus config is provided below:
- job_name: ecs
  honor_timestamps: true
  metrics_path: /metrics
  scheme: http
  file_sd_configs:
  - files:
    - /var/lib/prometheus/discovery/ecs_file_sd.yml
    refresh_interval: 1m
It relies on the PROMETHEUS_EXPORTER_PORT label by default to find the docker port where cAdvisor is listening. It is possible to customize this label by passing the -config.port-label option to Prometheus Amazon ECS discovery.
To read the ECS details, AWS credentials can be used as environment variables. Alternatively, an AWS role ARN can be passed using –config.role-arn option.
Full configuration options can be found at https://github.com/teralytics/prometheus-ecs-discovery/blob/master/README.md
Once Prometheus registers these endpoints, they can be found on the target page on Prometheus. The metrics exported by cAdvisor are prefixed with “container_” by default.

Jino John
DevOp Engineer
Related Articles
Getting started with Kafka Cassandra Connector
If you want to understand how to easily ingest data from Kafka topics into Cassandra than this blog can show you how with the DataStax Kafka Connector.
K3s – lightweight kubernetes made ready for production – Part 3
Do you want to know securely deploy k3s kubernetes for production? Have a read of this blog and accompanying Ansible project for you to run.
K3s – lightweight kubernetes made ready for production – Part 2
Do you want to know securely deploy k3s kubernetes for production? Have a read of this blog and accompanying Ansible project for you to run.
The post ECS Container monitoring using cAdvisor appeared first on digitalis.io.
]]>

